This Turkish Homemade Yogurt recipe is extremely easy to make, only requires two ingredients. You don't even need a yogurt machine or any special equipment. It yields perfectly smooth, creamy, and thick yogurt. The flavor is deliciously fresh, sweet and tangy every time.
As you may have seen by now, yogurt is a staple ingredient in Turkish cuisine. We use it to make yogurt drink ayran and cucumber yogurt dip cacik almost everyday. Oh and we can’t think of manti dumplings without yogurt.
Almost every household in Turkey makes their own yogurt and strained yogurt on a weekly basis.
Today, we will have a look at how to make yogurt in Turkish style and discuss various yogurt ingredients you can use. Then we will have a look at different yogurt starters you can use, how to thicken your runny yogurt, and answer some other frequently asked questions.
Jump to:
Why bother? Is it better?
Homemade yogurt is truly unmatched by store-bought brands. The biggest benefit is probably that you know exactly what you are consuming. Store-bought yogurt almost always contains colorants, preservatives, and flavor enhancers. Although these aren’t necessarily harmful to you, it is always better to consume fresh, chemical-free food.
Another big benefit of making yogurt is the taste and texture. Your yogurt will be much higher in quality because you can choose exactly what you are adding. The flavor will also be extremely unique (in the best way).
Not convinced? One more thing about diy yogurt is that it is much cheaper and more environmentally friendly than commercially made yogurt. You don't pay for the chemicals added or worry about the packaging used. So what are you waiting for?
Ingredients
Milk is the most important ingredient used to make yogurt. However, choosing the correct type of milk might be complicated.
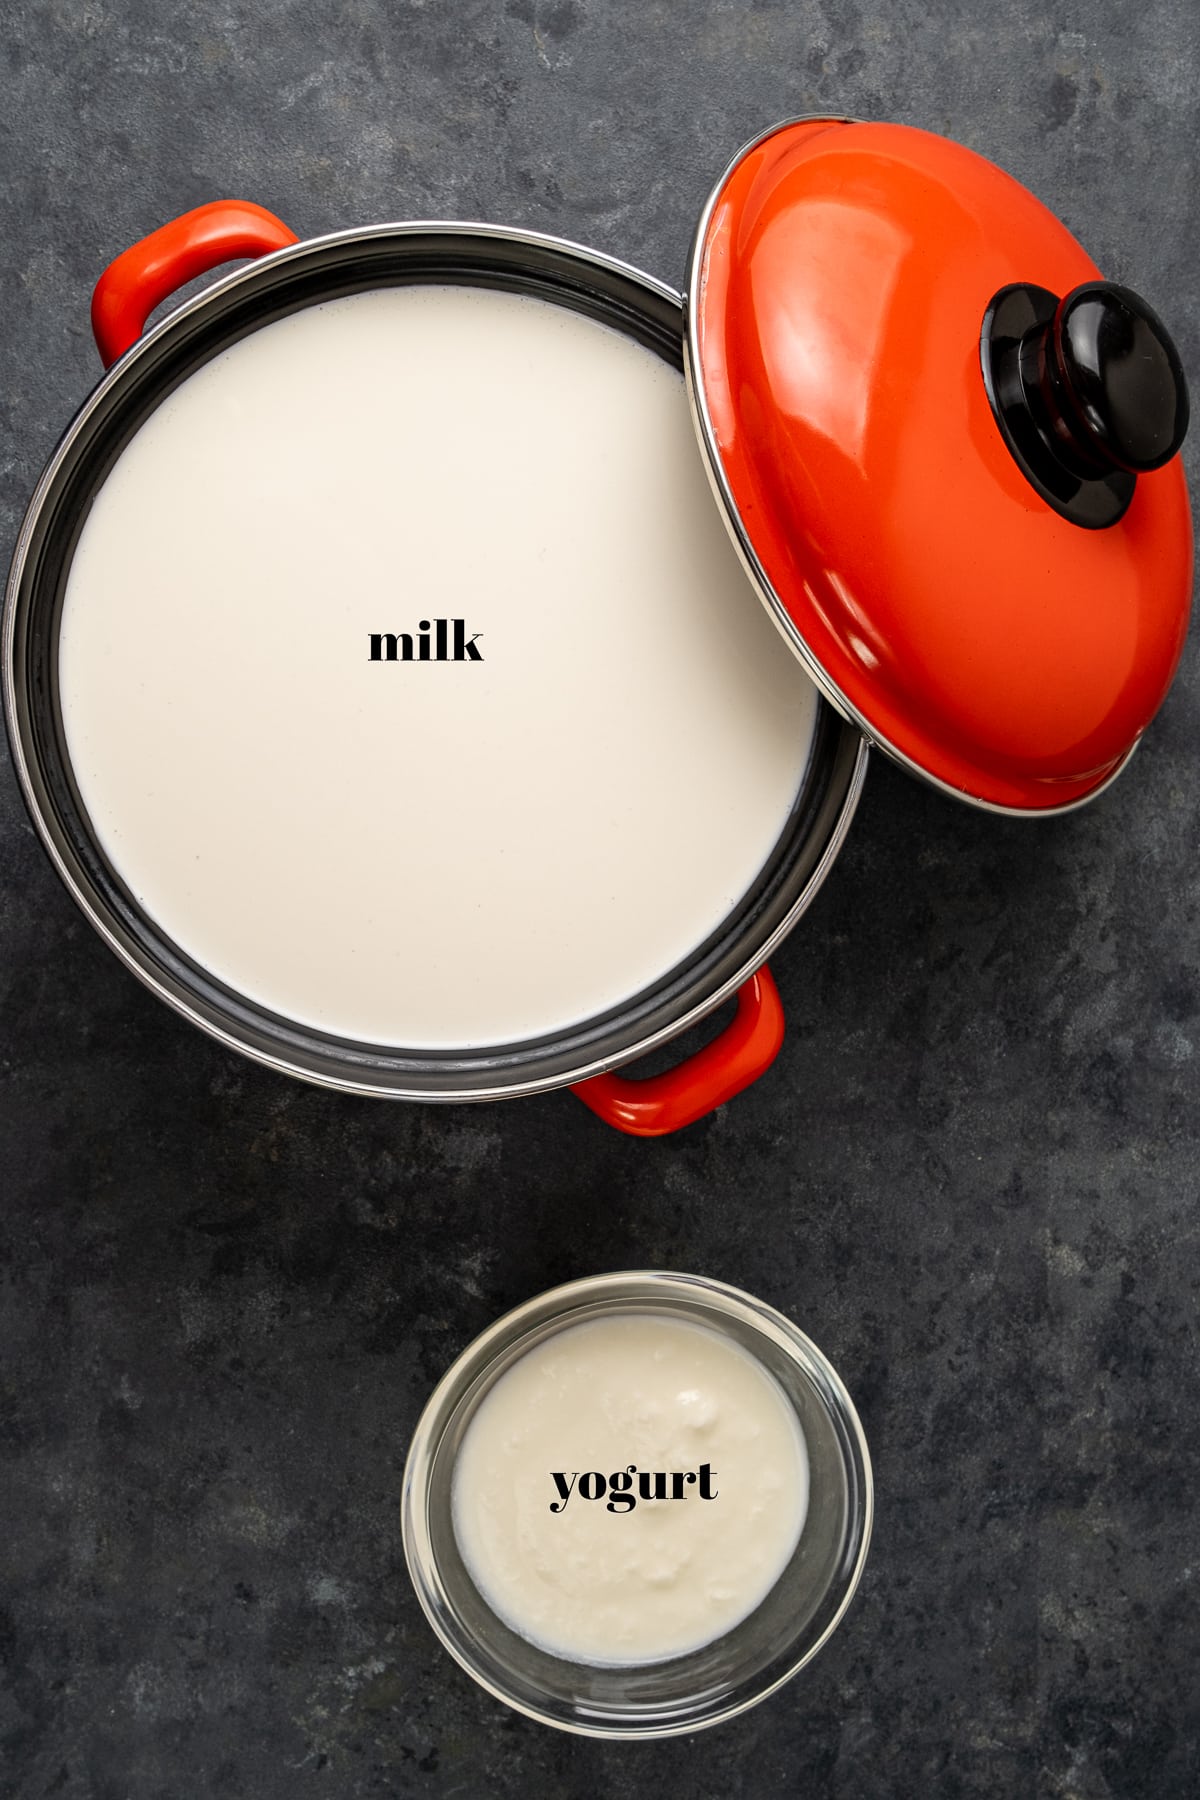
For our Turkish style yogurt recipe, we use whole cow's milk. We found that it yields the best result in flavor and texture, but you can definitely experiment using different types and test what works for you.
Raw milk can be used if you can find it. It is the milk obtained directly from the animal – the milk itself doesn't undergo any processing (pasteurization or homogenization). If there is a farm around, you can buy it from there. Traditional moms in Turkey mostly prefer raw milk and cook it at home before making yogurt. They say it has more fat, so the result is thicker and tastier.
You can use pasteurized milk too. It is the milk that has been heated and cooled to produce a “safer to consume” product. This process intends to kill certain harmful bacteria.
Never use UHT milk as you can’t get a quality yogurt with it.
Besides cow's milk, you can also use goat’s or sheep’s milk to make yogurt at home. It will yield very different yogurts but could be a nice experiment.
Next ingredient for a homemade yogurt recipe is the starter. We use a yogurt starter as it is the easiest and quickest way to make yogurt. You can either use a bit from store-bought plain yogurt or from your previous batch.
How To Make It
Making yogurt is much easier than you might have thought and only requires a bit of time and patience. This yogurt recipe will give you deliciously thick and creamy yogurt that is unmatched by any store-bought version!
First, heat the milk. Place the milk into a pot and bring it to a boil while stirring occasionally. Once boiling, reduce the heat and allow it to simmer for 15-20 minutes.
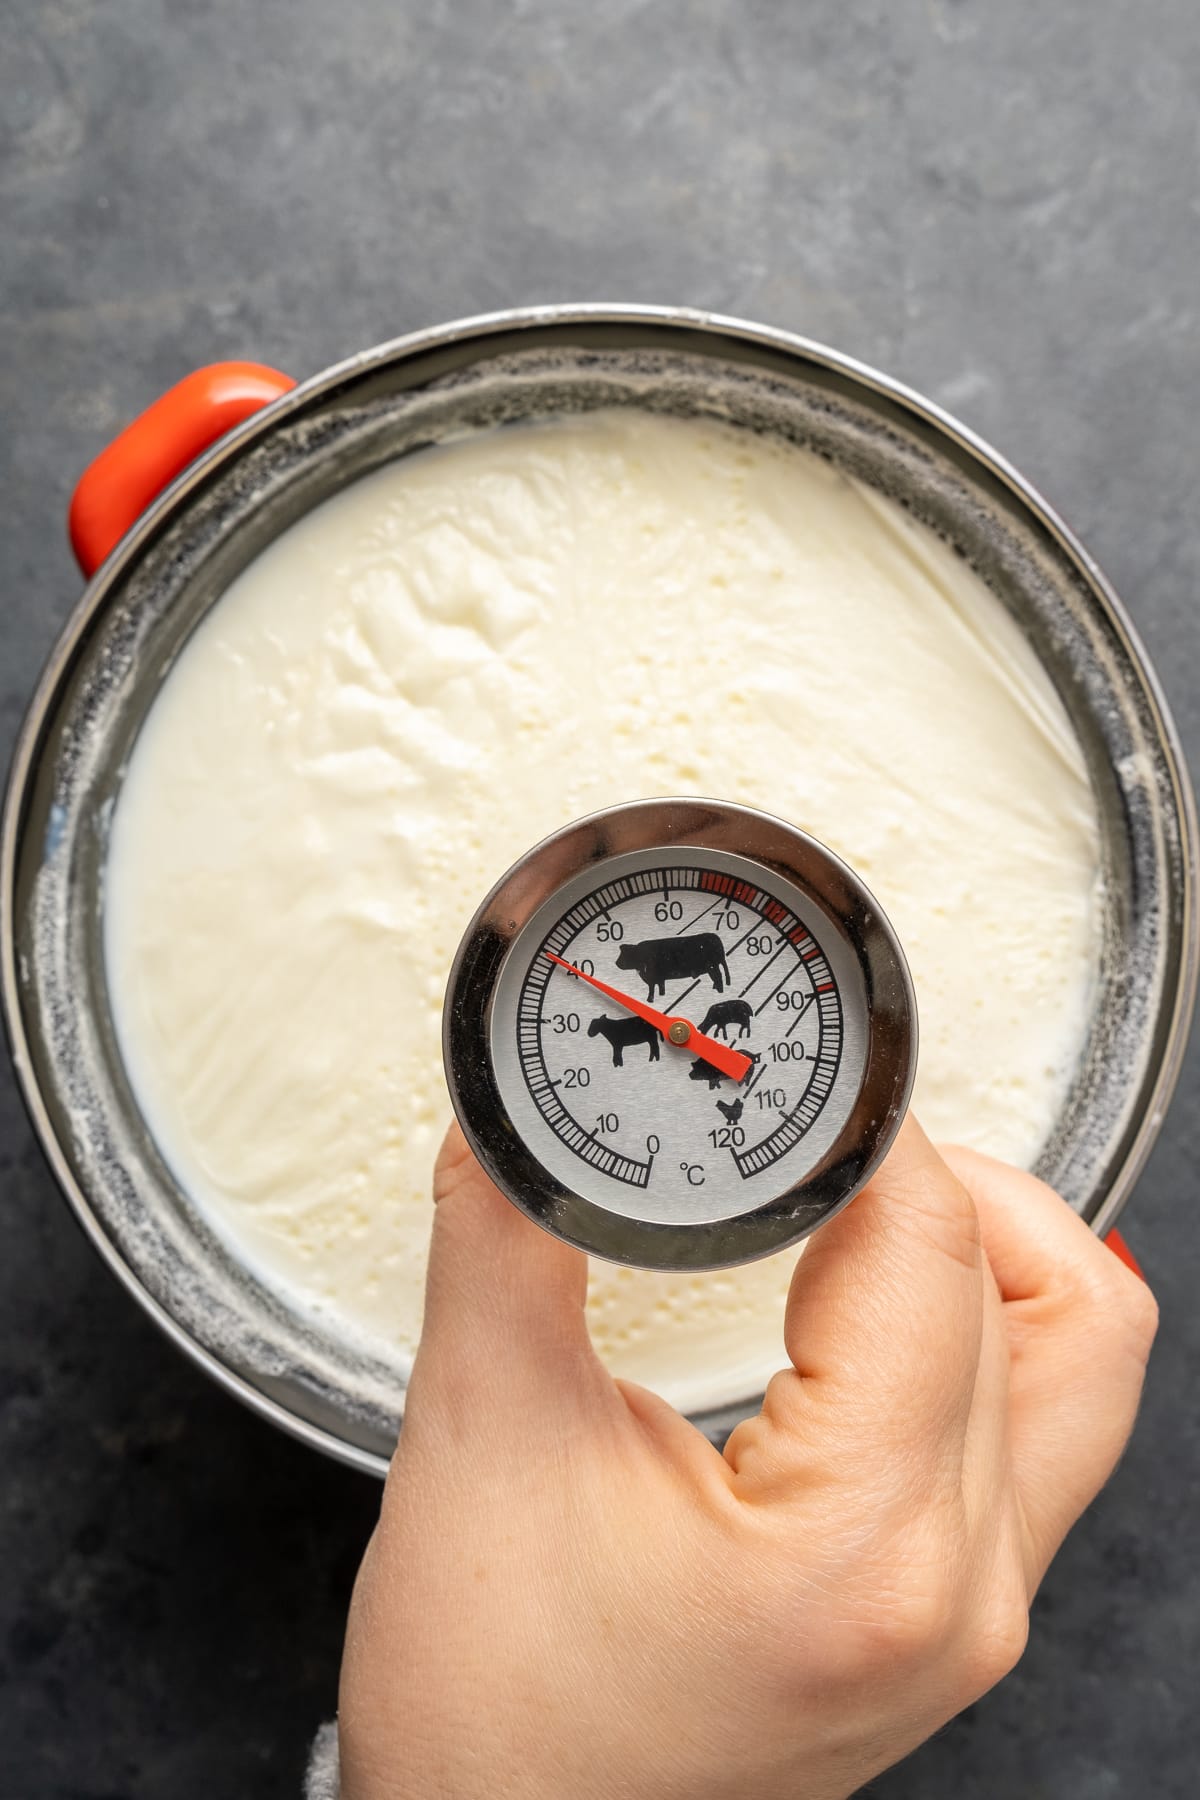
Second, remove the milk from the heat and allow it to cool. The milk cools sufficiently when the temperature reaches 110F (40C). Alternatively, you can test the temperature by placing your finger inside the milk. If you can keep it there for 5 seconds, the milk has cooled enough. That's what most Turkish people do to understand if it is ready. We always use this finger method too whenever we make yogurt.
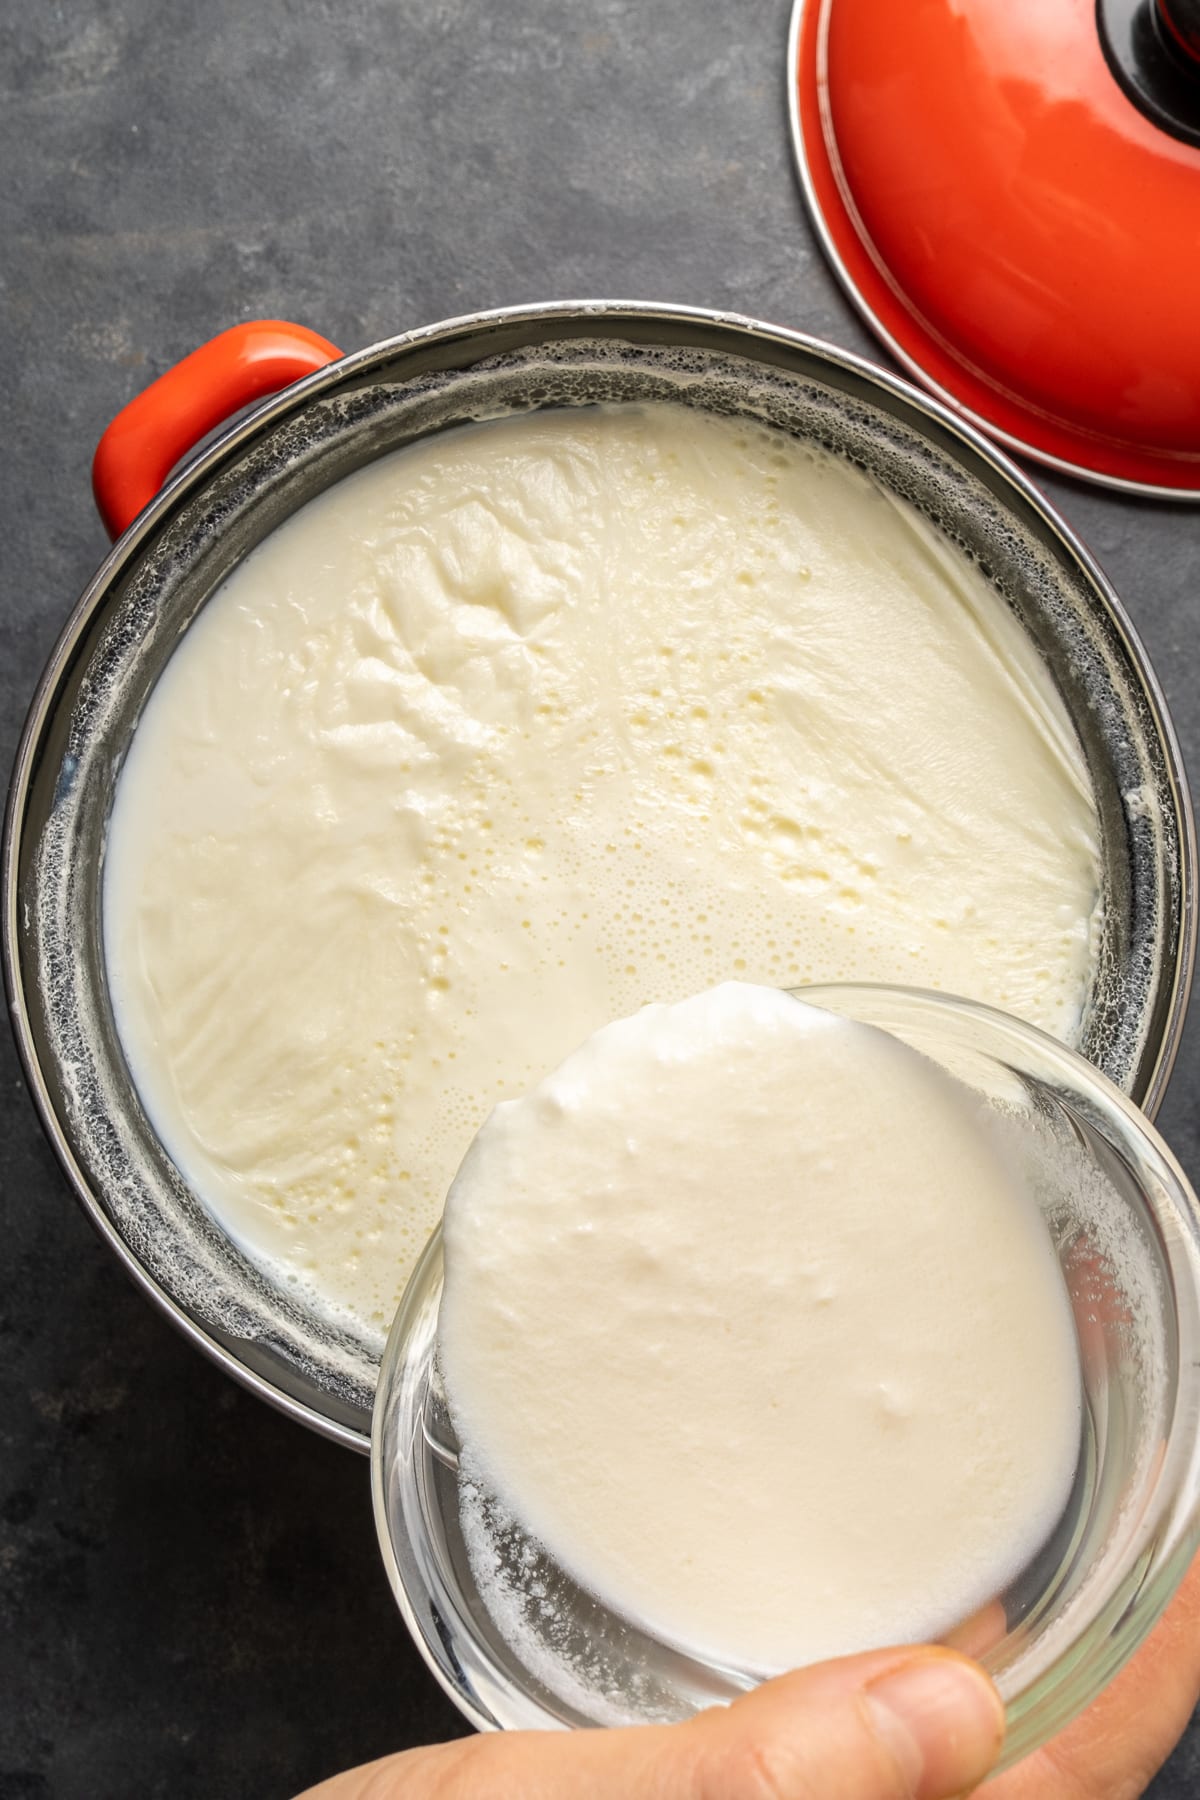
Third, add the starter. Place the yogurt in a bowl, add ½ cup milk and mix well. This will help the starter to heat and prevent the yogurt from splitting. Slowly add the mixture back into the pot and gently mix it through.
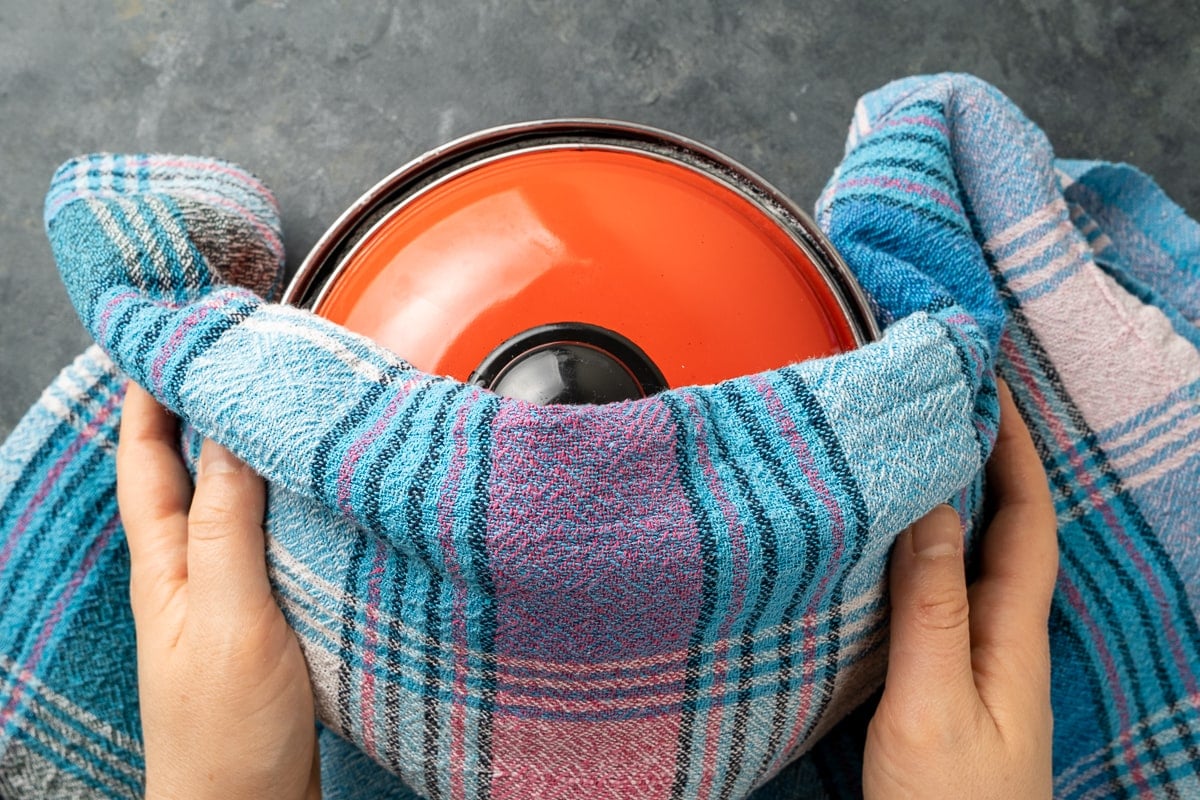
Fourth, let the mixture rest and turn into a delicious yogurt. Put the lid ajar and place the pot at a place in your home which has the least air circulation. Alternatively, you can keep it in the oven(off). Cover the pot well with a large and thick kitchen towel or a small blanket. Let it sit for 2-3 hours (in summer) or 4-5 hours (in winter).
If you want, you can transfer the mixture into small jars or a clay pot and make yogurt in these containers.
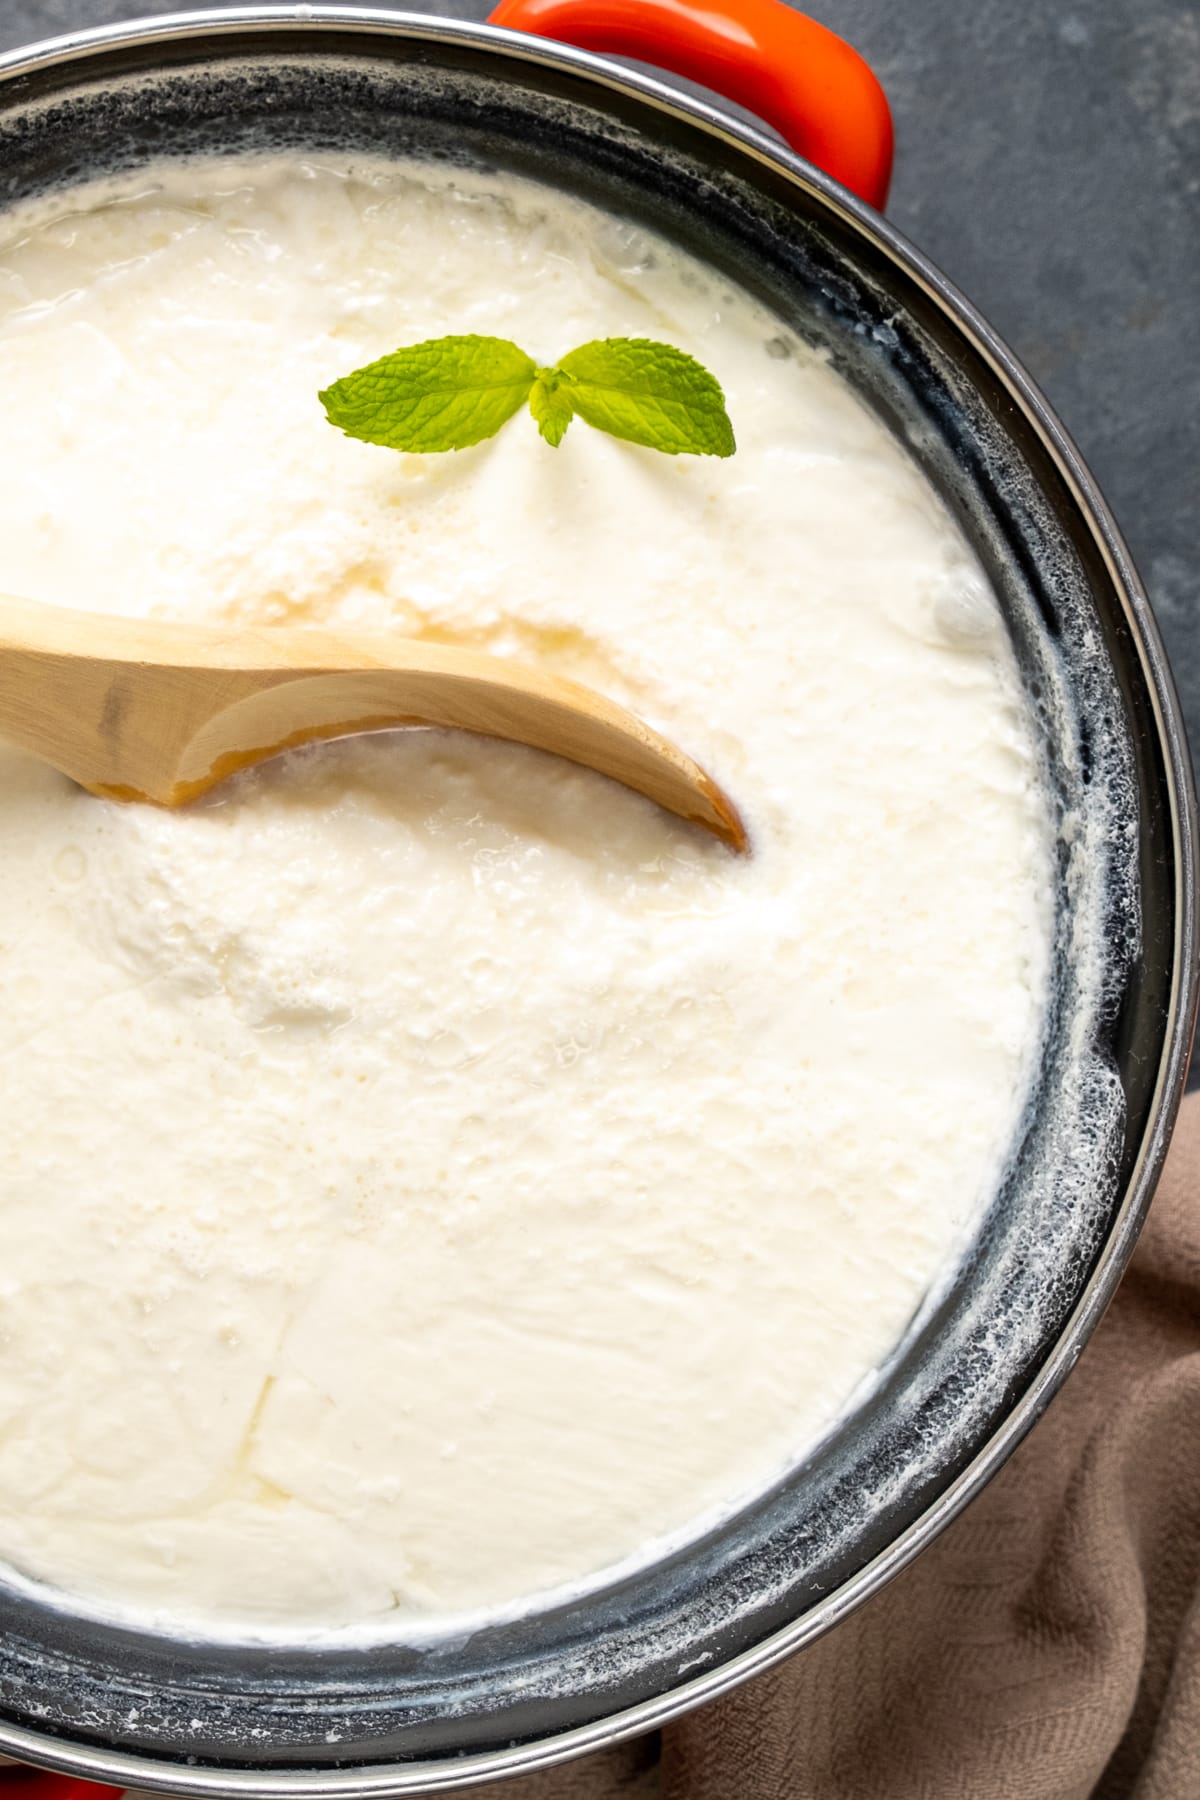
Finally, let the yogurt cool. Remove the towel and lid and allow the yogurt to cool completely before transferring it into the refrigerator. Allow it to chill overnight before serving it the next day.
Uses Of Yogurt
A bowl of Turkish homemade yogurt is a staple side dish served at lunch or dinner in a typical Turkish home. And it is probably the most used ingredient in Turkish recipes from savory to sweet.
- Yogurt is a must when making cilbir known as Turkish eggs.
- We use it in soups like comforting yogurt soup with rice.
- We use it in baking. Several bread recipes here like no yeast dinner rolls require yogurt.
- We also use it in yogurt marinades when making lamb shish kabobs or tavuk sis and in dips like haydari.
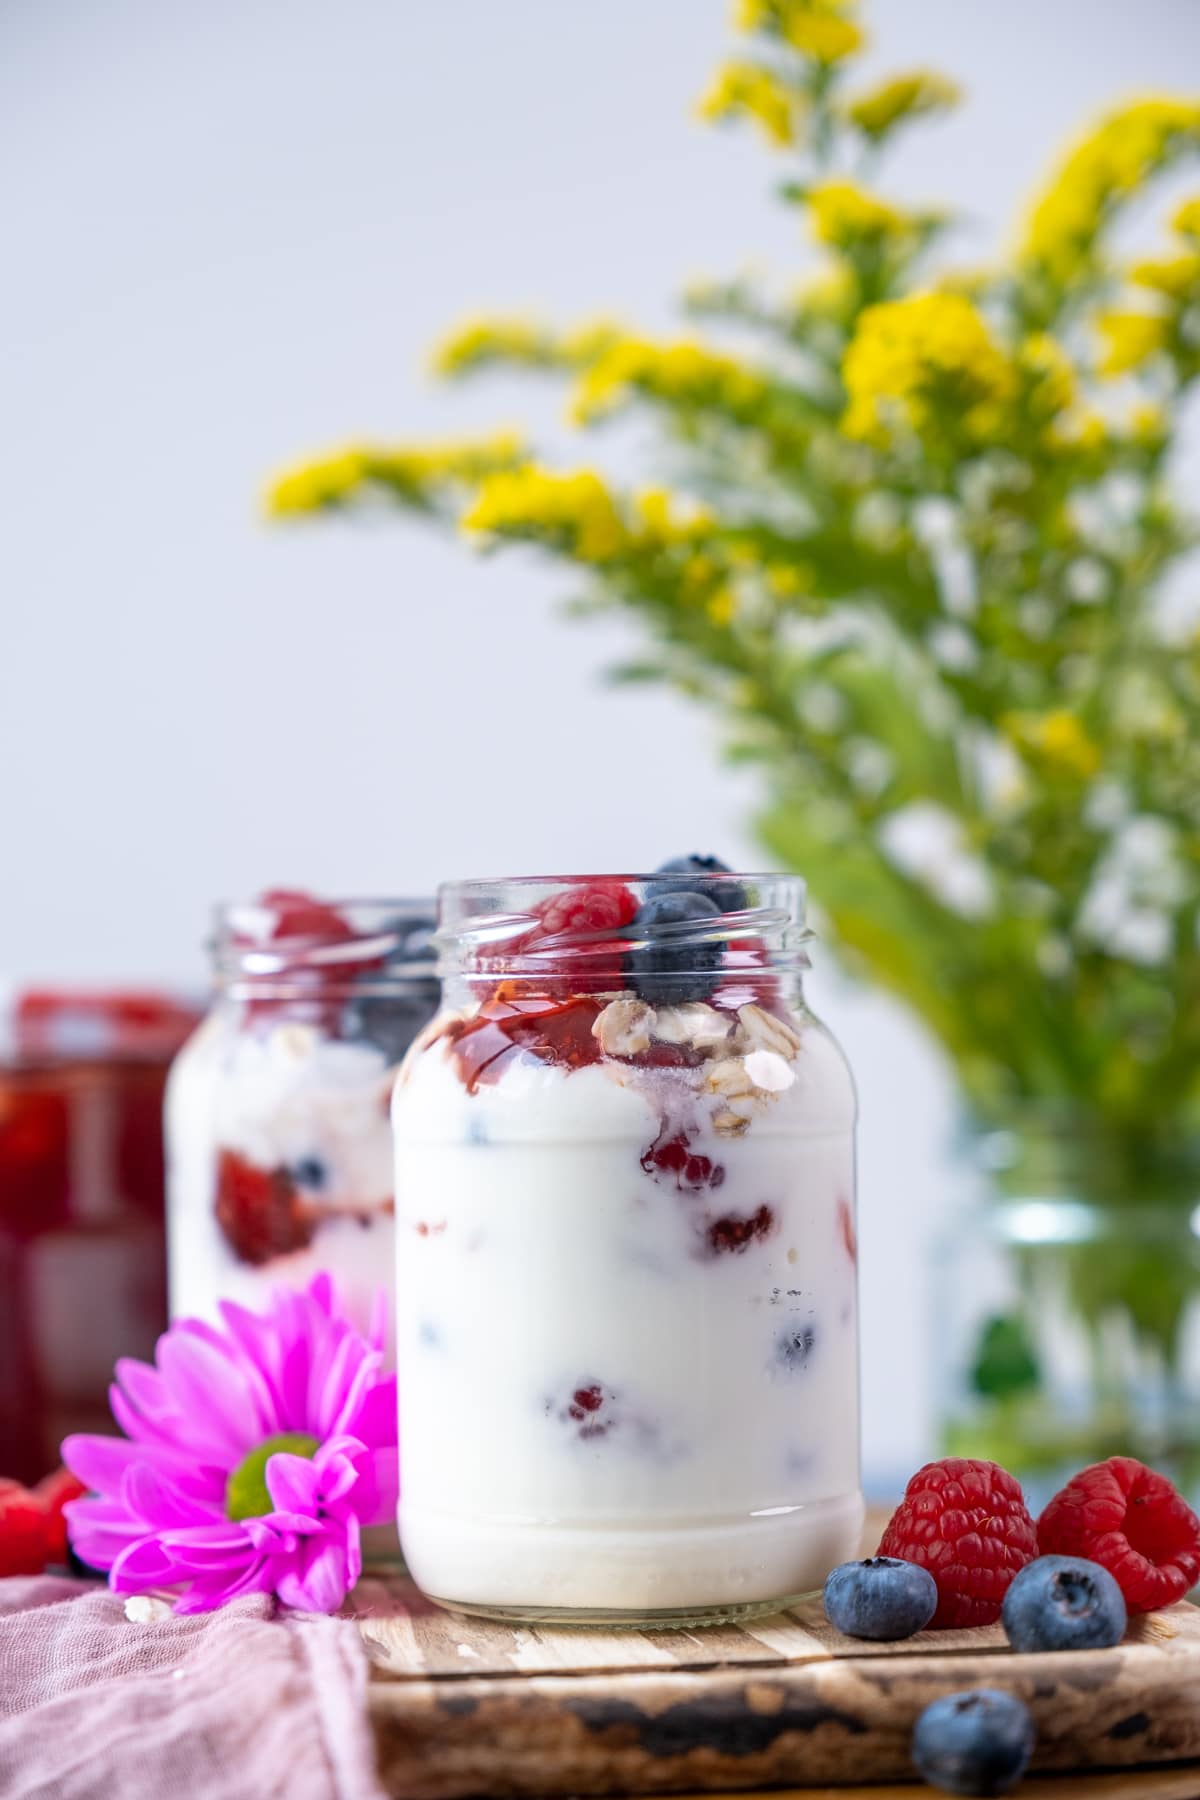
- We love a quick yogurt parfait with berries and oatmeal or granola for breakfast.
- When making phyllo borek recipe, we need a yogurt egg wash to stick the phyllo sheets to on another.
- We use it in baking as well. Check out our revani (Turkish semolina cake) and elmali kurabiye (Turkish style apple cookies)!
Tips and Tricks
- Don’t remove the milk from the heat just after it starts to boil. Let it simmer for about 15 minutes to end up with a thicker yogurt.
- Remove the milk from heat and let it cool down a bit. To understand whether milk reaches the right temperature, use your finger if you don’t have a thermometer. Dip your finger into hot milk, if you can tolerate its heat inside for about 5-7 seconds (not more), it’s ok. It mustn’t be too hot or less hot than necessary. If it is too hot, you will get a sourish yogurt and if it doesn’t reach the right temperature, it takes longer time for the yogurt to form. It even won't turn into a desired yogurt if the milk is colder than it is expected to be.
- Let the milk-yogurt rest at the warmest place of your home. Ideally, it is best to take the pot with hot milk to this place and let it wait there to reach the right temperature. It warms this place at the same time, which is a necessary step for thick yogurt.
- Put a thick blanket under the pot (one of your jumpers will work just fine for this, its arms can hug the pot to protect it from cold). And then mix it with the starter in the way explained above. You can pour it into jars at this step if you like or just keep it in the same pot.
- Put the lid on the pot, but don’t cover it completely as your milk-yogurt mixture needs some air inside. You can even use a suitable colander instead of its lid. This will help evaporation and yogurt will not be watery.
- Then cover the pot with another blanket very well. Don’t forget we must protect it from cold.
- Let it sit about 3 hours in summer when it is very hot, and about 4-6 hours in winter. Check it after this given time and if it is still not thick enough, keep waiting for some more hours.
- Then, uncover it completely and wait for another 1 or 2 hours without the lid this time.
- When it reaches room temperature, gently place it in the refrigerator and wait it there for a day to have a better result.
- You can place a paper towel on the surface of yogurt if it’s still so watery. This will absorb excessive water in it. You can throw the paper towel away and put a new one each time you take yogurt from the pot.
Frequently Asked Questions
The best type of milk to use when making yogurt is really any high-quality raw or pasteurized milk. The milk you use should NEVER be UHT milk – it kills too many bacteria and won’t produce as good quality yogurt compared to other types of milk.
Whole milk will give you the best result and thick, creamy, and flavorful homemade yogurt.
Runny yogurt is often the result of incorrect temperatures and times being used when making the yogurt. Your starter might have been the incorrect temperature when you added it to the milk, or it didn’t have enough time to ferment and thicken the milk.
Alternatively, the temperature of the milk itself could have been incorrect (usually too low) and the proteins didn't have time to properly denature. It could also be the result of the starter you used, and even the milk you used – that is why whole milk or high-quality raw milk works the best.
It is extremely important to use correct and accurate temperatures when making yogurt.
The easiest fix after you’ve already cooled the yogurt is to simply strain it through a cheesecloth and strainer. Stir occasionally so the excess liquid drains.
Your DIY yogurt will last about 2 weeks if stored properly (in the refrigerator). The reason store-bought yogurt has longer shelf life is because they have a bunch of preservatives added to them.
The easiest yogurt starter you can use is either store-bought plain yogurt or some yogurt from your previous homemade batch.
There are also some interesting starters we have heard like chickpeas, citric acid, lemon juice, and even some French bread. But we’ve never had experience with any of these.
You can use small glass containers or a large pot. The pot could be enamel or stainless steel. Traditionally the best container is a clay pot as it helps the food inside remain fresh and cold. 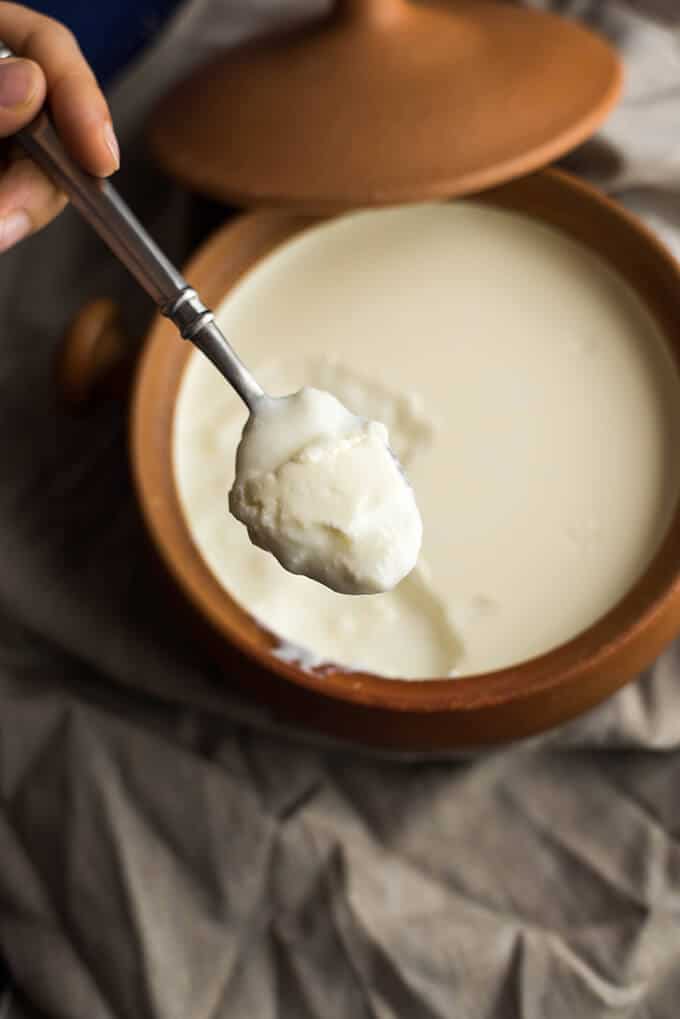
More Recipes With Yogurt
You might also like:


Sign up for the FREE Give Recipe Newsletter to get the new recipes into your inbox!
And stay in touch with us on Facebook, Pinterest, YouTube and Instagram for all the latest updates.
📖 Recipe

How To Make Turkish Yogurt
INGREDIENTS
- 2 liter whole milk
- 4 tablespoons plain yogurt at room temperature
INSTRUCTIONS
- Heat milk over medium heat until it boils. Stir occasionally.
- Reduce the heat once it boils and let it simmer for 15-20 minutes. This will help you get a thicker yogurt. Remove from heat and let it completely.
- There are two methods we can apply to understand the right temperature of the milk before making yogurt. First method is old-fashioned (moms) method: After letting it cool down for a while, dip your finger into the pot. If you can count until 5 when your finger is inside, the temperature is okay to make yogurt. Second is with a thermometer: Let the hot milk cool down. It is ready when you see 40C/110F on the thermometer.
- Put 4 tablespoon yogurt in a bowl. This is the starter. Pour about ½ cup milk into this and mix. This is to heat the yogurt a bit. Pour this mixture into the milk and gently mix it.
- Put the lid ajar and place the pot at a place in your home which has the least air circulation. Alternatively, you can keep it in the oven(off). Cover the pot well with a large and thick kitchen towel or a small blanket. Let it sit for 2-3 hours (in summer) or 4-5 hours (in winter).
- After this time, remove the kitchen towel and the lid. Let the pot sit there until it cools down completely. Then transfer it into the refrigerator and chill overnight before eating.
NOTES
- Don’t remove the milk from the heat just after it starts to boil. Let it simmer for about 15 minutes to end up with a thicker yogurt.
- Remove the milk from heat and let it cool down a bit. To understand whether milk reaches the right temperature, use your finger if you don’t have a thermometer. Dip your finger into hot milk, if you can tolerate its heat inside for about 5-7 seconds (not more), it’s ok. It mustn’t be too hot or less hot than necessary. If it is too hot, you will get a sourish yogurt and if it doesn’t reach the right temperature, it takes longer time for the yogurt to form. It even won't turn into a desired yogurt if the milk is colder than it is expected to be.
- Let the milk-yogurt rest at the warmest place of your home. Ideally, it is best to take the pot with hot milk to this place and let it wait there to reach the right temperature. It warms this place at the same time, which is a necessary step for thick yogurt.
- Put a thick blanket under the pot (one of your jumpers will work just fine for this, its arms can hug the pot to protect it from cold). And then mix it with the starter in the way explained above. You can pour it into jars at this step if you like or just keep it in the same pot.
- Put the lid on the pot, but don’t cover it completely as your milk-yogurt mixture needs some air inside. You can even use a suitable colander instead of its lid. This will help evaporation and yogurt will not be watery.
- Then cover the pot with another blanket very well. Don’t forget we must protect it from cold.
- Let it sit about 3 hours in summer when it is very hot, and about 4-6 hours in winter. Check it after this given time and if it is still not thick enough, keep waiting for some more hours.
- Then, uncover it completely and wait for another 1 or 2 hours without the lid this time.
- Next, when it reaches room temperature, gently place it in the refrigerator and wait it there for a day to have a better result.
- You can place a paper towel on the surface of yogurt if it’s still so watery. This will absorb excessive water in it. You can throw the paper towel away and put a new one each time you take yogurt from the pot.
NUTRITION
Nutrition information is automatically calculated, so should only be used as an approximation.
Rebekah says
Hi! I have some very thick (Greek) strained yogurt that I purchased at a farmer's market. Can I use that as a starter, or should I use regular yogurt? Thanks!
Zerrin says
Hi Rebekah! Yes, you can use it as a starter.
Linda says
Can this be done with soy or coconut milk and yogurt the same way?
vanessa says
Great recipe!
I left the starter in the freezer and now that I am ready to make a new batch I noticed the starter has lost its yogurt consistency, it is more liquid, like milk.
Will it still work?
Thanks for your input!
Carlotta says
I freeze a little bit of yogurt often... so I make sure I have some starter just in case someone uses the last bit in the refrigerator. Yes, it work fine.
Zerrin says
Hi Carlotta! I've never tried freezing yogurt. Great idea to keep it as a starter! Thanks for sharing!
Marieke says
Thank you for the recipe! I have been living in Turkey for two years now (I'm from the Netherlands) and am now in the process of making home-made yoghurt for the first time. Now I am waiting for the milk to cool down. I wasn't sure what to do with the layer on the surface of the hot milk. My guess was to remove it, or would you suggest to leave it there? I can't wait to taste the result!
Zerrin says
Oh that's nice! Which city are you living in? Isn't it a great feeling to make your own yogurt? If you want to make low fat yogurt, it's good to remove that layer on the surface of milk. You can leave it there if you want it full-fat. Hope you love your first homemade yogurt. Feel free to ask any questions you have.
Marieke says
Hi Zerrin,
Thanks for your reply! Maybe I should leave the layer there next time then, because I like it creamy 🙂 It is very nice to make it indeed. It's difficult to be patient though, I feel like checking it every half an hour!
I live in Izmir by the way. Next year I might spend some months in your city, Eskisehir, as part of my phd research. I have never been there, but look forward to explore a new city in Turkey.
Zerrin says
Yes, the hardest part for me, when making yogurt is to wait for hours! But I know I must leave it alone.
I've been to Izmir a few times. It's a very nice city to live in. Are you going to come to Eskisehir? It's great news! I'm sure you will love my city. The energy of thousands of university students always makes this city active. It just lacks sea. Let me know when you come. Would love to help you explore Eskisehir!
I'm Delicious... says
Thanks for sharing this great recipe!
I also run a food blog and will be featuring your recipe this afternoon.
The Mom Chef says
My mom ALWAYS had a bowl covered in a blue, white and pink towel on the counter with the next batch of yogurt going. We loved it so much as children. I'm embarrassed to say that I have yet to make it myself. I need to do this. Thank you for the instructions and the nudge!
turkey's for life says
Zerrin, I cannot tell you how long I have waited for someone to tell me how to make my own yoghurt. Thank you!! 🙂 I've asked so many people and they just say, 'Oh, it's easy, I'll ask my mum' but then they never actually tell me how to do it. Maybe they want to keep it a secret. 🙂 I can't wait to make this and I'll let you know how we get one with it. Excited now.
Julia
Peggy says
I definitely need to start making my own yogurt! We go through so much of it and I'm sure it would be so much better homemade!
foodieforager says
I have been making lots of cheese at home over the last month....but need to try yogurt. Thanks!
A Canadian Foodie says
I always have homemade yogurt in the fridge. Once you made your own, you never go back. And it just gets thicker and thicker as you use your own starter from the last batch each time. I love it.
🙂
Valerie
Cajun Chef Ryan says
Homemade yogurt is so good and quite easy to make!
Mely(Mexicoinmykitchen) says
I learned to made yogurt that way from an Indian Lady. It is so easy to make at home. Thanks for the tips, they are always handy.
Mely
thecoffeebreak says
I was looking for a yogurt recipe for some time, thanks for sharing and helpful tips!
irena says
Thanks for posting this POST...wonderful yogurt and great tips:)
OysterCulture says
Homemade yogurt is the best and I must try your version soon so I can claim to make Turkish yogurt.