This Turkish Homemade Yogurt recipe is extremely easy to make, only requires two ingredients. You don't even need a yogurt machine or any special equipment. It yields perfectly smooth, creamy, and thick yogurt. The flavor is deliciously fresh, sweet and tangy every time.
As you may have seen by now, yogurt is a staple ingredient in Turkish cuisine. We use it to make yogurt drink ayran and cucumber yogurt dip cacik almost everyday. Oh and we can’t think of manti dumplings without yogurt.
Almost every household in Turkey makes their own yogurt and strained yogurt on a weekly basis.
Today, we will have a look at how to make yogurt in Turkish style and discuss various yogurt ingredients you can use. Then we will have a look at different yogurt starters you can use, how to thicken your runny yogurt, and answer some other frequently asked questions.
Jump to:
Why bother? Is it better?
Homemade yogurt is truly unmatched by store-bought brands. The biggest benefit is probably that you know exactly what you are consuming. Store-bought yogurt almost always contains colorants, preservatives, and flavor enhancers. Although these aren’t necessarily harmful to you, it is always better to consume fresh, chemical-free food.
Another big benefit of making yogurt is the taste and texture. Your yogurt will be much higher in quality because you can choose exactly what you are adding. The flavor will also be extremely unique (in the best way).
Not convinced? One more thing about diy yogurt is that it is much cheaper and more environmentally friendly than commercially made yogurt. You don't pay for the chemicals added or worry about the packaging used. So what are you waiting for?
Ingredients
Milk is the most important ingredient used to make yogurt. However, choosing the correct type of milk might be complicated.
For our Turkish style yogurt recipe, we use whole cow's milk. We found that it yields the best result in flavor and texture, but you can definitely experiment using different types and test what works for you.
Raw milk can be used if you can find it. It is the milk obtained directly from the animal – the milk itself doesn't undergo any processing (pasteurization or homogenization). If there is a farm around, you can buy it from there. Traditional moms in Turkey mostly prefer raw milk and cook it at home before making yogurt. They say it has more fat, so the result is thicker and tastier.
You can use pasteurized milk too. It is the milk that has been heated and cooled to produce a “safer to consume” product. This process intends to kill certain harmful bacteria.
Never use UHT milk as you can’t get a quality yogurt with it.
Besides cow's milk, you can also use goat’s or sheep’s milk to make yogurt at home. It will yield very different yogurts but could be a nice experiment.
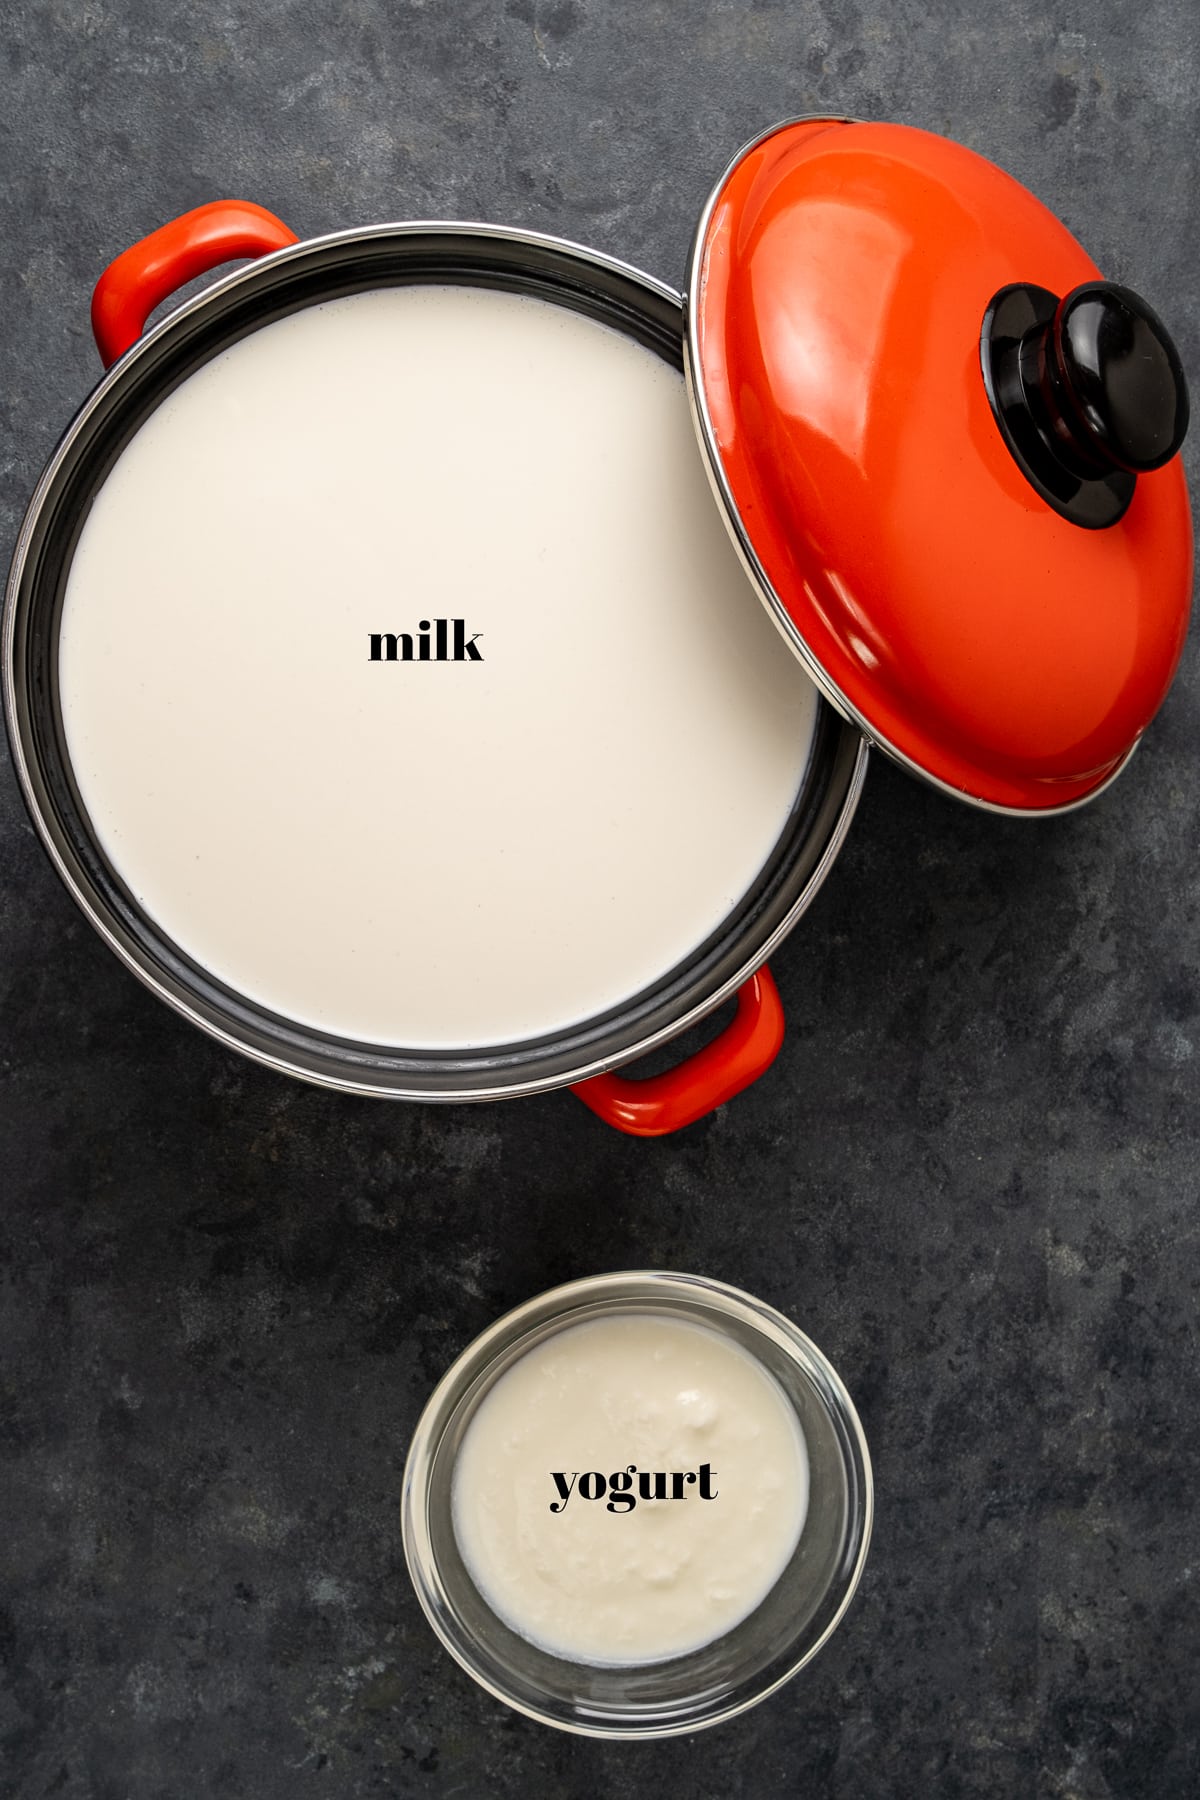
Next ingredient for a homemade yogurt recipe is the starter. We use a yogurt starter as it is the easiest and quickest way to make yogurt. You can either use a bit from store-bought plain yogurt or from your previous batch.
How To Make It
Making yogurt is much easier than you might have thought and only requires a bit of time and patience. This yogurt recipe will give you deliciously thick and creamy yogurt that is unmatched by any store-bought version!
First, heat the milk. Place the milk into a pot and bring it to a boil while stirring occasionally. Once boiling, reduce the heat and allow it to simmer for 15-20 minutes.
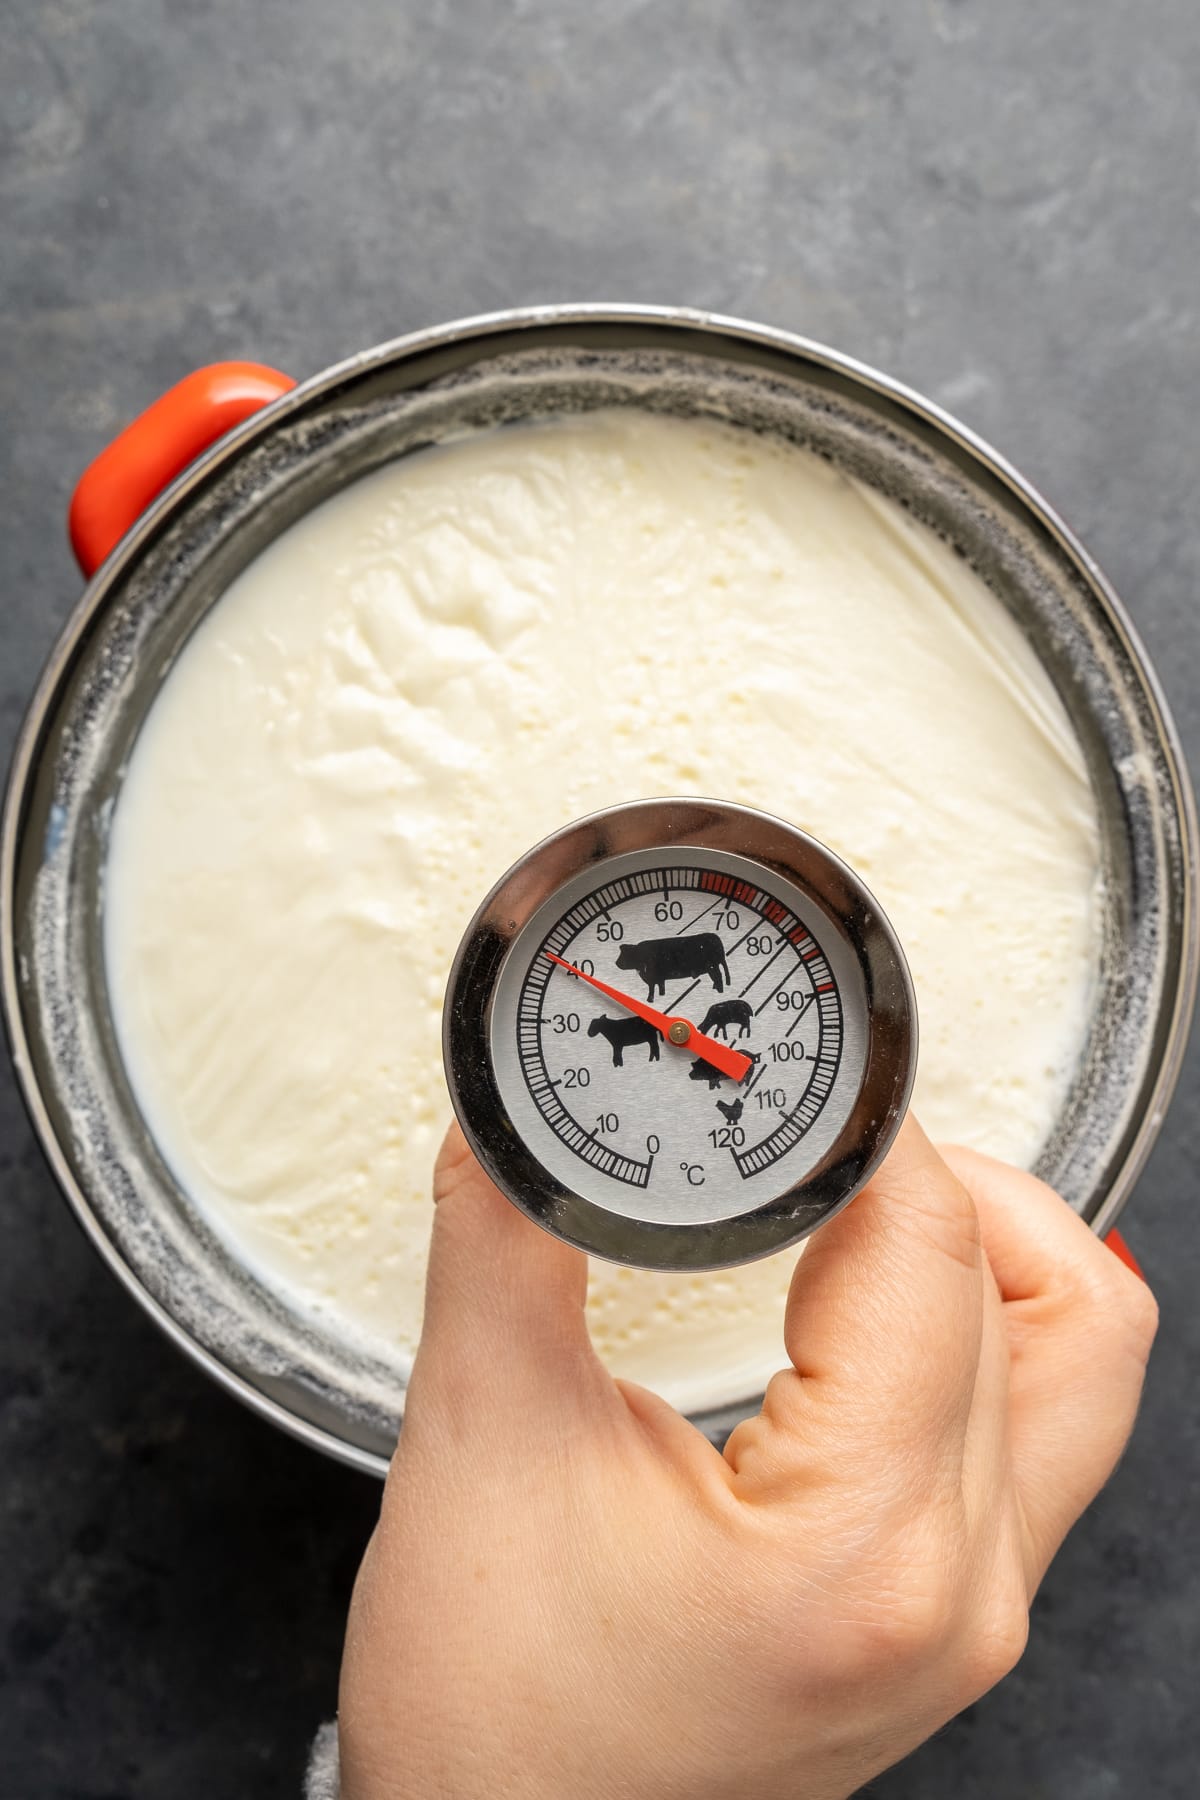
Second, remove the milk from the heat and allow it to cool. The milk cools sufficiently when the temperature reaches 110F (40C). Alternatively, you can test the temperature by placing your finger inside the milk. If you can keep it there for 5 seconds, the milk has cooled enough. That's what most Turkish people do to understand if it is ready. We always use this finger method too whenever we make yogurt.
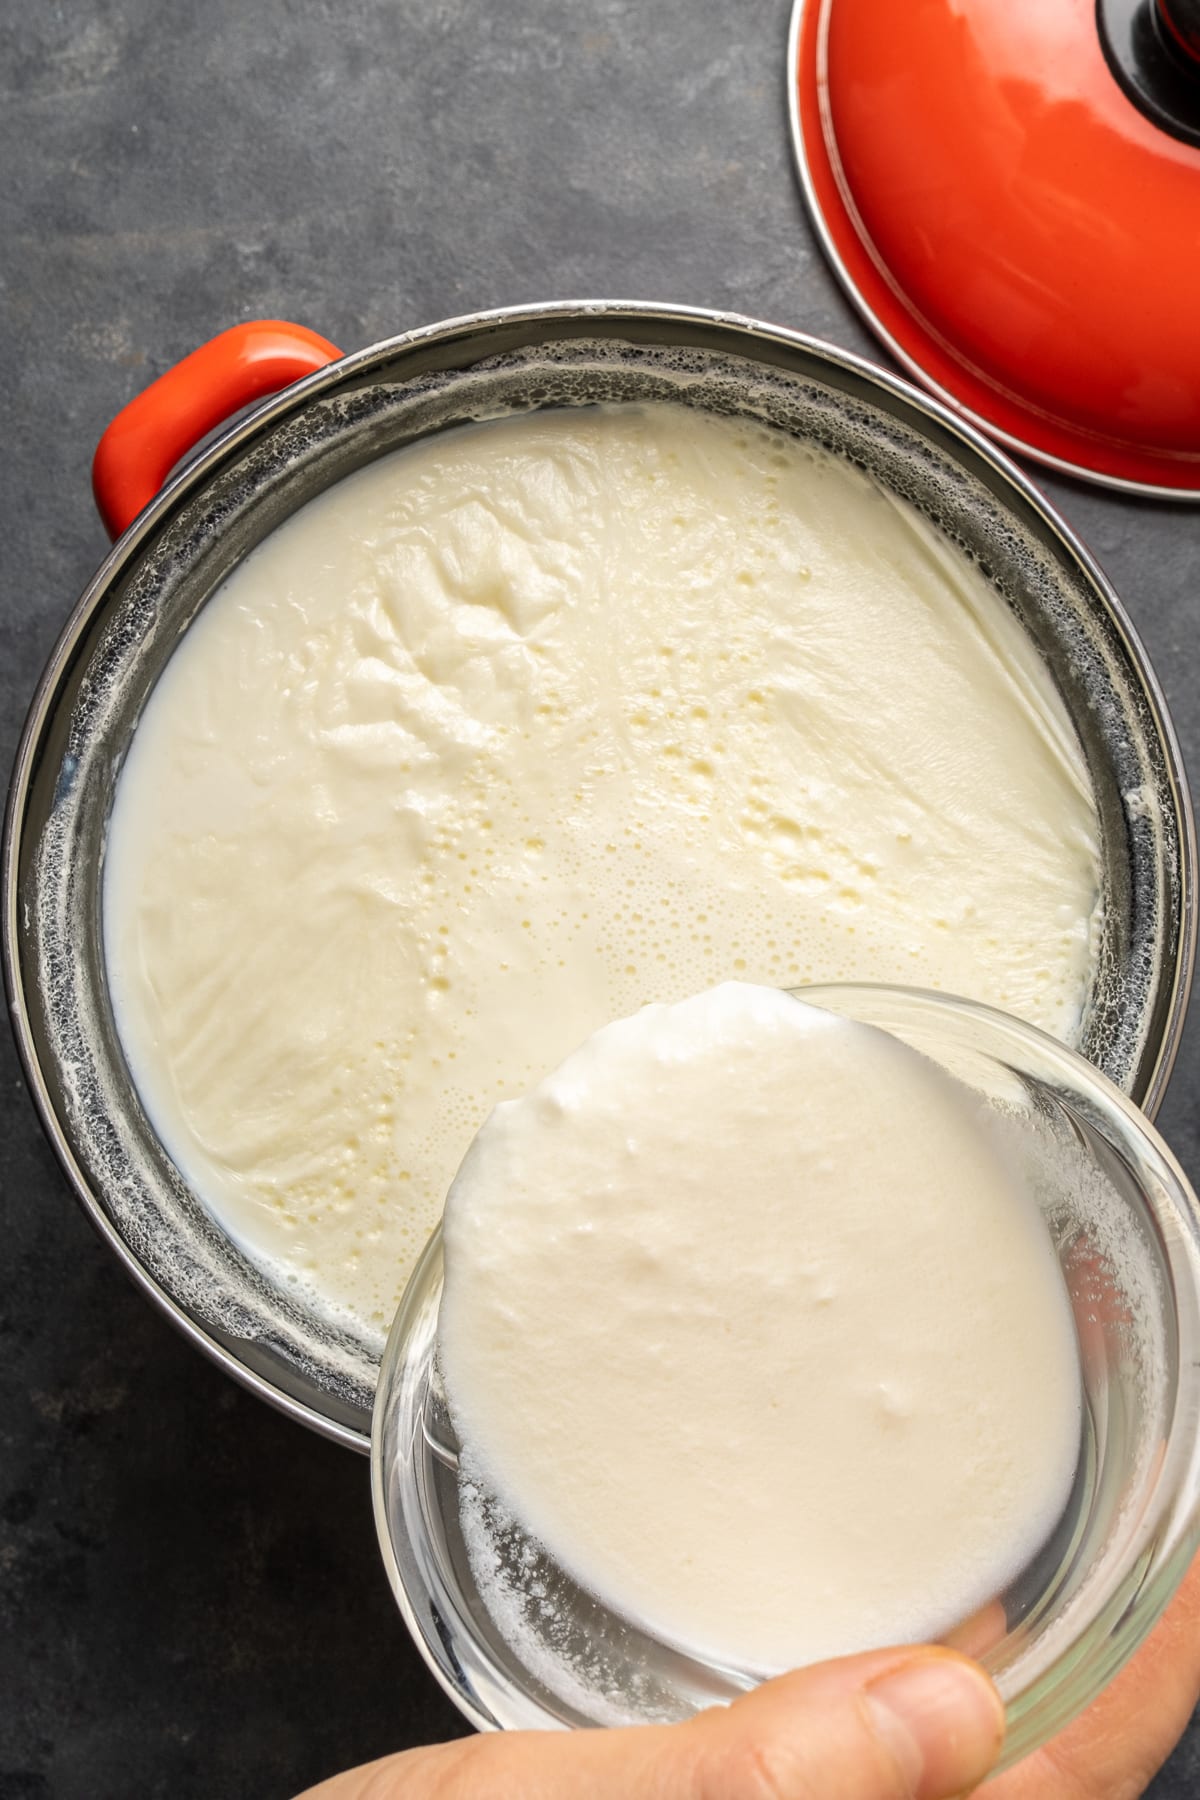
Third, add the starter. Place the yogurt in a bowl, add ½ cup milk and mix well. This will help the starter to heat and prevent the yogurt from splitting. Slowly add the mixture back into the pot and gently mix it through.
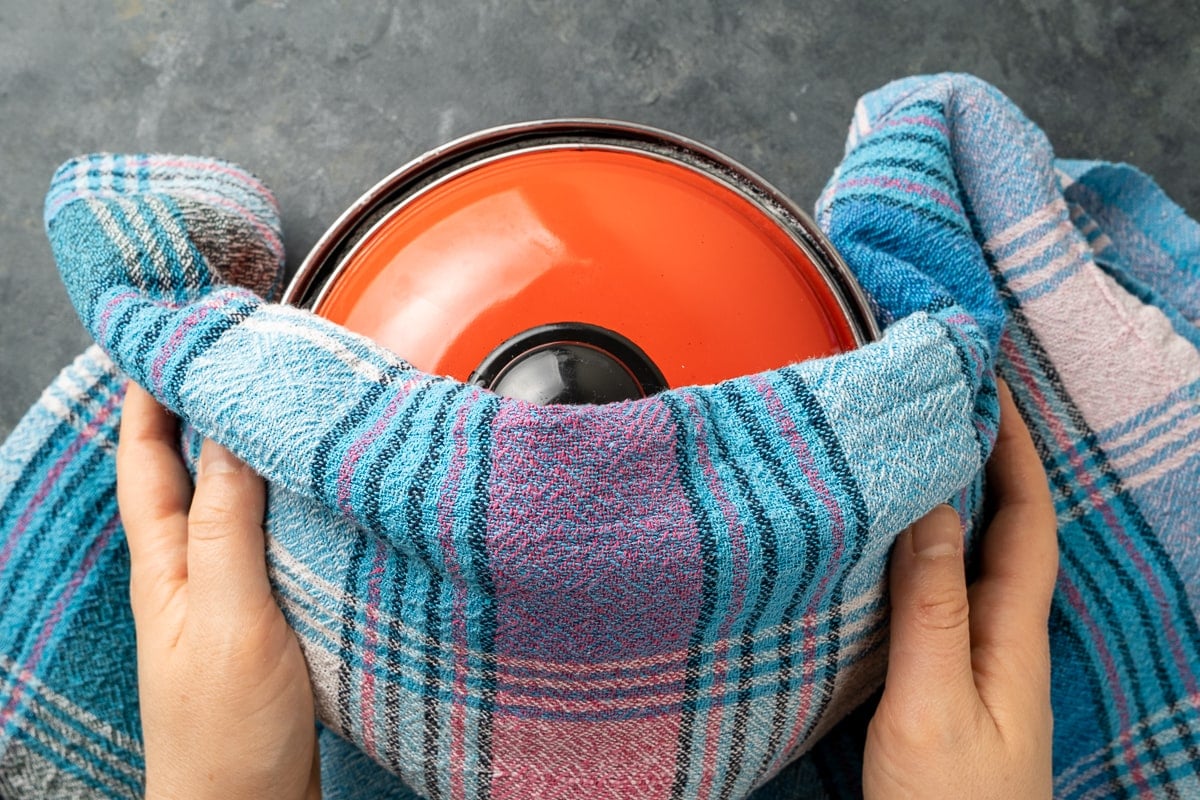
Fourth, let the mixture rest and turn into a delicious yogurt. Put the lid ajar and place the pot at a place in your home which has the least air circulation. Alternatively, you can keep it in the oven(off). Cover the pot well with a large and thick kitchen towel or a small blanket. Let it sit for 2-3 hours (in summer) or 4-5 hours (in winter).
If you want, you can transfer the mixture into small jars or a clay pot and make yogurt in these containers.
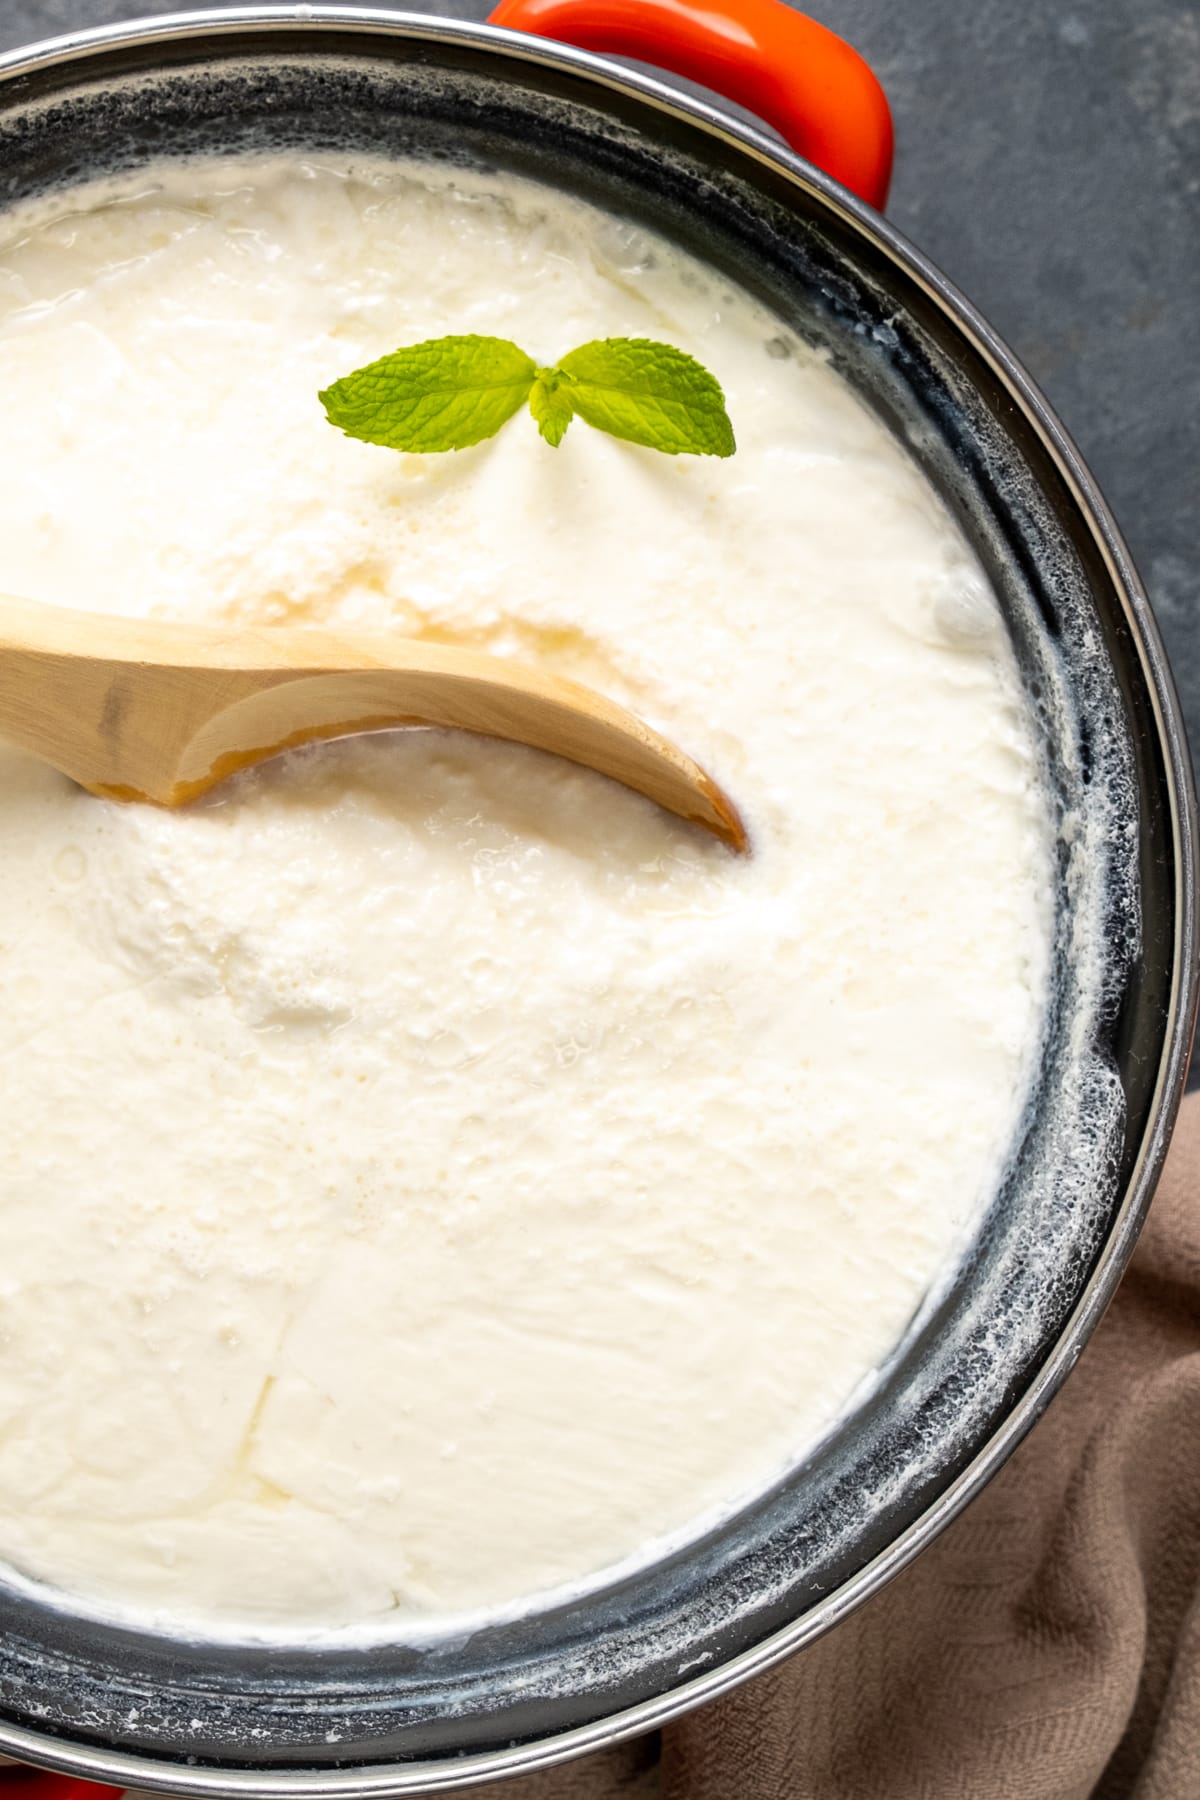
Finally, let the yogurt cool. Remove the towel and lid and allow the yogurt to cool completely before transferring it into the refrigerator. Allow it to chill overnight before serving it the next day.
Uses Of Yogurt
A bowl of Turkish homemade yogurt is a staple side dish served at lunch or dinner in a typical Turkish home. And it is probably the most used ingredient in Turkish recipes from savory to sweet.
- Yogurt is a must when making cilbir known as Turkish eggs.
- We use it in soups like comforting yogurt soup with rice.
- We use it in baking. Several bread recipes here like no yeast dinner rolls require yogurt.
- We also use it in yogurt marinades when making lamb shish kabobs or tavuk sis and in dips like haydari.
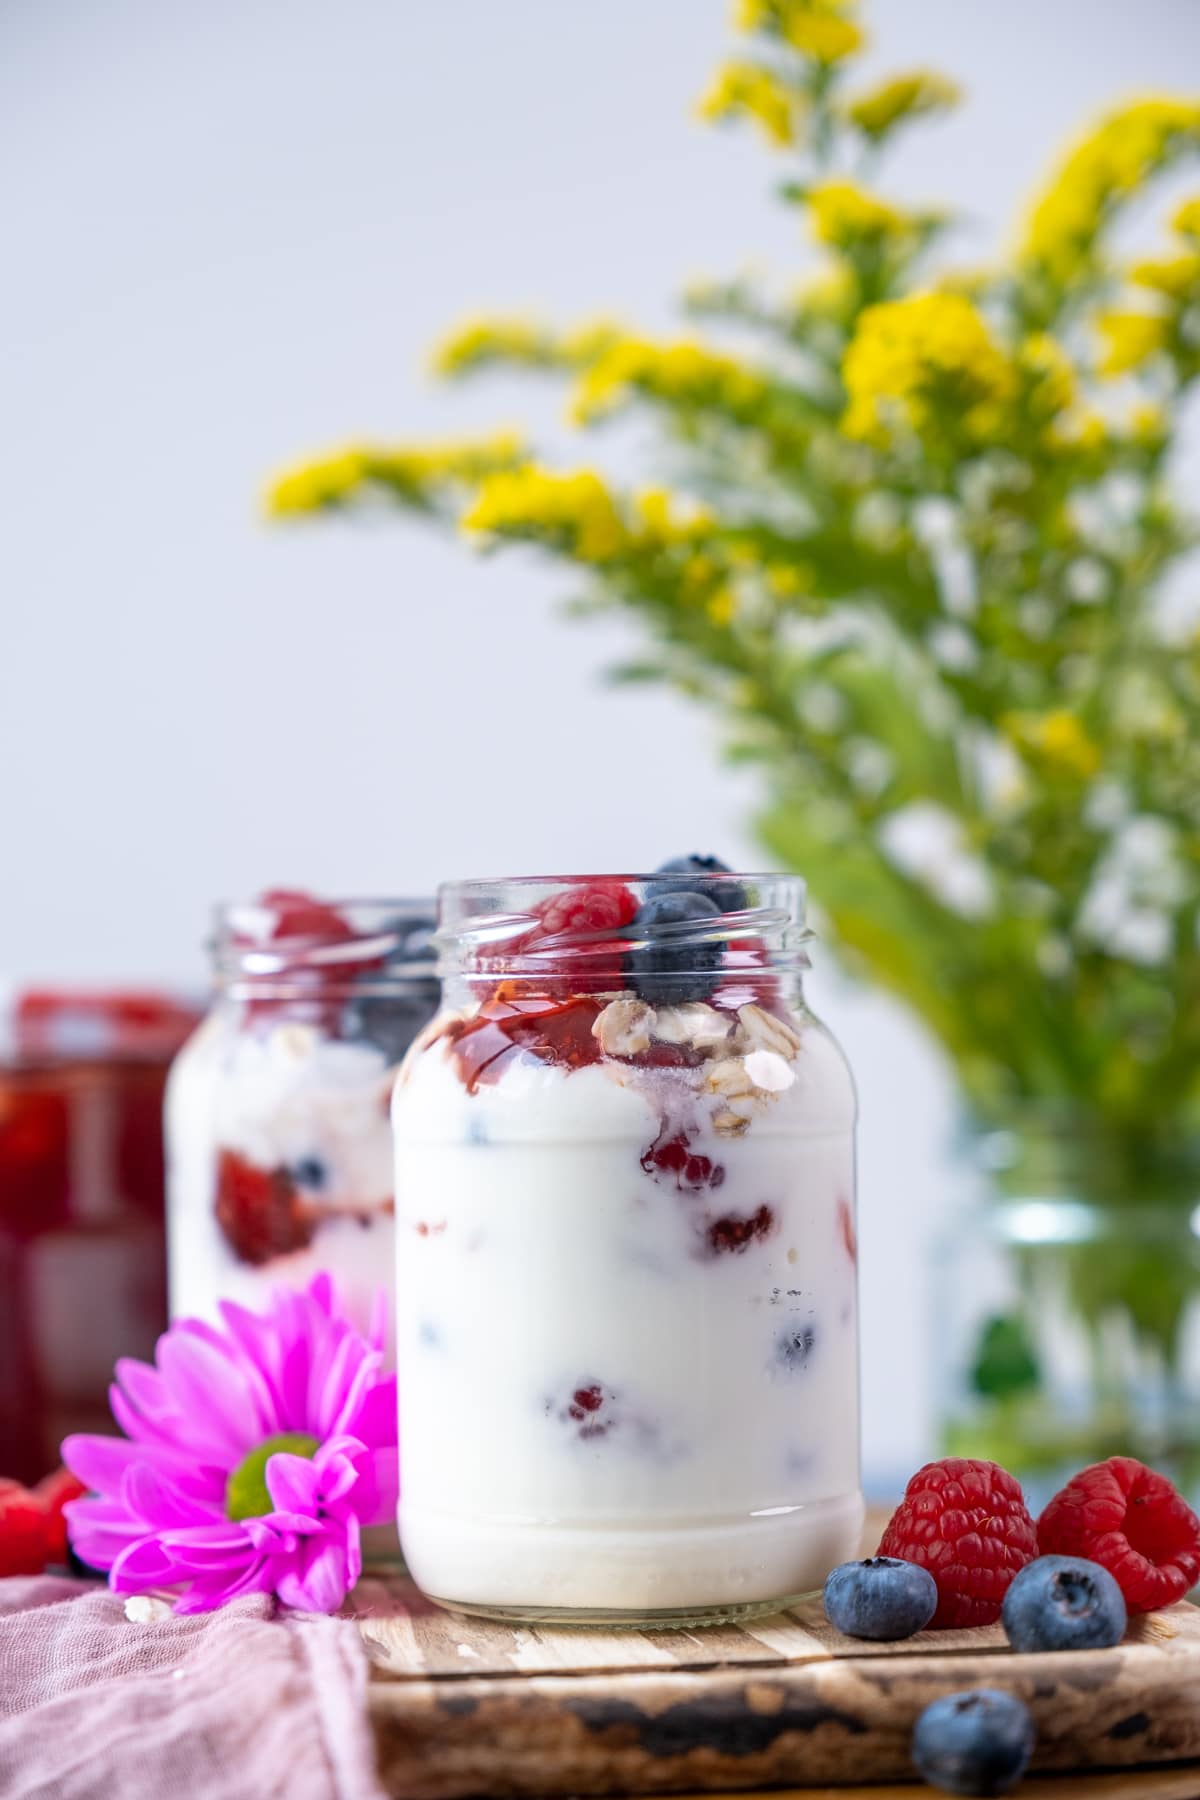
- We love a quick yogurt parfait with berries and oatmeal or granola for breakfast.
- When making phyllo borek recipe, we need a yogurt egg wash to stick the phyllo sheets to on another.
- We use it in baking as well. Check out our revani (Turkish semolina cake) and elmali kurabiye (Turkish style apple cookies)!
Tips and Tricks
- Don’t remove the milk from the heat just after it starts to boil. Let it simmer for about 15 minutes to end up with a thicker yogurt.
- Remove the milk from heat and let it cool down a bit. To understand whether milk reaches the right temperature, use your finger if you don’t have a thermometer. Dip your finger into hot milk, if you can tolerate its heat inside for about 5-7 seconds (not more), it’s ok. It mustn’t be too hot or less hot than necessary. If it is too hot, you will get a sourish yogurt and if it doesn’t reach the right temperature, it takes longer time for the yogurt to form. It even won't turn into a desired yogurt if the milk is colder than it is expected to be.
- Let the milk-yogurt rest at the warmest place of your home. Ideally, it is best to take the pot with hot milk to this place and let it wait there to reach the right temperature. It warms this place at the same time, which is a necessary step for thick yogurt.
- Put a thick blanket under the pot (one of your jumpers will work just fine for this, its arms can hug the pot to protect it from cold). And then mix it with the starter in the way explained above. You can pour it into jars at this step if you like or just keep it in the same pot.
- Put the lid on the pot, but don’t cover it completely as your milk-yogurt mixture needs some air inside. You can even use a suitable colander instead of its lid. This will help evaporation and yogurt will not be watery.
- Then cover the pot with another blanket very well. Don’t forget we must protect it from cold.
- Let it sit about 3 hours in summer when it is very hot, and about 4-6 hours in winter. Check it after this given time and if it is still not thick enough, keep waiting for some more hours.
- Then, uncover it completely and wait for another 1 or 2 hours without the lid this time.
- When it reaches room temperature, gently place it in the refrigerator and wait it there for a day to have a better result.
- You can place a paper towel on the surface of yogurt if it’s still so watery. This will absorb excessive water in it. You can throw the paper towel away and put a new one each time you take yogurt from the pot.
Frequently Asked Questions
The best type of milk to use when making yogurt is really any high-quality raw or pasteurized milk. The milk you use should NEVER be UHT milk – it kills too many bacteria and won’t produce as good quality yogurt compared to other types of milk.
Whole milk will give you the best result and thick, creamy, and flavorful homemade yogurt.
Runny yogurt is often the result of incorrect temperatures and times being used when making the yogurt. Your starter might have been the incorrect temperature when you added it to the milk, or it didn’t have enough time to ferment and thicken the milk.
Alternatively, the temperature of the milk itself could have been incorrect (usually too low) and the proteins didn't have time to properly denature. It could also be the result of the starter you used, and even the milk you used – that is why whole milk or high-quality raw milk works the best.
It is extremely important to use correct and accurate temperatures when making yogurt.
The easiest fix after you’ve already cooled the yogurt is to simply strain it through a cheesecloth and strainer. Stir occasionally so the excess liquid drains.
Your DIY yogurt will last about 2 weeks if stored properly (in the refrigerator). The reason store-bought yogurt has longer shelf life is because they have a bunch of preservatives added to them.
The easiest yogurt starter you can use is either store-bought plain yogurt or some yogurt from your previous homemade batch.
There are also some interesting starters we have heard like chickpeas, citric acid, lemon juice, and even some French bread. But we’ve never had experience with any of these.
You can use small glass containers or a large pot. The pot could be enamel or stainless steel. Traditionally the best container is a clay pot as it helps the food inside remain fresh and cold. 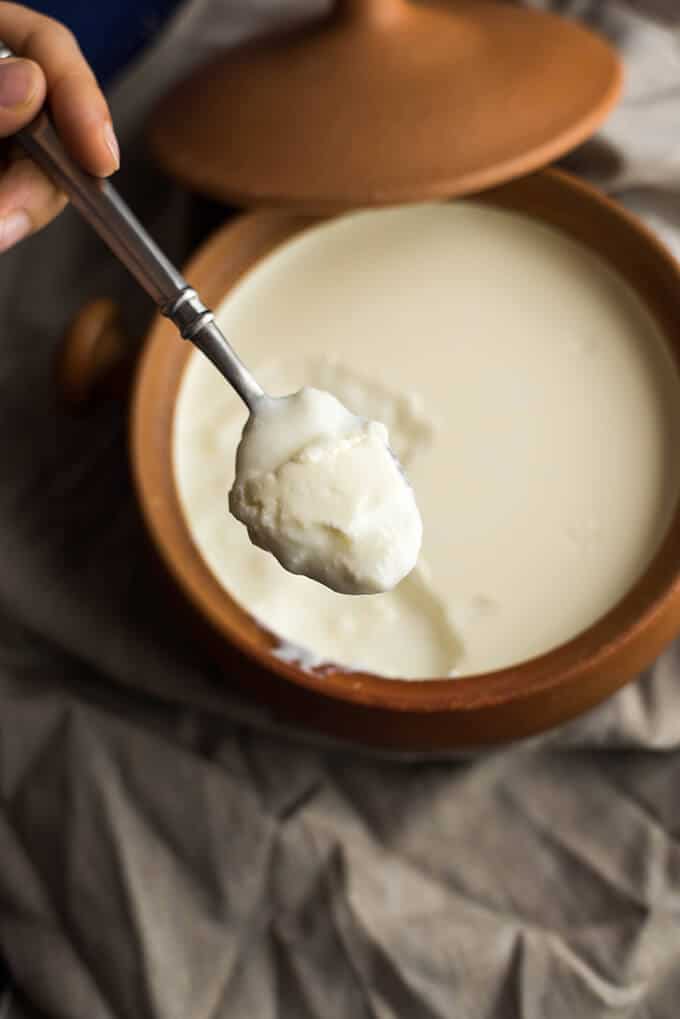
More Recipes With Yogurt
You might also like:


Sign up for the FREE Give Recipe Newsletter to get the new recipes into your inbox!
And stay in touch with us on Facebook, Pinterest, YouTube and Instagram for all the latest updates.
📖 Recipe

How To Make Turkish Yogurt
INGREDIENTS
- 2 liter whole milk
- 4 tablespoons plain yogurt at room temperature
INSTRUCTIONS
- Heat milk over medium heat until it boils. Stir occasionally.
- Reduce the heat once it boils and let it simmer for 15-20 minutes. This will help you get a thicker yogurt. Remove from heat and let it completely.
- There are two methods we can apply to understand the right temperature of the milk before making yogurt. First method is old-fashioned (moms) method: After letting it cool down for a while, dip your finger into the pot. If you can count until 5 when your finger is inside, the temperature is okay to make yogurt. Second is with a thermometer: Let the hot milk cool down. It is ready when you see 40C/110F on the thermometer.
- Put 4 tablespoon yogurt in a bowl. This is the starter. Pour about ½ cup milk into this and mix. This is to heat the yogurt a bit. Pour this mixture into the milk and gently mix it.
- Put the lid ajar and place the pot at a place in your home which has the least air circulation. Alternatively, you can keep it in the oven(off). Cover the pot well with a large and thick kitchen towel or a small blanket. Let it sit for 2-3 hours (in summer) or 4-5 hours (in winter).
- After this time, remove the kitchen towel and the lid. Let the pot sit there until it cools down completely. Then transfer it into the refrigerator and chill overnight before eating.
NOTES
- Don’t remove the milk from the heat just after it starts to boil. Let it simmer for about 15 minutes to end up with a thicker yogurt.
- Remove the milk from heat and let it cool down a bit. To understand whether milk reaches the right temperature, use your finger if you don’t have a thermometer. Dip your finger into hot milk, if you can tolerate its heat inside for about 5-7 seconds (not more), it’s ok. It mustn’t be too hot or less hot than necessary. If it is too hot, you will get a sourish yogurt and if it doesn’t reach the right temperature, it takes longer time for the yogurt to form. It even won't turn into a desired yogurt if the milk is colder than it is expected to be.
- Let the milk-yogurt rest at the warmest place of your home. Ideally, it is best to take the pot with hot milk to this place and let it wait there to reach the right temperature. It warms this place at the same time, which is a necessary step for thick yogurt.
- Put a thick blanket under the pot (one of your jumpers will work just fine for this, its arms can hug the pot to protect it from cold). And then mix it with the starter in the way explained above. You can pour it into jars at this step if you like or just keep it in the same pot.
- Put the lid on the pot, but don’t cover it completely as your milk-yogurt mixture needs some air inside. You can even use a suitable colander instead of its lid. This will help evaporation and yogurt will not be watery.
- Then cover the pot with another blanket very well. Don’t forget we must protect it from cold.
- Let it sit about 3 hours in summer when it is very hot, and about 4-6 hours in winter. Check it after this given time and if it is still not thick enough, keep waiting for some more hours.
- Then, uncover it completely and wait for another 1 or 2 hours without the lid this time.
- Next, when it reaches room temperature, gently place it in the refrigerator and wait it there for a day to have a better result.
- You can place a paper towel on the surface of yogurt if it’s still so watery. This will absorb excessive water in it. You can throw the paper towel away and put a new one each time you take yogurt from the pot.
NUTRITION
Nutrition information is automatically calculated, so should only be used as an approximation.
BigFatBaker says
Very interesting! I am a yogurt fanatic. i like to have it almost every day for breakfast. I imagined this to be a much more difficult process, I have almost no excuse to make it!
Hester Casey - Alchemy says
I had a yoghurt maker with loads of fiddly little pots that was more trouble than it was worth. You remind me that yoghurt making doesn't have to be complicated. That's a lovely story about the neighbourliness of passing on the yoghurt starter.
Medeja says
My husband tried to make it once, but it didnt come out well :)) don't know what was the mistake, but after that we didn't try anymore :))
Simply Life says
do you use a certain kind of milk or yogurt to start with? Great info - thanks!
Tonya - What's On My Plate says
i had no idea that making homemade yogurt was so simple!
Konstant Kraver says
Thank you so much I love love yogurt and have always wondered the secret to making it! I will be trying this soon!
Felice - All That's Left Are The Crumbs says
Yogurt is something I have always wanted to try to make. Just this morning one of my daughters was complaining about how sweet the yogurt is in the US. We are used to a more tart yogurt. I have bookmarked this and will try it soon. Thanks!
Mateja says
Homemade yogurt is the best! To make sure that my yogurt-milk mix is warm and cozy, I always put the pot into a cooler filled with warm water and then place the cooler away from curious eyes 😉 Thank you for sharing Zerrin 🙂
megi says
We have been making our own yogurt for ten years now and the taste and texture far so superior of the store bought one. Thank you for sharing your tips.
Nicole says
I used to make my own yogurt all the time, but for some reason got out of the habit. Thanks for the little nudge to start up this wonderful habit again.
Kim - Liv Life says
I've always heard about making ones own yogurt, but have never tasted homemade or tried to make it. You've made it sounds so easy here, I'm really tempted to give this a shot! Nicely done!
Cookin' Canuck says
I have been wanting to make homemade yogurt for a long time. Thanks for the reminder of how easy and worthwhile it can be!
Kate @ Diethood.com says
I love my homemade yogurt - I make it all the time. I don't remember the last time I bought it, and if I did buy it, it was because I needed a few tablespoons to make more. 🙂 Great tips!
Cheryl and Adam @ pictureperfectmeals.com says
Love yogurt and this looks so inviting! Have to try this. Thanks!
Gloria in Western Canada says
Making yogurt is another item on my bucket list I've yet to get to. Thanks for this Zerrin.