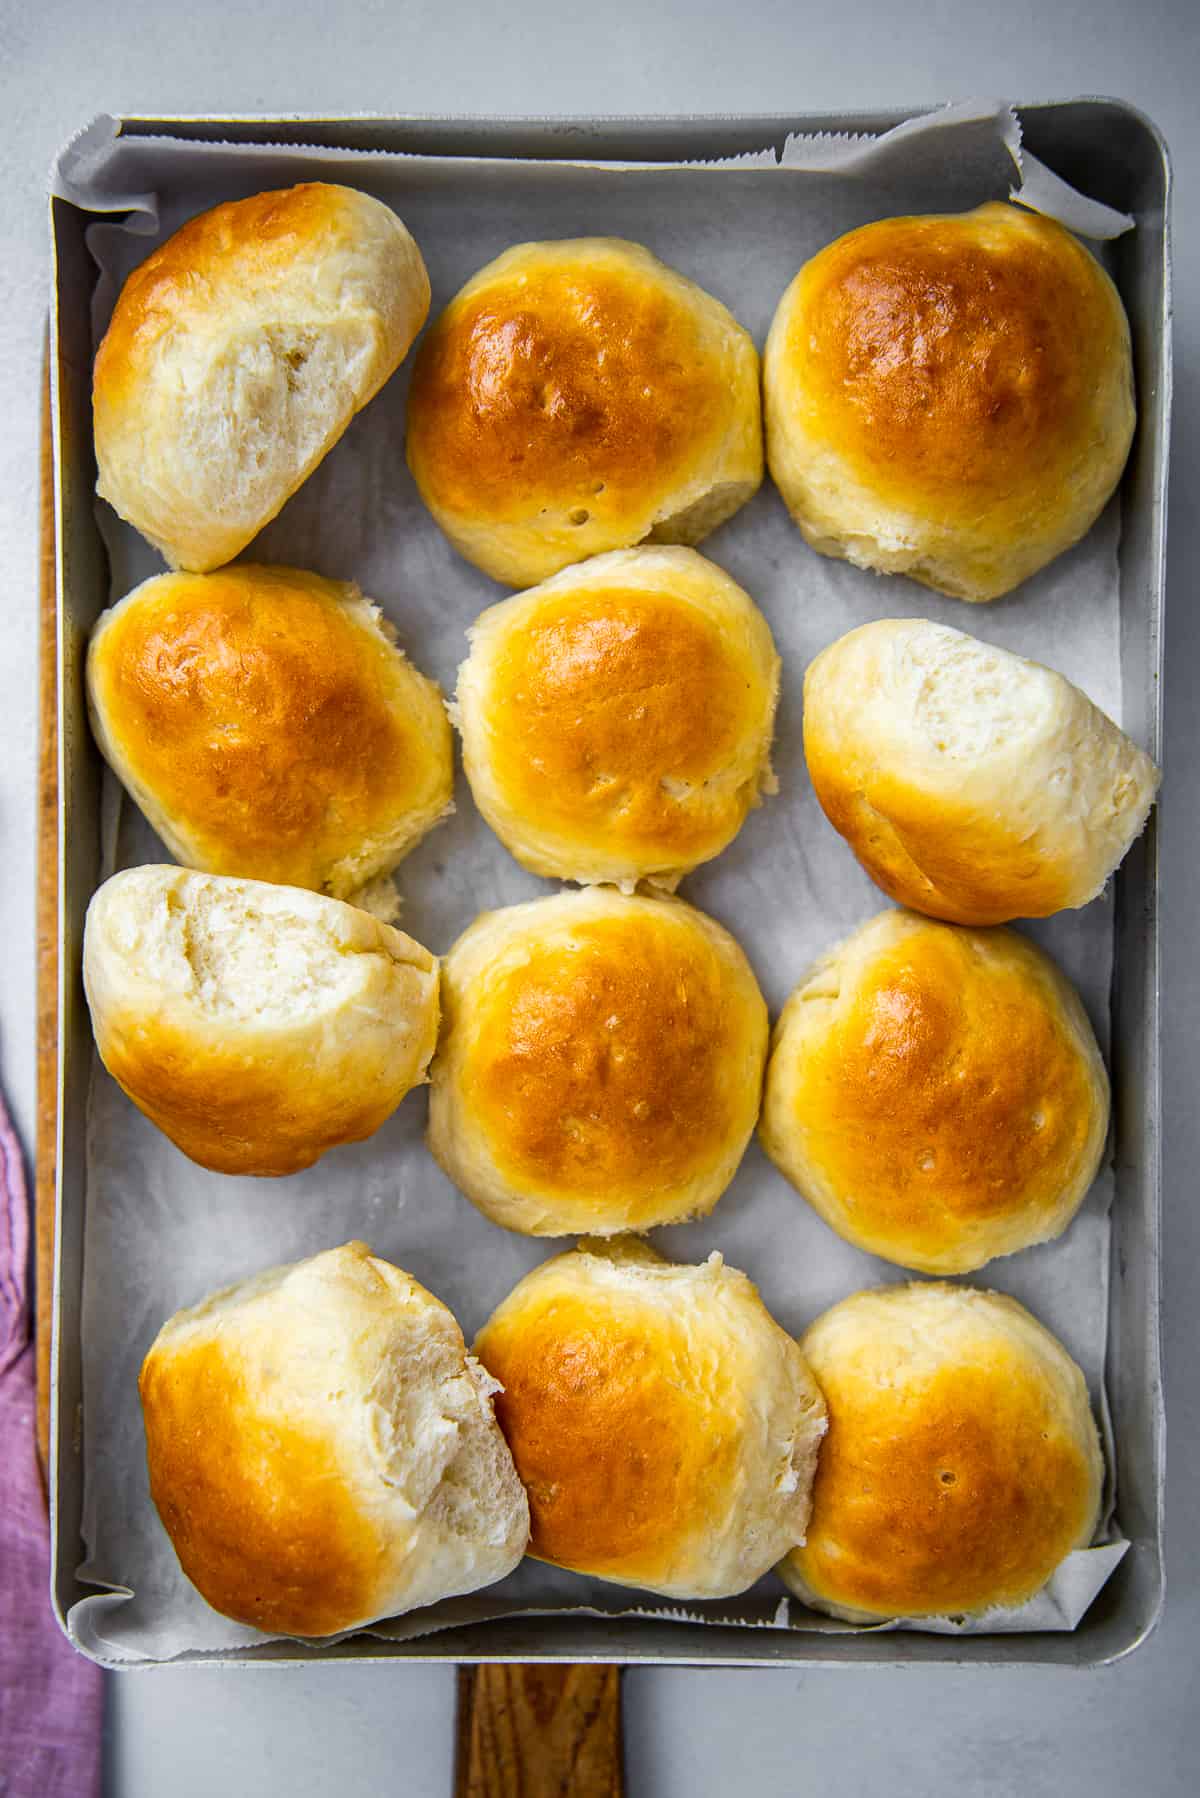
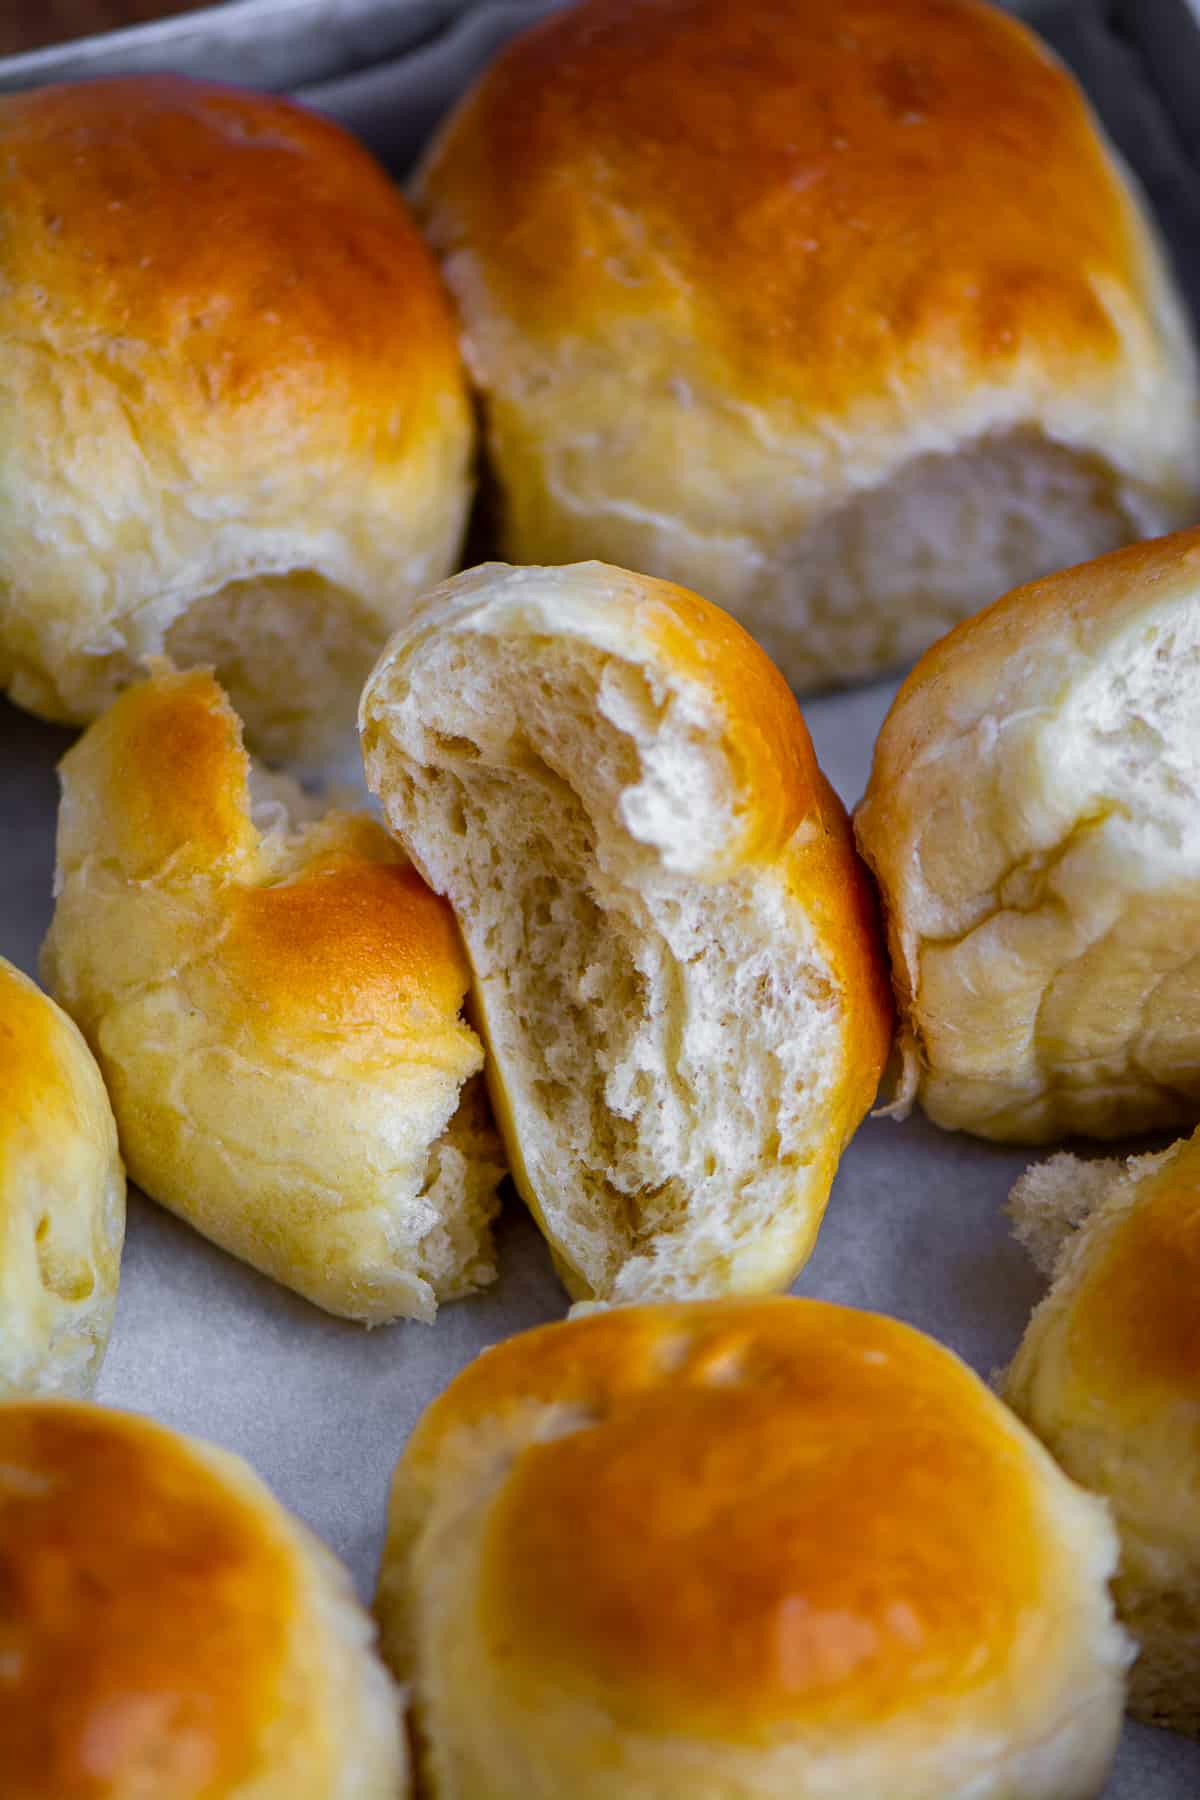
Love the soft bread rolls you buy from the store? You can definitely make them at home too! These homemade bread rolls with yeast turn out pillowy soft and golden every time. All you need is a handful of simple ingredients and a bit of rising time.
We promise you’ll feel like a pro after making this easy recipe for homemade bread rolls with yeast. It’s one of our best and most reliable bread recipes. If you’re short on time, you can also check out our quicker version: Homemade Bread Rolls Without Yeast!
About The Ingredients
Our homemade bread rolls call for simple ingredients that come together to create a soft and fluffy result.
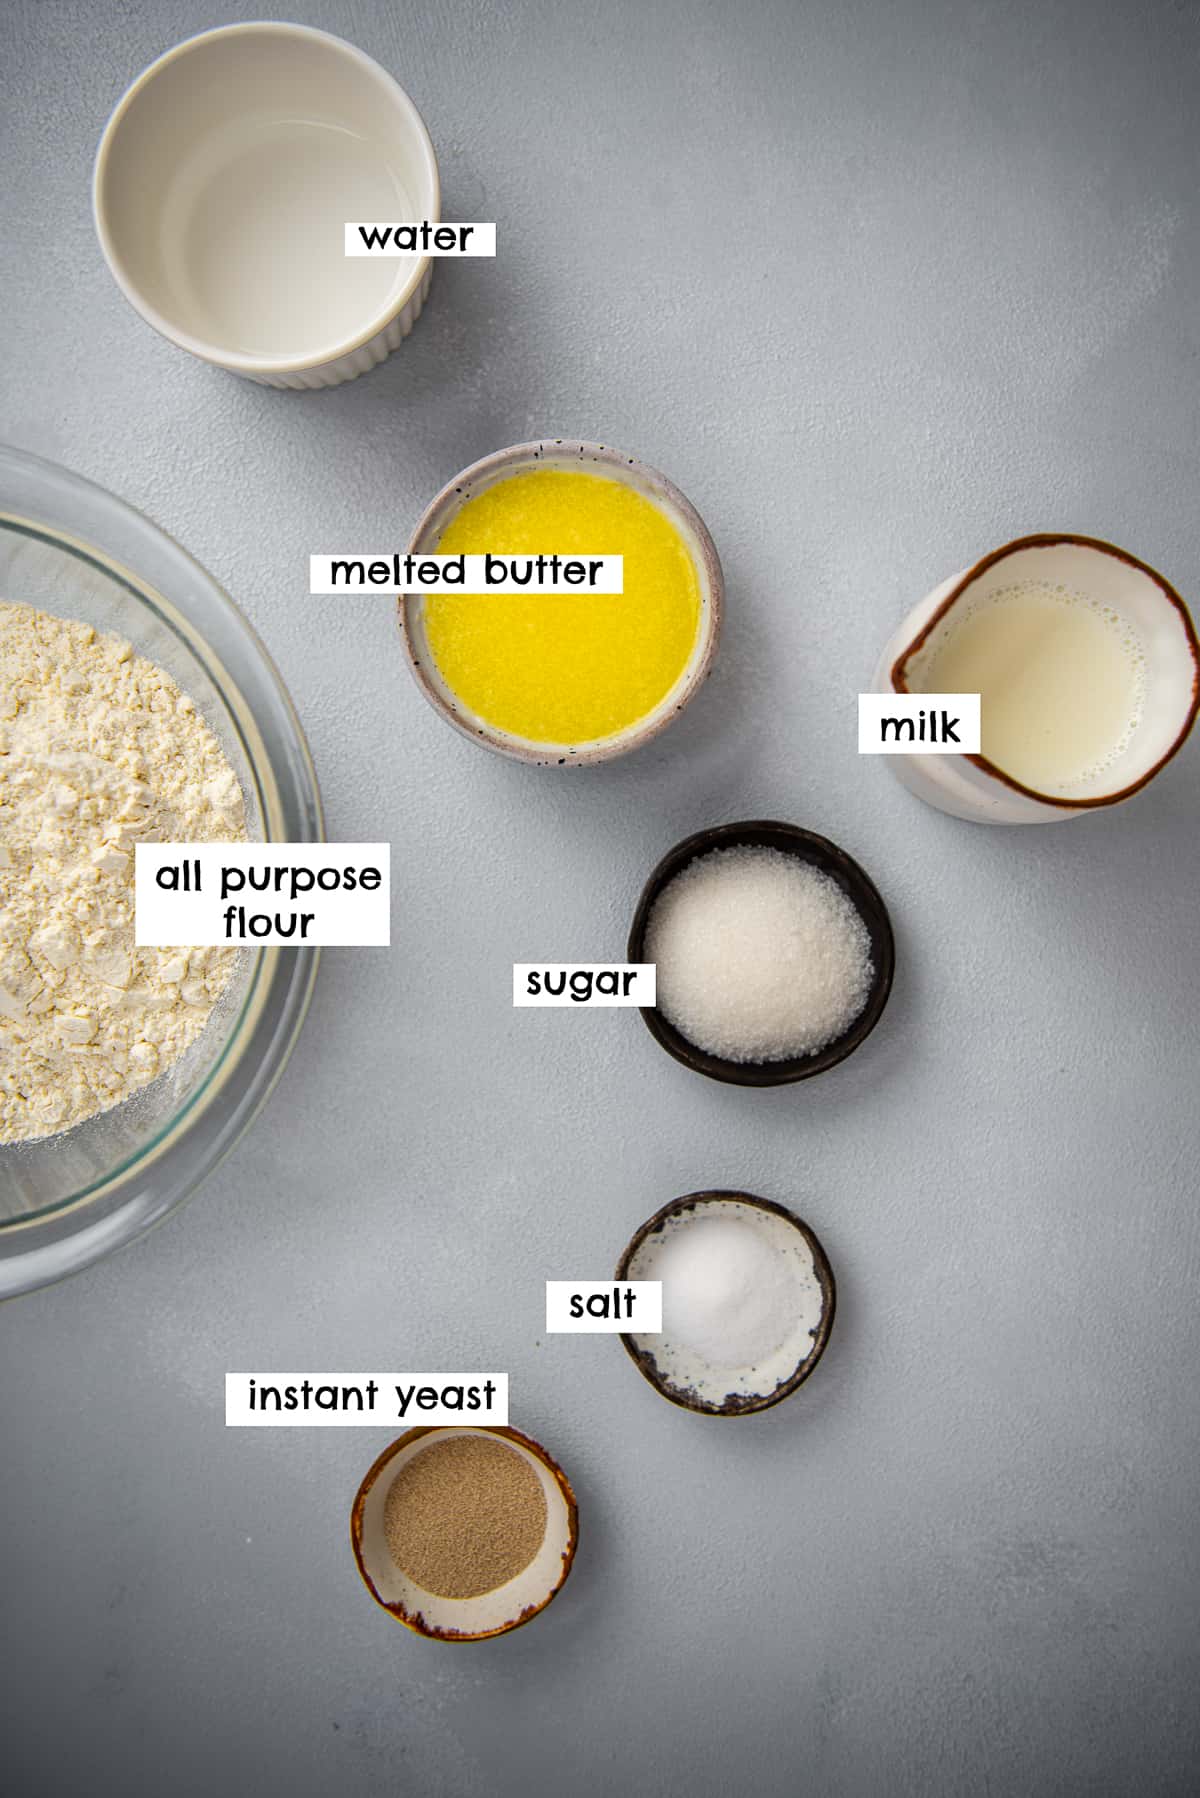
Lukewarm Water: This helps activate the yeast and kickstart the fermentation process. If it’s too hot, it can kill the yeast, so make sure it feels warm to the touch, not hot.
Instant Yeast: Also called rapid-rise yeast. It’s super convenient and works faster than active dry yeast. It helps the dough rise beautifully and gives the rolls their fluffy texture.
Sugar: We use just 1 tablespoon of sugar to feed the yeast.
All-Purpose Flour: A reliable choice for soft bread rolls.
Salt: Essential for balancing flavor.
Lukewarm Milk: Makes the dough richer and more tender. It also helps with yeast activation, just like lukewarm water does.
Melted Butter: Adds flavor, moisture, and that melt-in-your-mouth softness.
How to Make Homemade Bread Rolls with Yeast
Detailed instructions are in the recipe card at the bottom of the page, but here’s a quick overview of how to make these super soft rolls.
Start by activating the yeast with warm water and a little sugar. While it’s not strictly necessary with instant yeast, this extra step helps the dough rise better.
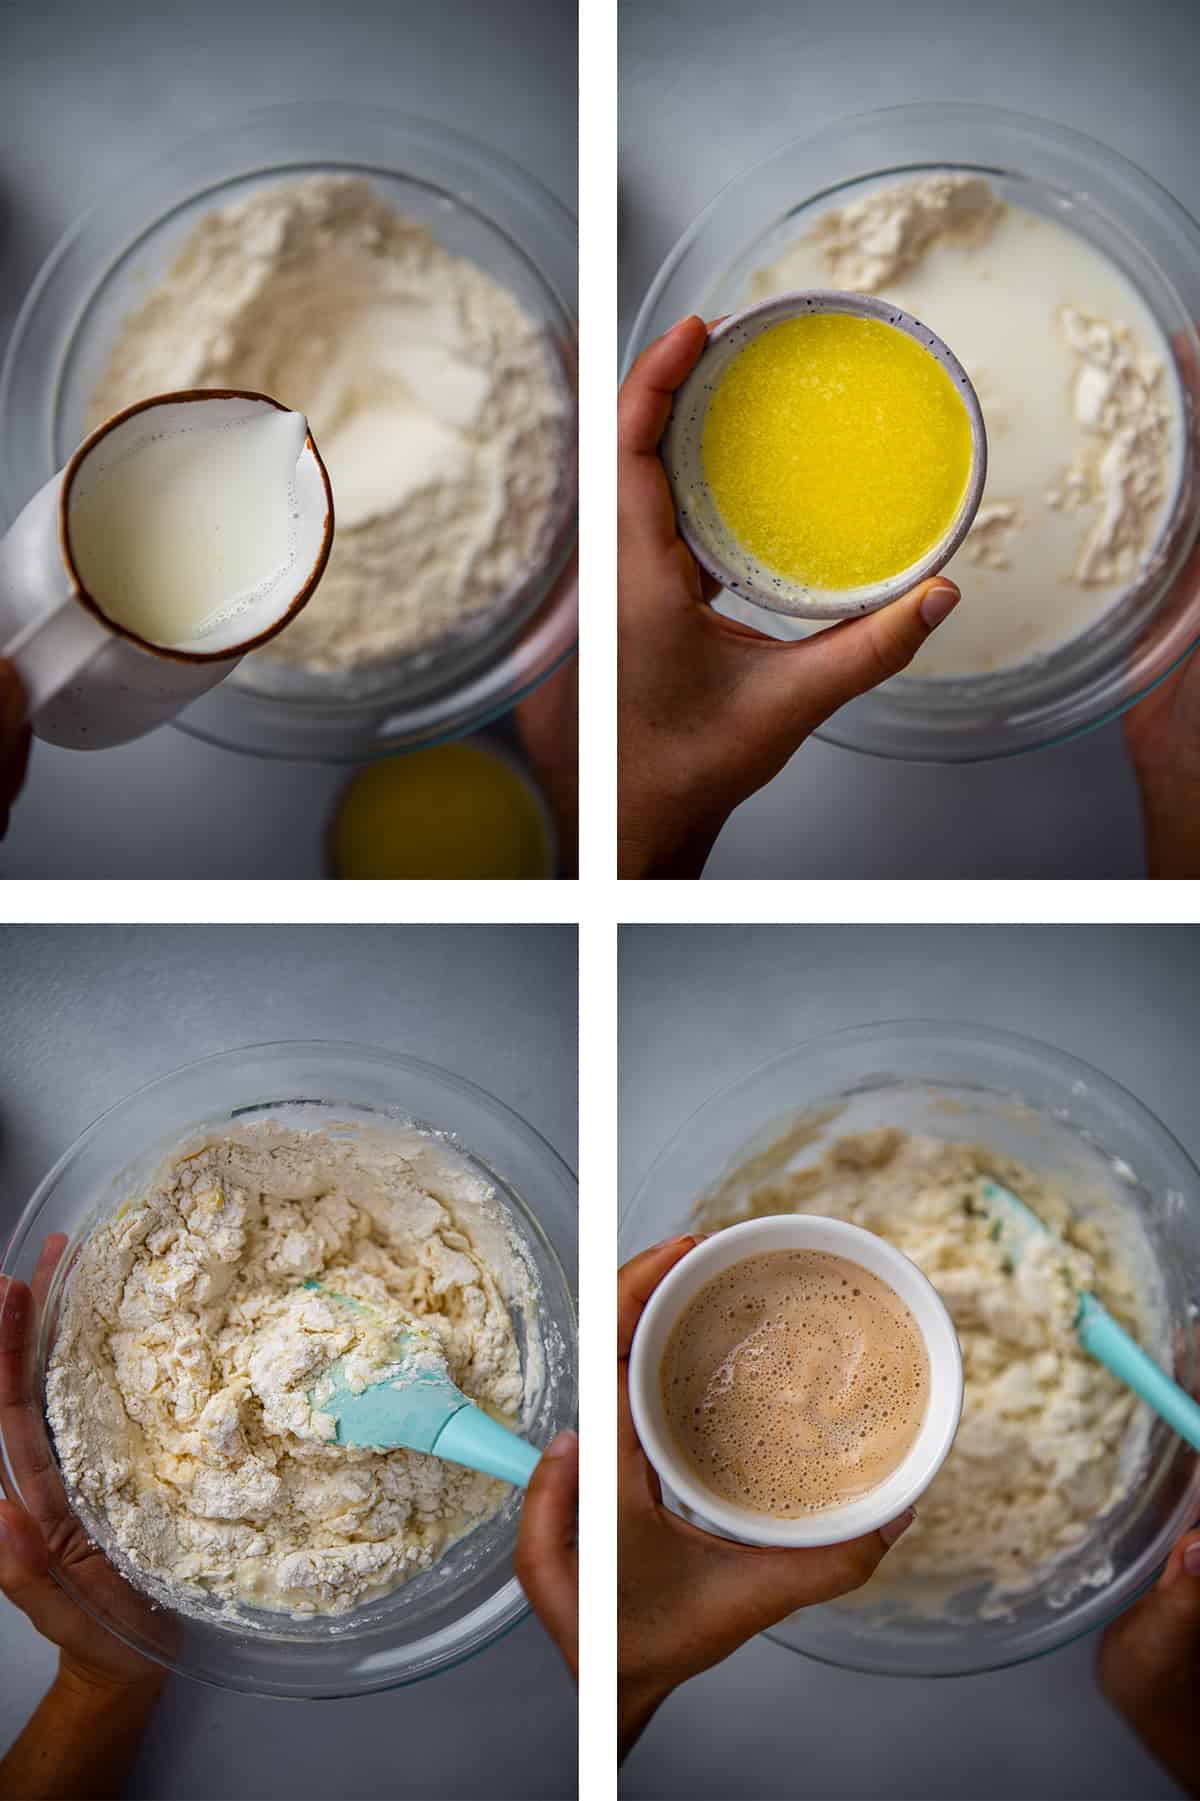
In a separate bowl, mix the flour and salt, then add warm milk and melted butter. Pour in the yeast mixture and bring everything together into a sticky but smooth dough.
Knead it briefly and let it rise in a greased bowl until doubled. Once it’s puffed up, punch it down and divide into 12 pieces. Roll each one into a ball and place them in a baking pan.
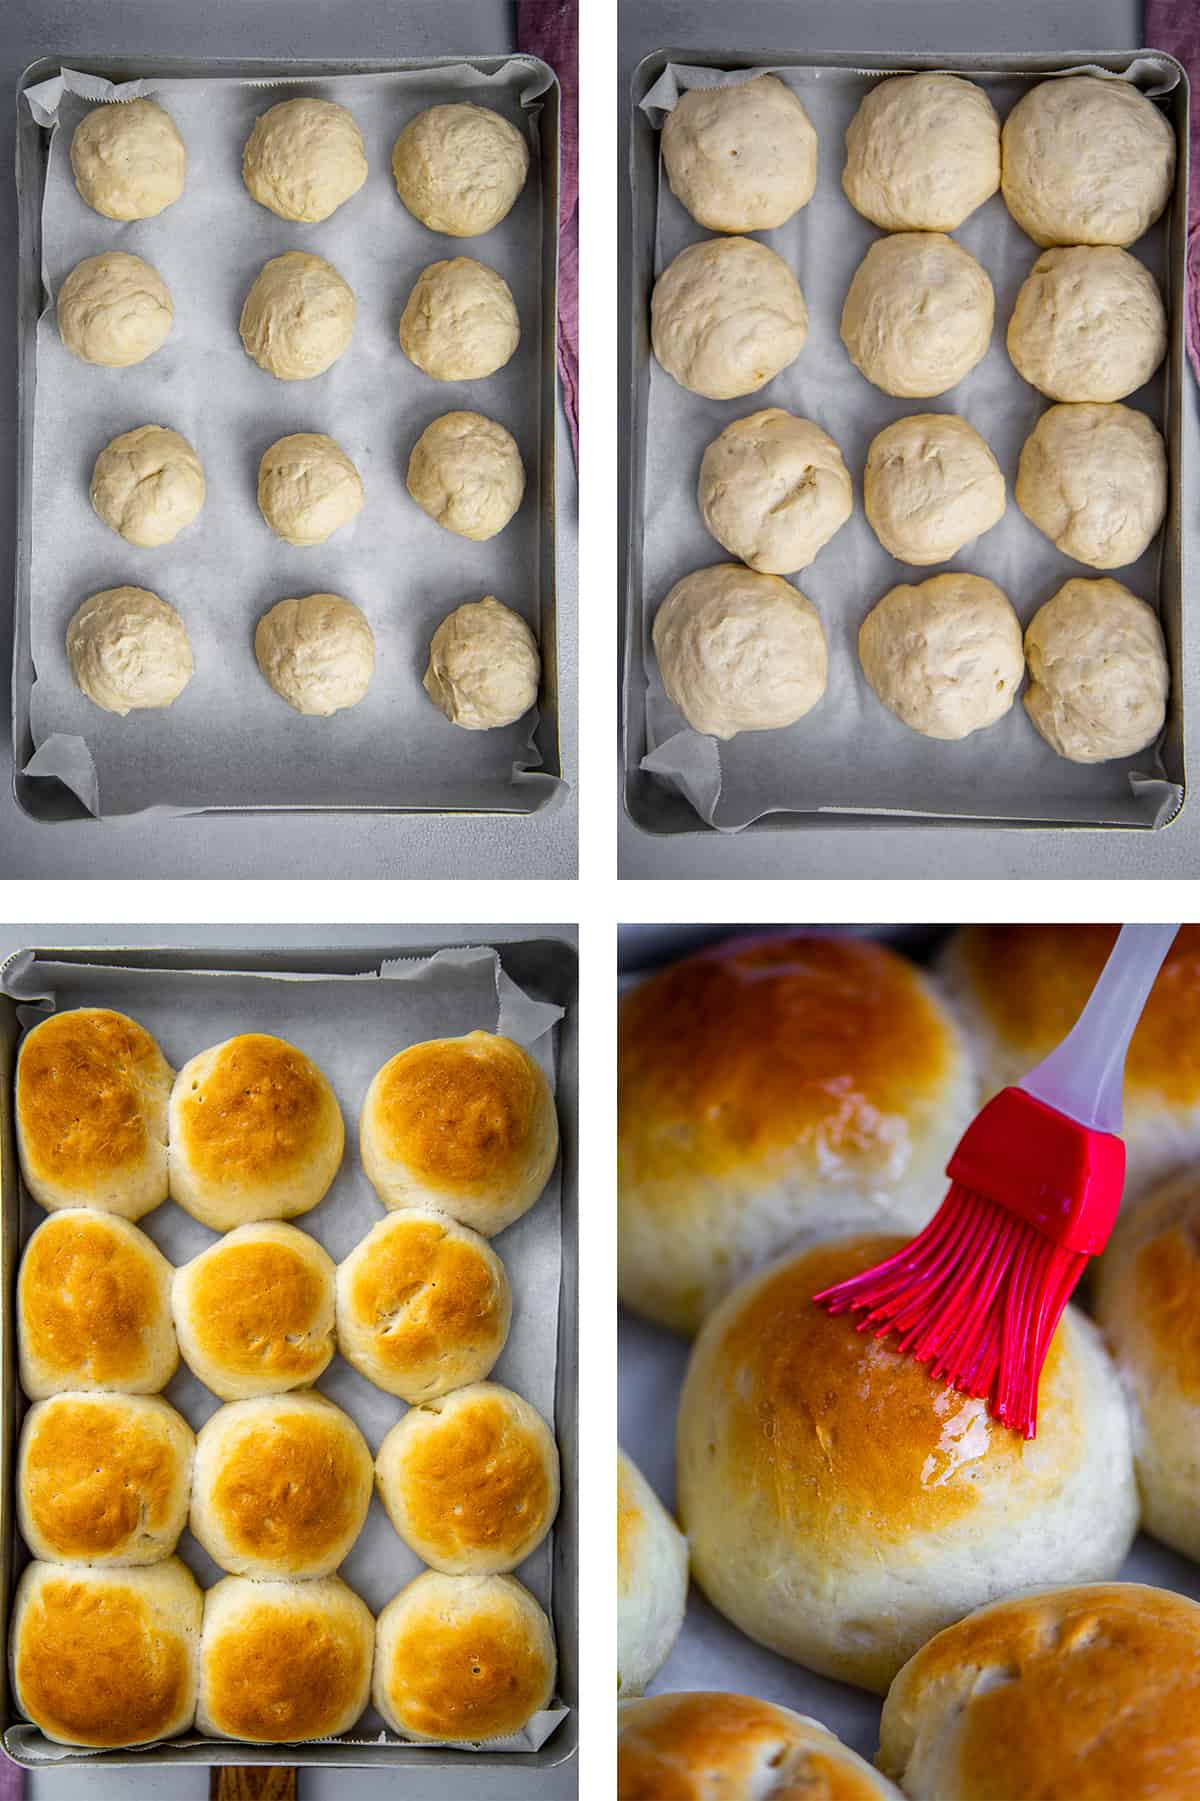
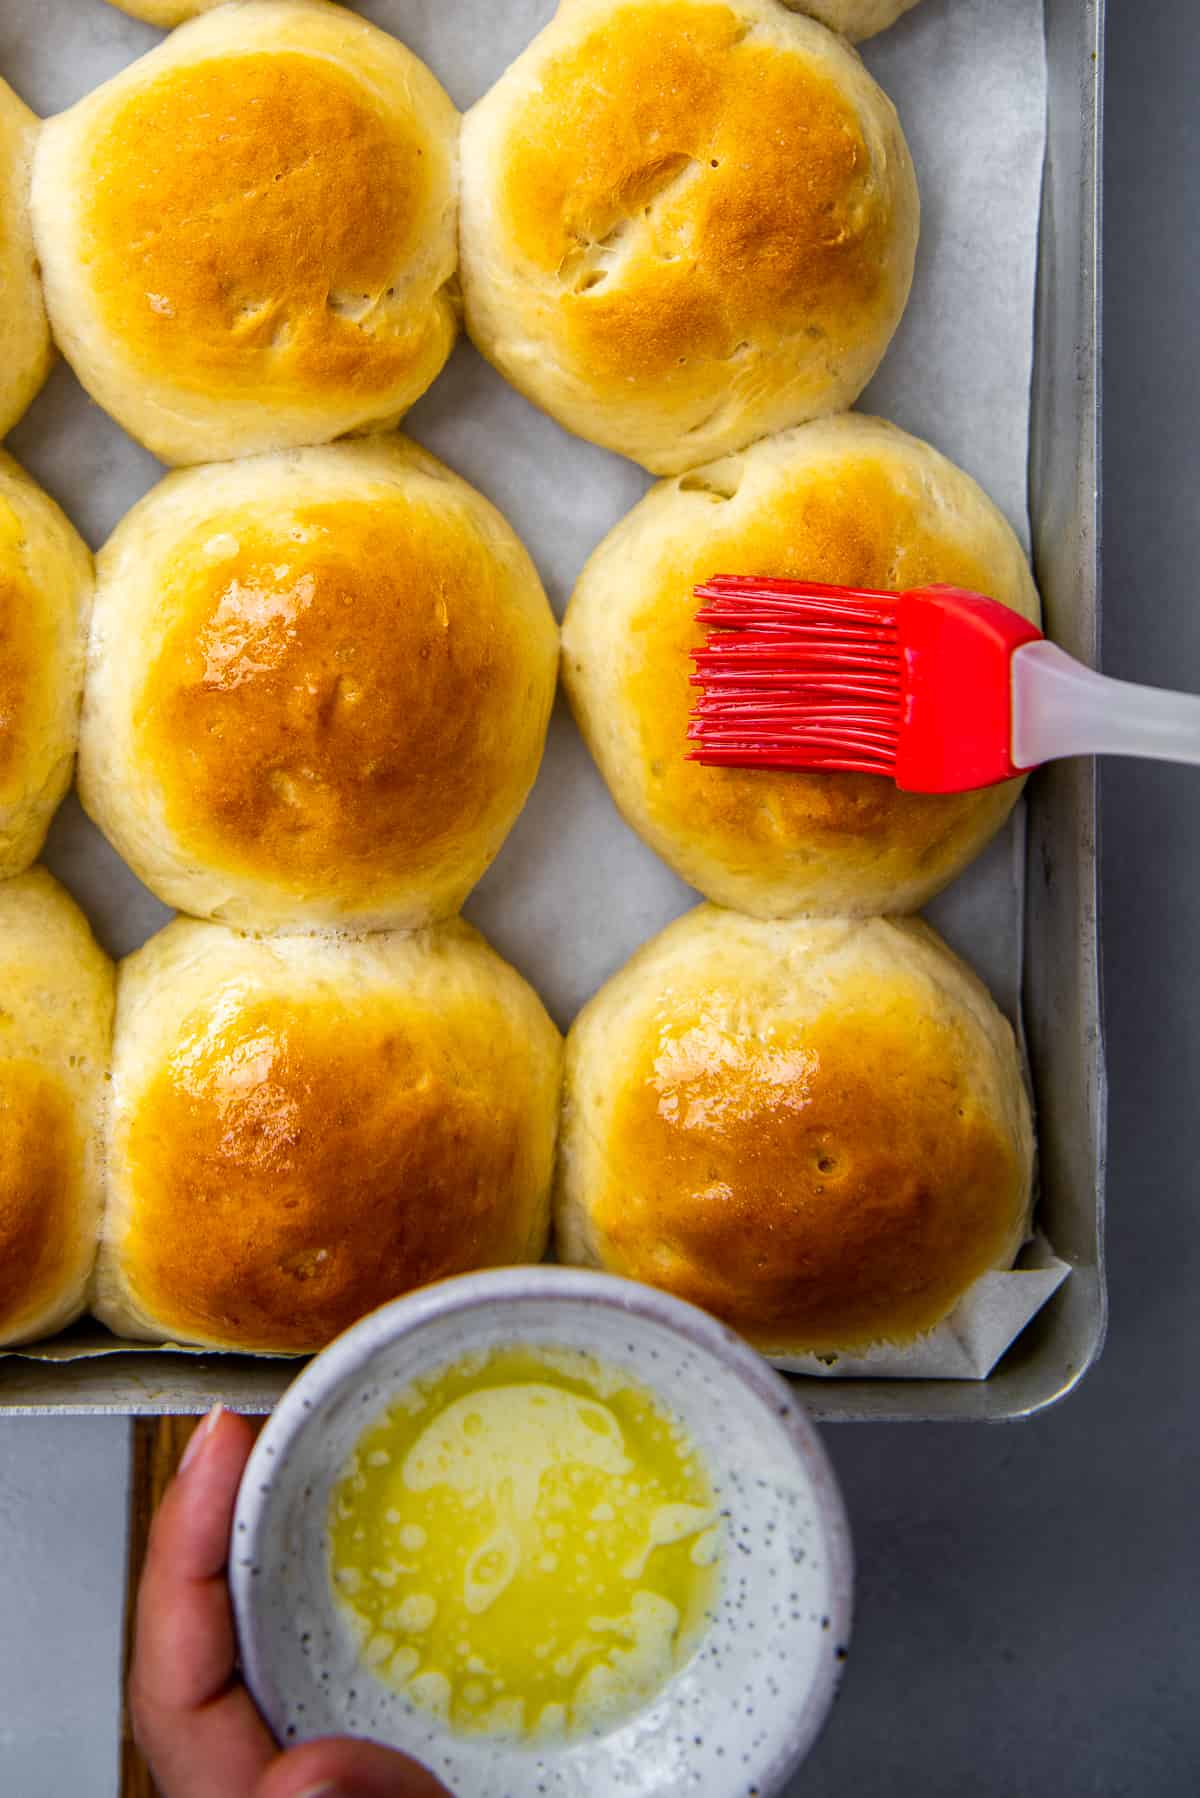
After a second rise, bake the rolls until golden. Finish by brushing them with melted butter for that perfect soft top.
Let the Dough Rise Properly!
To get soft and fluffy homemade bread rolls with yeast, it’s important to let the dough rise the right way.
Keep it warm. If your kitchen is cold, turn your oven on for a minute, turn it off, then place the dough inside.
Cover the bowl with a clean towel or plastic wrap to cover the bowl. This keeps the dough from drying out.
Wait until it doubles. This usually takes around 1 hour.
Don’t move it around. Leave the bowl in one place, away from cold air or wind.
Check if it’s ready. Press the dough gently with your finger. If the mark stays, it’s ready.
Let the Dough Rise Twice!
For the softest and fluffiest homemade bread rolls with yeast, don’t skip the second rise. It really makes a big difference.
After shaping the dough into rolls and placing them in the baking pan, let them rest again before baking. This second rise helps the rolls get bigger, lighter, and softer. It also makes sure they bake evenly and keep their nice round shape.
If you skip this step, the rolls can turn out dense and flat, not what you want after all that effort!
Our Tips for the Softest Homemade Bread Rolls
When making homemade bread rolls with yeast, it's important to pay attention to a few key details:
- Warm Ingredients: Make sure all ingredients, like milk and water, are lukewarm or at room temperature. Yeast works best in a warm environment.
- Dough Consistency: The dough shouldn't be too hard or too soft. Aim for a balance to ensure it rises properly.
- Allow Enough Rising Time: Give the dough enough time to rise. This is crucial for light, fluffy rolls.
- Right Environment for Rising: Place the dough in a warm, draft-free spot. Avoid cool or cold areas, like a balcony, and keep windows closed in cold weather. If it's too cold, the dough won't rise well.
- Punch Down After First Rise: After the dough has risen once, punch it down. This releases any gas from the yeast and relaxes the gluten, improving the texture of your rolls.
Storing & Reheating
To keep your homemade dinner rolls fresh and delicious, proper storage and reheating methods are essential. Here’s how to do it:
Storing:
- Cool Completely: Allow the rolls to cool completely at room temperature before storing. Storing them while still warm can lead to moisture buildup and sogginess.
- Airtight Container or Plastic Bag: Place the cooled rolls in an airtight container or a resealable plastic bag. This helps to maintain their moisture and freshness.
- Room Temperature Storage: For short-term storage (2-3 days), keep them at room temperature. Avoid direct sunlight and keep them in a cool, dry place.
- Refrigerating: If you need to store them for up to a week, place them in the refrigerator. This slows down the staling process.
- Freezing for Long-Term Storage: For longer storage, wrap the rolls individually in plastic wrap and then place them in a freezer-safe bag or container. They can be stored in the freezer for up to 3 months.
Reheating:
- Thawing: If frozen, let the rolls thaw at room temperature before reheating.
- Reheating: Preheat your oven to 300°F (150°C). Place the rolls on a baking sheet and cover them with foil to prevent them from drying out. Heat for about 5-8 minutes or until they are warm throughout.
Can I Freeze Them Before Baking?
Yes, you can freeze these homemade bread rolls before baking.
After shaping the rolls, place them on a baking sheet and freeze until solid. Then, transfer them to a freezer-safe bag or container.
When you're ready to bake, thaw them at room temperature, let them complete the second rise, and then bake as directed.
Serving Suggestions
Homemade bread rolls are a great addition to any meal. Here are some serving suggestions to make the most out of these soft, fluffy bread buns:

- Classic Butter Spread: Serve your homemade bread rolls warm with a side of butter. The simple combination of fresh bread and soft butter is always a crowd-pleaser. They are great with honey butter as well.
- With Soups and Stews: They are the best when served with soups like Roasted Garlic Tomato Soup, Carrot Tomato Soup, Tomato Rice Soup or Unstuffed Cabbage Soup. Use your fresh bread rolls to soak up the delicious flavors of hearty dishes like Meatball Stew.
- Sandwiches: Transform the bread rolls into mini sandwich sliders. They are ideal for small bites filled with chicken salad, Turkish döner, or your choice of deli meats and cheeses like feta cheese or grilled halloumi.
- Breakfast or Brunch: Serve them at breakfast or brunch with jams (like our orange jam), jellies, or honey. Pair them with eggs, bacon, or sausage for a complete meal.
- Dinner Side Dish: Accompany a main course like Unstuffed Cabbage Casserole, Turkish Beef Stew, or Baked Whole Sea Bass with these rolls.
- Holiday Meals: These buttery rolls are a must-have for holiday dinners like Rice Stuffed Chicken.
Variations
Experimenting with different variations can add exciting flavors and textures to your homemade yeast bread rolls. Here are some creative ideas to try:
- Herb Rolls: Add herbs like rosemary, thyme, parsley or dill to the dough for a fragrant twist. This works great with savory meals.
- Cheese Rolls: Incorporate shredded cheese, such as cheddar or mozzarella, into the dough or sprinkle it on top before baking for cheesy, gooey rolls.
- Seed-Topped Rolls: Before baking, brush the rolls with an egg wash and sprinkle with seeds like sesame, poppy, or sunflower seeds for added crunch and nutrition.
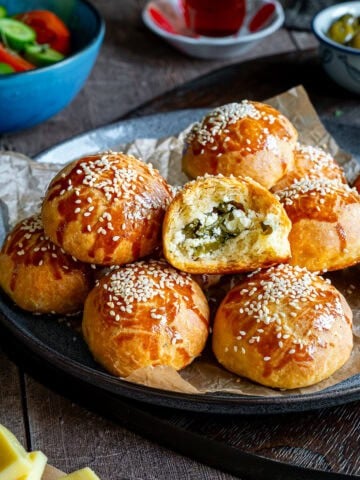
- Stuffed Rolls: Similar to our Turkish pogaca, before shaping, fill portions of the dough with fillings like cheese.
Frequently Asked Questions
Dinner rolls should be stored in plastic bags or wrapped in foil. Also, it is important that they should be stored at room temperature, not in the fridge because they will become dry in the fridge.
There might be a few reasons for this. Did you knead your dough long enough? Or did you let it rise long enough? These are important.
Your dough might have too much salt in it or the content of the flour you use might have little protein. Or maybe you left your dough to rise in a place that was too hot and it killed your yeast.
Again there might be several reasons behind it. Here are some important points to be careful about:
Make sure your yeast is good. It should be stored in refrigerator and it should not be too old.
The water you use to make your dough should not be too hot. Too hot water kills the yeast. Too cold water is not good for the yeast either.
Make sure you give the dough enough time to rise. It should rise to a double size.
Kneading for about 10 minutes is mostly enough. At the end of this duration, your dough should hold its shape. get smooth and slightly sticky. Plus, you can make a poke test. Poke that ball of of dough with your finger firmly. If it fills back quickly, it is well kneaded. If it doesn’t fill back, keep kneading.+
Dough is loose and tears easily when it is under kneaded. Keep kneading until it holds the shape and doesn’t tear easily.
If dough is dense and tough, it is over kneaded. This dough will not easily rise, so keep the rising time a bit longer.
Yes! It would be way easier for you. Use a dough hook attachment and make the dough in your stand mixer.
More Bread Recipes
Our cheese stuffed Turkish pogaca are usually on high demand at gatherings. But when we want something plain but as good, we go for these yeast bread rolls. And below is a list of bread recipes that we often make:
- Ramazan Pidesi (Turkish Pide Bread)
- Cornmeal Bread without Flour
- Bazlama Bread
- No Yeast Bread
- Lavash Bread
You Might Also Like

Sign up for the FREE Give Recipe Newsletter to get the new recipes into your inbox!
And stay in touch with us on Facebook, Pinterest, YouTube and Instagram for all the latest updates.
📖 Recipe

Homemade Bread Rolls With Yeast
INGREDIENTS
- ¼ cup lukewarm water
- 2¼ teaspoon instant yeast
- 1 tablespoon sugar
- 3½ cup all purpose flour
- 1 teaspoon salt
- 1¼ cup lukewarm milk
- ¼ cup melted butter
Optional Topping:
- 1 tablespoon melted butter
INSTRUCTIONS
- To make the yeast mixture, whisk together warm water, instant yeast and sugar in a small bowl. Wait for 5 minutes. Although this step is not necessary for this type of yeast and you can just whisk it together with flour, we find it works even better when mixed together with warm water first.
- In a large bowl, combine flour, salt, milk and butter. Pour the proofed yeast in the large mixture.
- Combine everything using your hands. Knead it with your hands right in the bowl. Wet your fingers with a little water occasionally so that the dough doesn't stick. Keep kneading until you have a smooth but slightly sticky dough.
- Transfer the dough into a large bowl that is slightly greased (not just the bottom, all the sides inside). Cover with a clean kitchen towel or plastic wrap and let it sit at room temperature for 1 hour to rise.
- When the dough doubles in size, punch it down to release the air.
- Transfer the dough on the slightly floured counter and shape it into a log. Cut it into 12 pieces.
- Preheat oven to 375 F / 190 C.
- Roll each into a ball and place them in a 9 x 13 inch (23 x 33 cm) baking pan that is lined with parchment paper. Cover them with a clean kitchen towel or plastic wrap and let them rise, at least for 40 minutes.
- Bake the rolls for 15-20 minutes or until golden.
- Remove from the oven and brush each with melted butter and let them cool for about 10 minutes before serving.
- Keep the leftover rolls tightly covered at room temperature for 2-3 days or in the refrigerator up to 1 week.
NOTES
- Combine Ingredients in Mixer: Place the flour and salt in the bowl of your stand mixer. Add the warm milk and melted butter to the flour mixture. Pour the proofed yeast mixture over these ingredients.
- Mixing the Dough: Attach the dough hook or paddle attachment to your stand mixer. Set the mixer to a low speed and beat the mixture until the dough starts to come together. You'll notice the dough beginning to pull away from the sides of the bowl.
- Knead in the Mixer: Continue beating the dough for 1-2 minutes at the same low speed. The goal is to achieve a smooth and slightly sticky dough.
- To make the yeast rolls sweeter: You can add extra 3 tablespoons of sugar in the flour and salt mixture if you want your dinner rolls to be sweeter.
- Temperature Matters: Ensure all ingredients, especially liquids, are at the right temperature – warm, but not too hot, to activate the yeast without killing it.
- Quality of Yeast: Check the expiration date of your yeast. Fresh, active yeast is vital for a good rise.
- Gentle Kneading: Knead the dough enough to develop gluten, which gives the rolls their structure, but avoid over-kneading which can lead to tough rolls.
- Proper Rising Time: Allow the dough to rise until it doubles in size. Rushing this process can affect the texture and flavor of the rolls. Don't skip the step of second rise.
- Avoid Drafts During Rising: Keep the dough in a warm, draft-free area while it's rising. Temperature consistency is key to a good rise.
- Don’t Overbake: Keep an eye on the rolls as they bake to prevent overbaking, which can dry them out and make them hard.
NUTRITION
Nutrition information is automatically calculated, so should only be used as an approximation.
Clive says
Oven temperature is that for a fan oven?
Zerrin & Yusuf says
This is for a fan assisted oven.
CYNTHIA CHIMBLO says
Thanks YUSUF, Made these for Thanksgiving yesterday. Big hit. I used 408 grams of Gold Medal Bread flour plus another 45gm for kneading. Baked up beautifully golden and tender on inside. It's a keeper.
Zerrin & Yusuf says
Hi Cynthia,
So happy to hear that you enjoyed these rolls for Thanksgiving! Thanks for sharing which flour you used, it will definitely be helpful for others.
Cheers!
Elaine says
This recipe is great! I reference it often when I want to make bread :). A tip if you're trying it yourself, I find 3.5 - 4 cups of flour works better than 3.
Zerrin & Yusuf says
Hi Elanie,
So happy to hear that you love this dinner roll recipe as much as we do. It is one of our go-to bread recipes.
Thanks for the tip! We always make these with the given measurements, but the type of flour might make a difference.
Cheers!
Carmen says
These look delicious. Can I freeze the dough? At what point do I freeze it?
Tracy Godfrey says
Omg these were so good... just starting trying to make my own breads etc and I will defiantly be using this recipe again. Thank you for a great recipe
Yusuf says
Hi Tracy,
So happy to hear that you loved these rolls. These are our favorite too, especially with butter and some cheese 🙂
Thanks for the feedback!
DeaMaree says
I have attempted these rolls twice. Both times the 3 cups flour was not enough for the dough to come together. Added flour until dough pulled away from sides of bowl (using stand mixer and dough hook). First time, it took almost a whole additional cup and the rolls were dense and crumbly. Second time I added less extra flour, but am afraid the extra flour and extra “knead” time will effect the texture again. Why will my dough not come together with the ingredients as lists?
Yusuf says
The dough should still be slightly sticky when all the ingredients are combined together. You might have to add a little extra flour, but a whole additional cup is definitely too much. What kind of flour are you using?
Mary Ann says
Hi my name is Mary Ann. Rolls made today for first time. I made in bread machine on dough cycle. Dough perfect.Rolls beautiful. My husband said these rolls taste like his beloved Mother’s rolls. I will make this recipe replacing many roll recipes that I have made in the past. Delicious, beautiful rolls and the rolls look like I bought from a Bakery. Thank you.
Yusuf says
Hi Mary Ann! So happy to hear that you and your husband loved the rolls! Thank you so much for your feedback!
Anne says
I made these rolls today and they turned out so good! I just added a little more sugar because I wanted it sweeter. Kids spread nutella in the center and I spread butter when they were still warm. YUM! Thank you for the recipe!