Homemade phyllo dough, also known as filo dough or phyllo pastry, is easier to make than you might think. No professional baking skills required! With a handful of basic ingredients, a touch of patience, and our easy-to-follow guide, you'll be whipping up your own ultra-thin filo sheets in your own kitchen.
You've seen us use phyllo dough in lots of our recipes. And the most loved ones on the blog are our Turkish borek and our baklava recipe. Sure, it's easy to just buy it from the store, but what about making it at home?
Many people think learning how to make phyllo dough sheets is too tough, but we're here to prove that's not true. With our simple, step-by-step guide, you'll see how doable it is.
What Is Phyllo Dough?
Phyllo dough is also known as filo dough, phyllo pastry, filo pastry or baklava dough. It is a simple yet unique ingredient widely used in baking. You can easily find it at the freezer section of supermarkets. Athens Foods, Fillo Factory, Apollo and Jus-Rol (UK) are the most famous filo brands.
The word 'phyllo' or 'filo' is derived from the Greek word, which means 'leaf', and it perfectly describes how thin the leaf-like layers are.
Phyllo dough is a staple in many types of cuisines, but it's particularly famous in Mediterranean and Middle Eastern dishes.

It's basically made from a mixture of flour, salt and water. The variations of it might have olive oil, vinegar and egg. It's then skillfully rolled or stretched into paper-thin sheets. These sheets, when used in baking, create deliciously light, flaky, and crisp textures.
From sweet desserts like baklava to savory dishes like the famous Greek spinach and cheese pie called spanakopita or Turkish spinach and cheese borek, phyllo dough has a crucial role.
Layers of phyllo give these traditional dishes their signature flaky and crunchy exterior. And you can always get creative about the fillings.
So, if you enjoy phyllo recipes and love a bit of a baking challenge, give this homemade phyllo dough recipe a try!
Phyllo Dough vs Puff Pastry
Are puff pastry and phyllo dough the same?
No, they are not! Some phyllo dough brands use the name phyllo pastry (or filo pastry) on their package. So phyllo dough and puff pastry might look similar. But they're actually quite different.
Phyllo dough is a thin, light pastry that you layer or fold to make dishes like baklava or spanakopita. It's usually brushed with oil or melted butter between the layers, which helps it cook up to be crispy and flaky.
On the other hand, puff pastry is a rich, buttery dough. It's made by folding dough and butter together over and over. When it's baked, the water in the butter turns into steam and puffs up the dough, creating many tender, flaky layers.
So phyllo dough can not be used as a substitute for puff pastry or vice versa.
Ingredients
In making homemade phyllo dough, each ingredient has a specific role to ensure you get that perfect thin and pliable pastry. Here are the key ingredients:
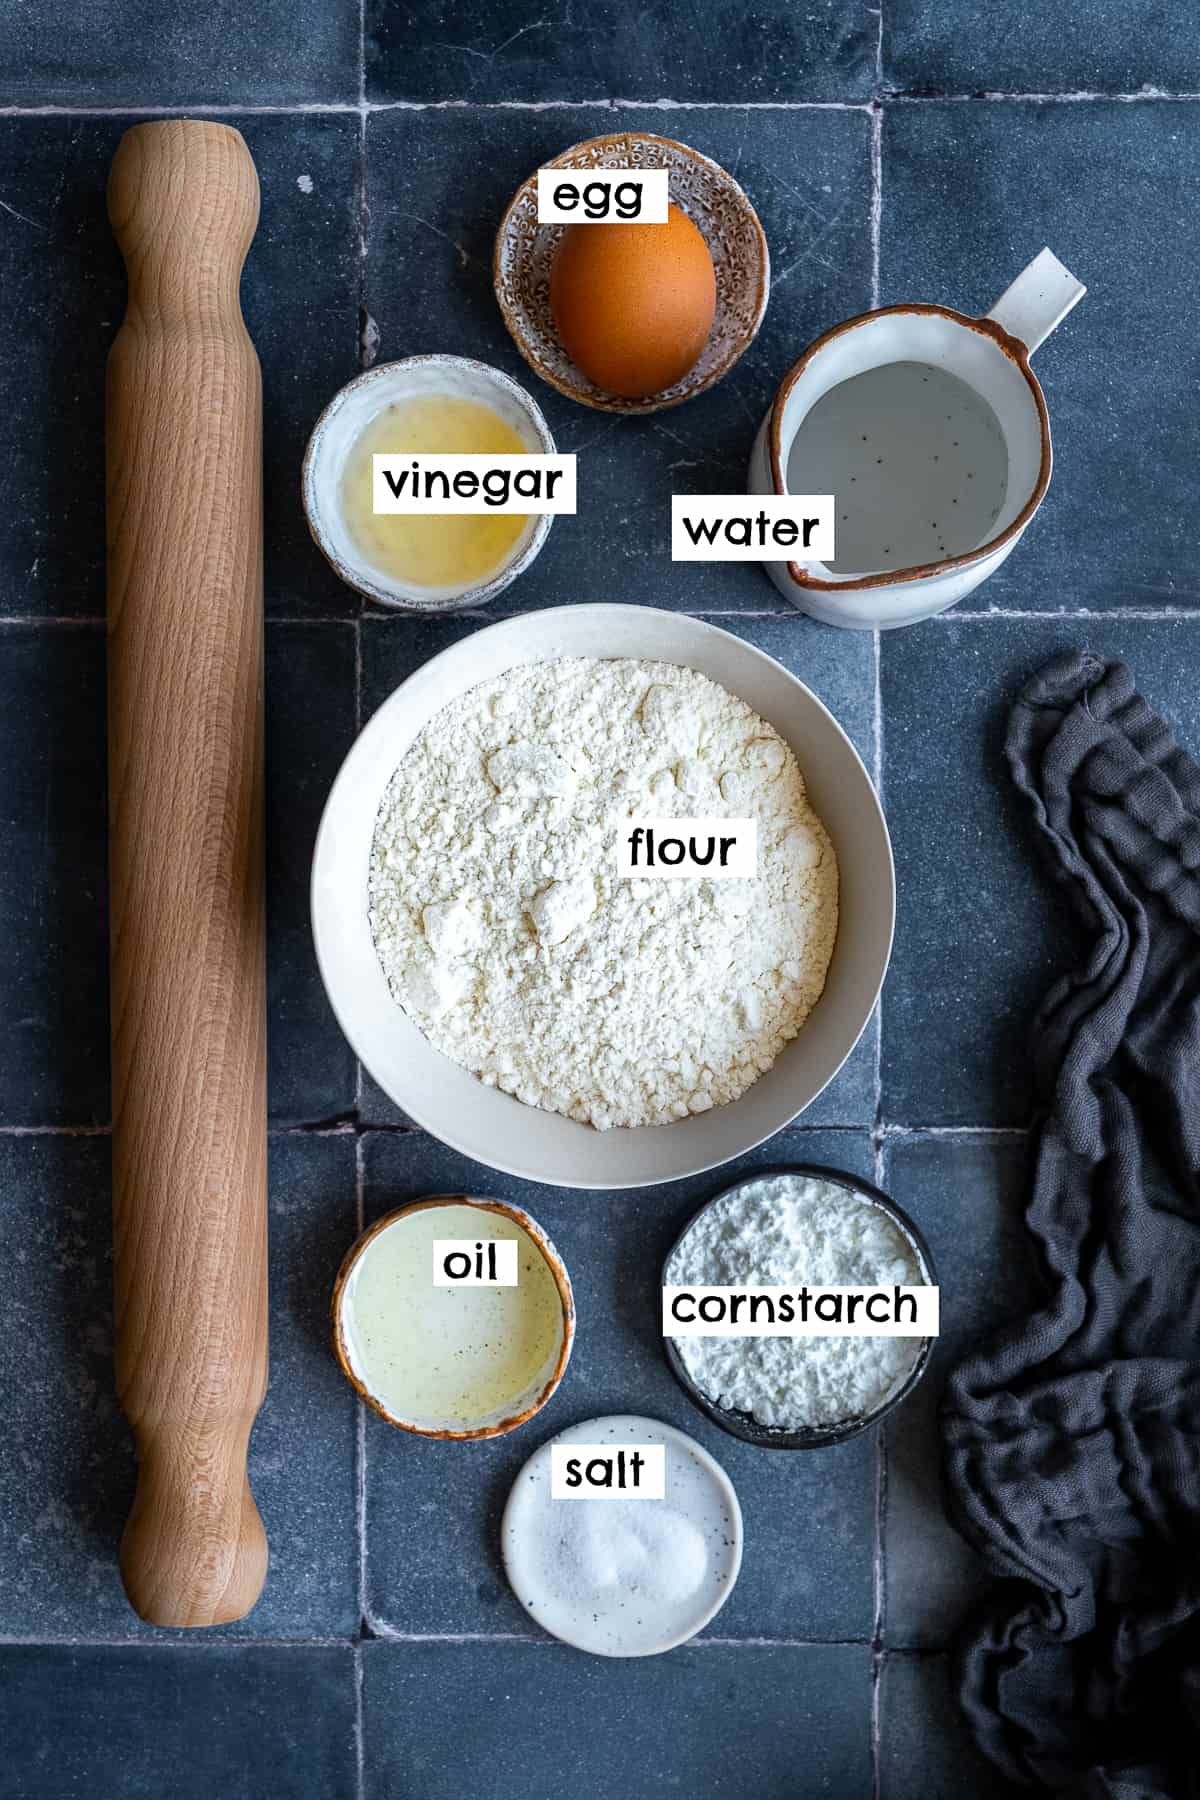
- Egg: This is an optional ingredient, but including an egg can make your dough firmer and easier to work with. If you prefer an egg-free version, you can just increase the amount of water ( 3 tablespoon of water for one medium egg).
- Water: Use it at room temperature.
- Vinegar: We use apple cider vinegar, but white vinegar or white wine vinegar works fine too. It helps the filo sheets get flaky when baked.
- Salt: Use fine salt.
- Flour: Use all-purpose flour creates a dough that's strong enough to be rolled out very thin without tearing, but also tender enough that your baked goods will have a pleasant texture. White bread flour works great too.
- Cornstarch: It is not mixed into the dough but used when rolling out your fresh phyllo sheets. It prevents the thin layers from sticking to each other.
- Oil: We use light olive oil or sun flower oil. It is brushed onto the circle dough layers as you stack and roll them out. This helps each layer to separate nicely. Thanks to oil, you get nice, super thin phyllo pastry sheets that won't tear.
Step-By-Step Instructions
Now that we've covered what phyllo dough is and what ingredients are in it, let's dive into the step-by-step process of making your own homemade phyllo dough sheets.
Make the Dough:
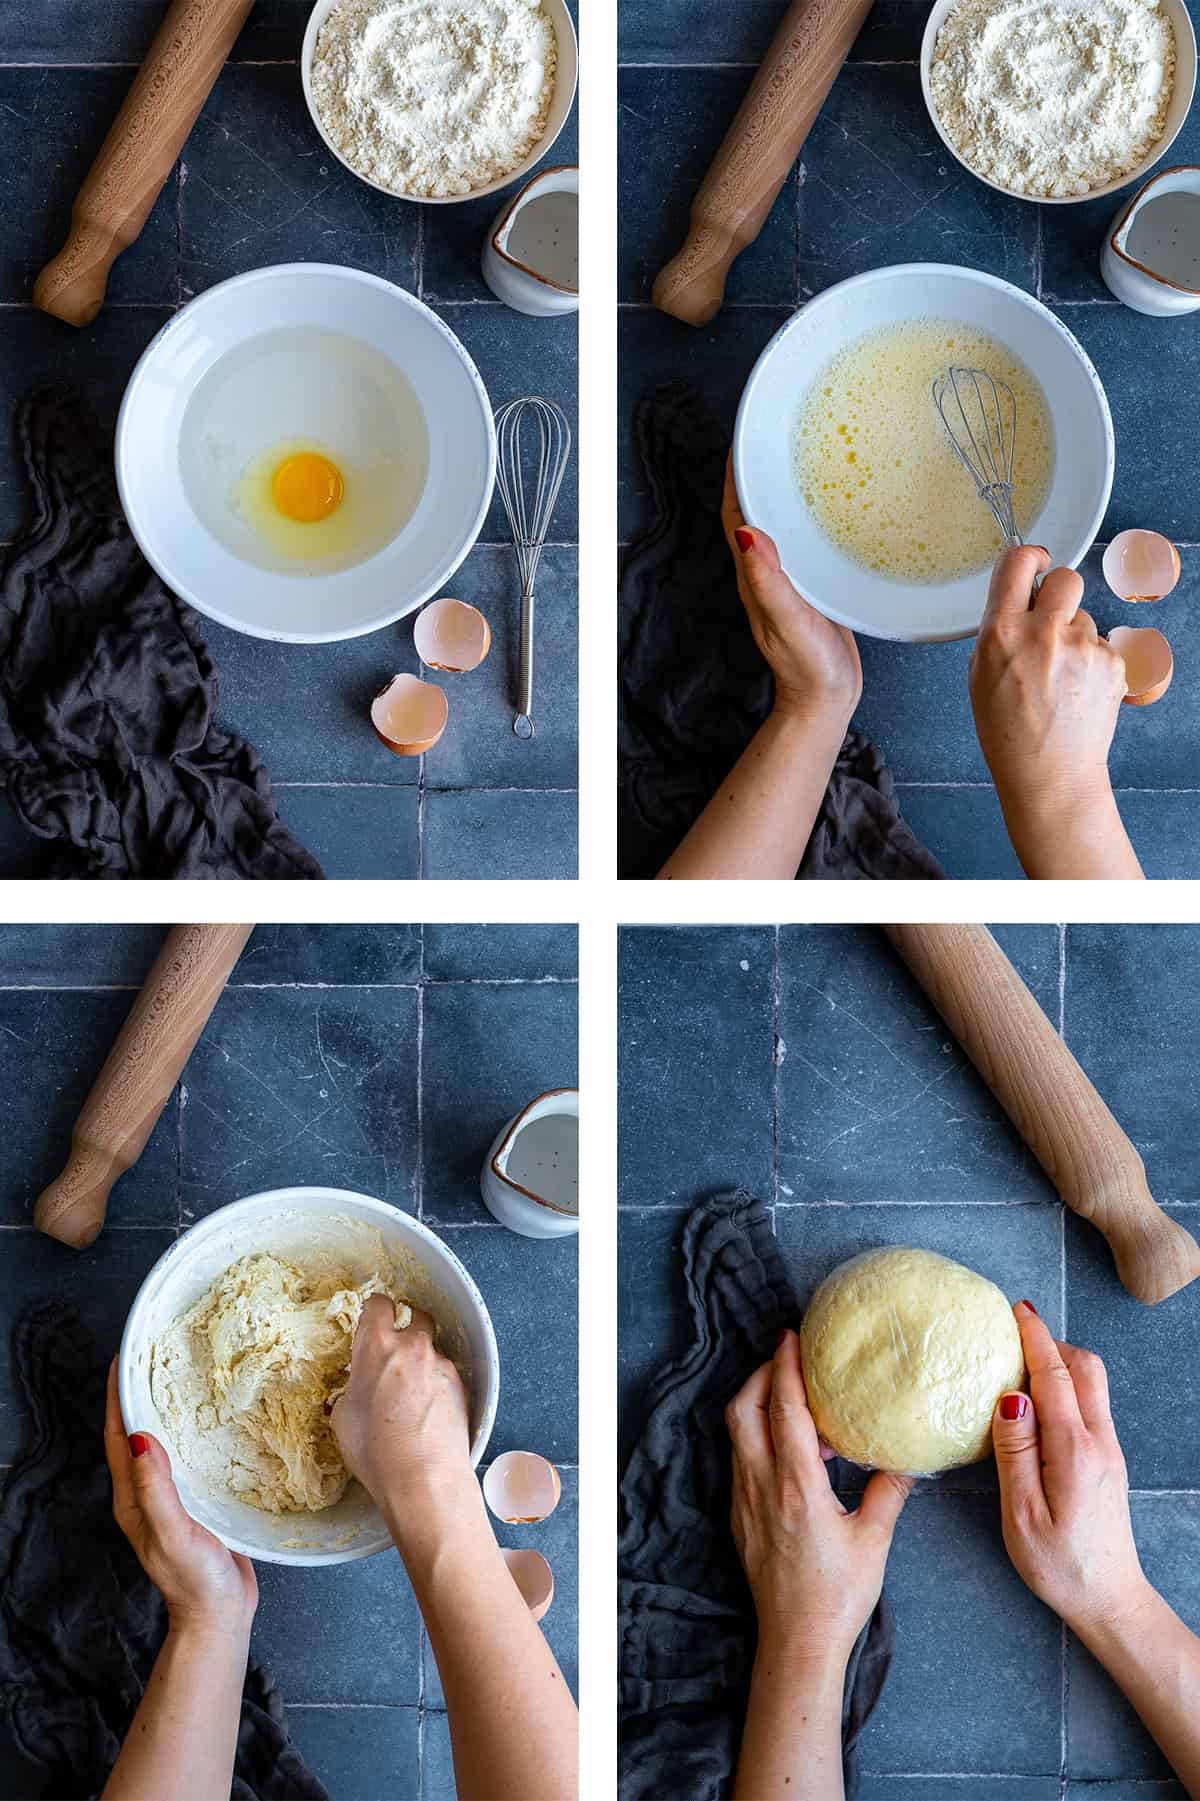
In a large bowl, combine egg, water, your choice of vinegar, and fine salt. Mix them together until everything is well combined. Now, add in your all-purpose flour. Start stirring the mixture with your hand until everything combines.
Knead and Rest The Dough:
Once your dough is formed, it's time to knead. You can do this right in your mixing bowl or on a lightly floured surface. Knead for about 5 minutes or until the dough is smooth.
Then, shape it into a ball, cover it with plastic wrap and let it rest for at least 30 minutes, ideally an hour. This resting time lets the gluten in the dough relax, making it easier to roll out later.
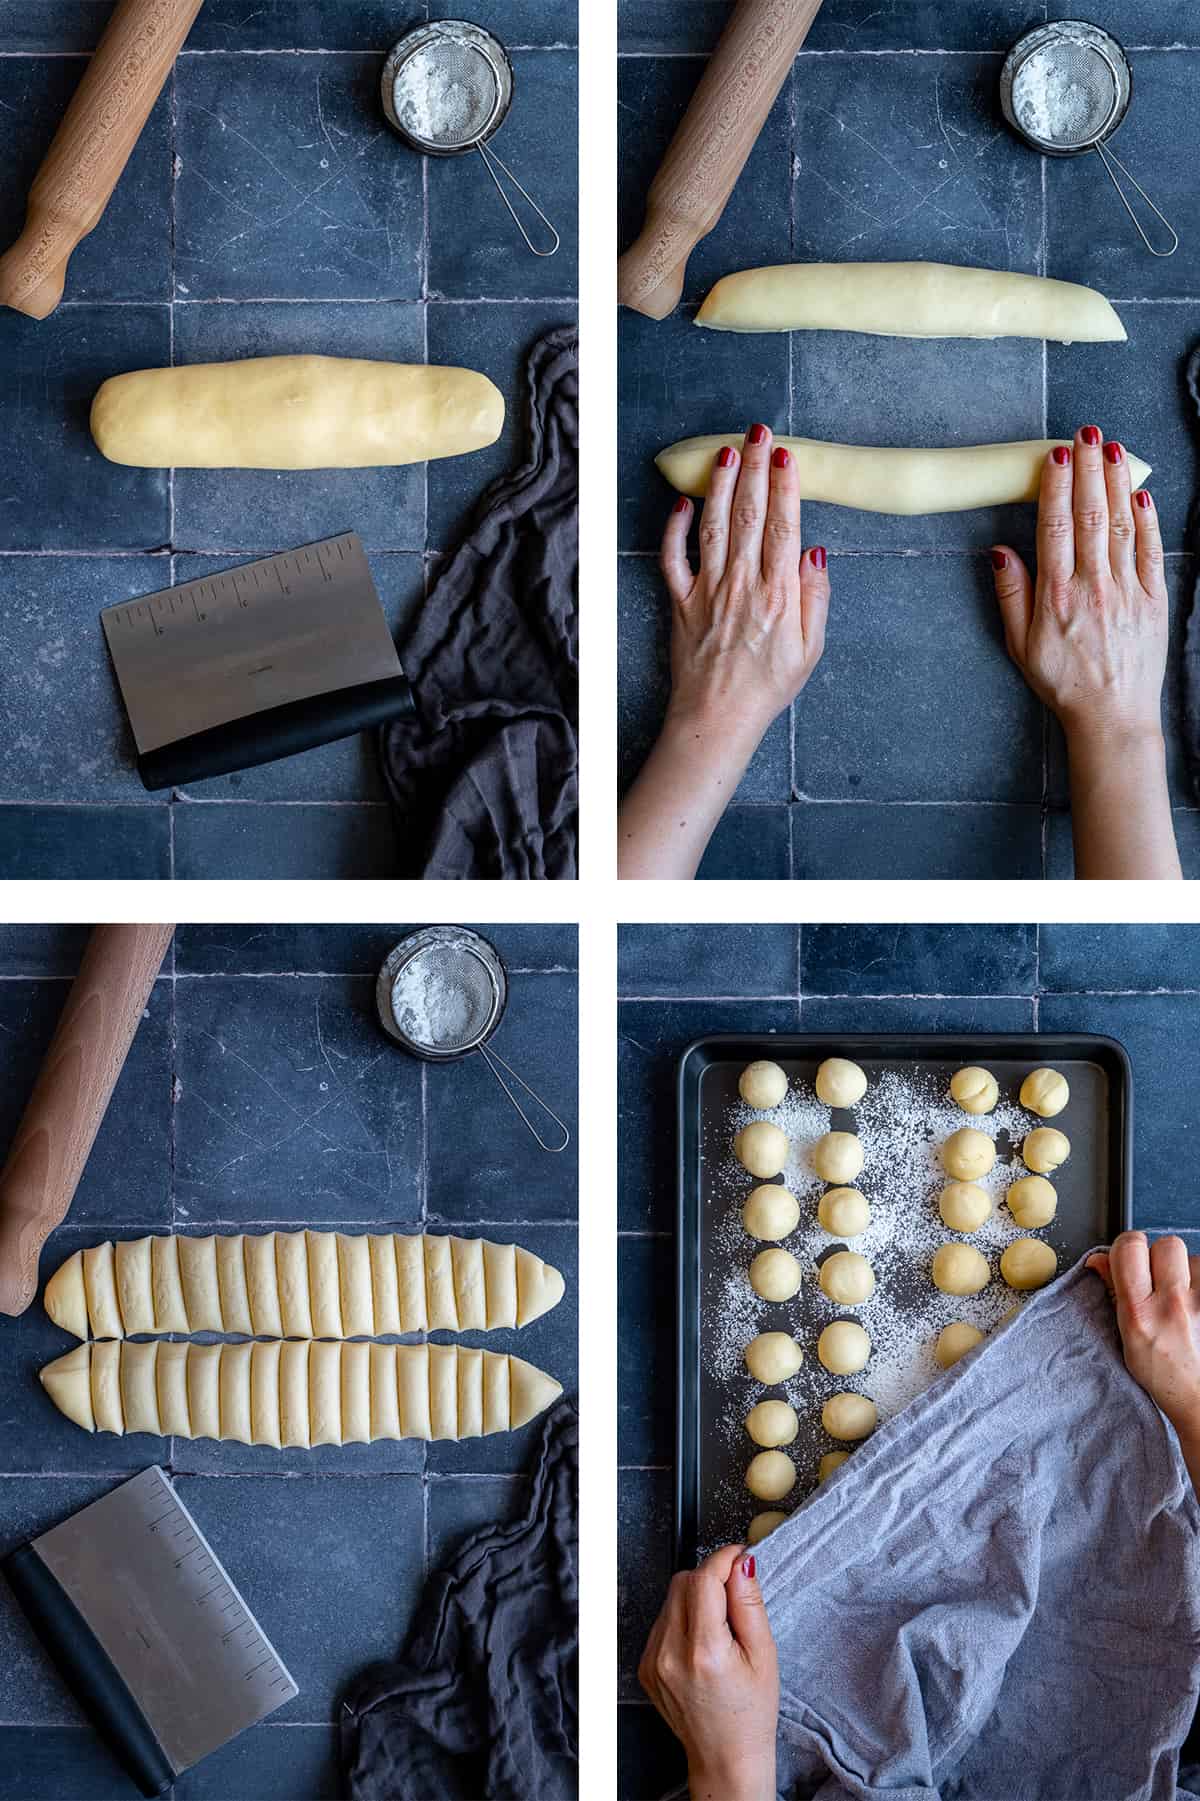
Portion the Dough:
After the dough has rested, roll it into a log shape and cut it vertically into two. Then, roll each half again into a log shape and cut each into 16 equal pieces.
You should end up with 32 dough pieces. Roll each piece into a ball and cover them to prevent drying out.
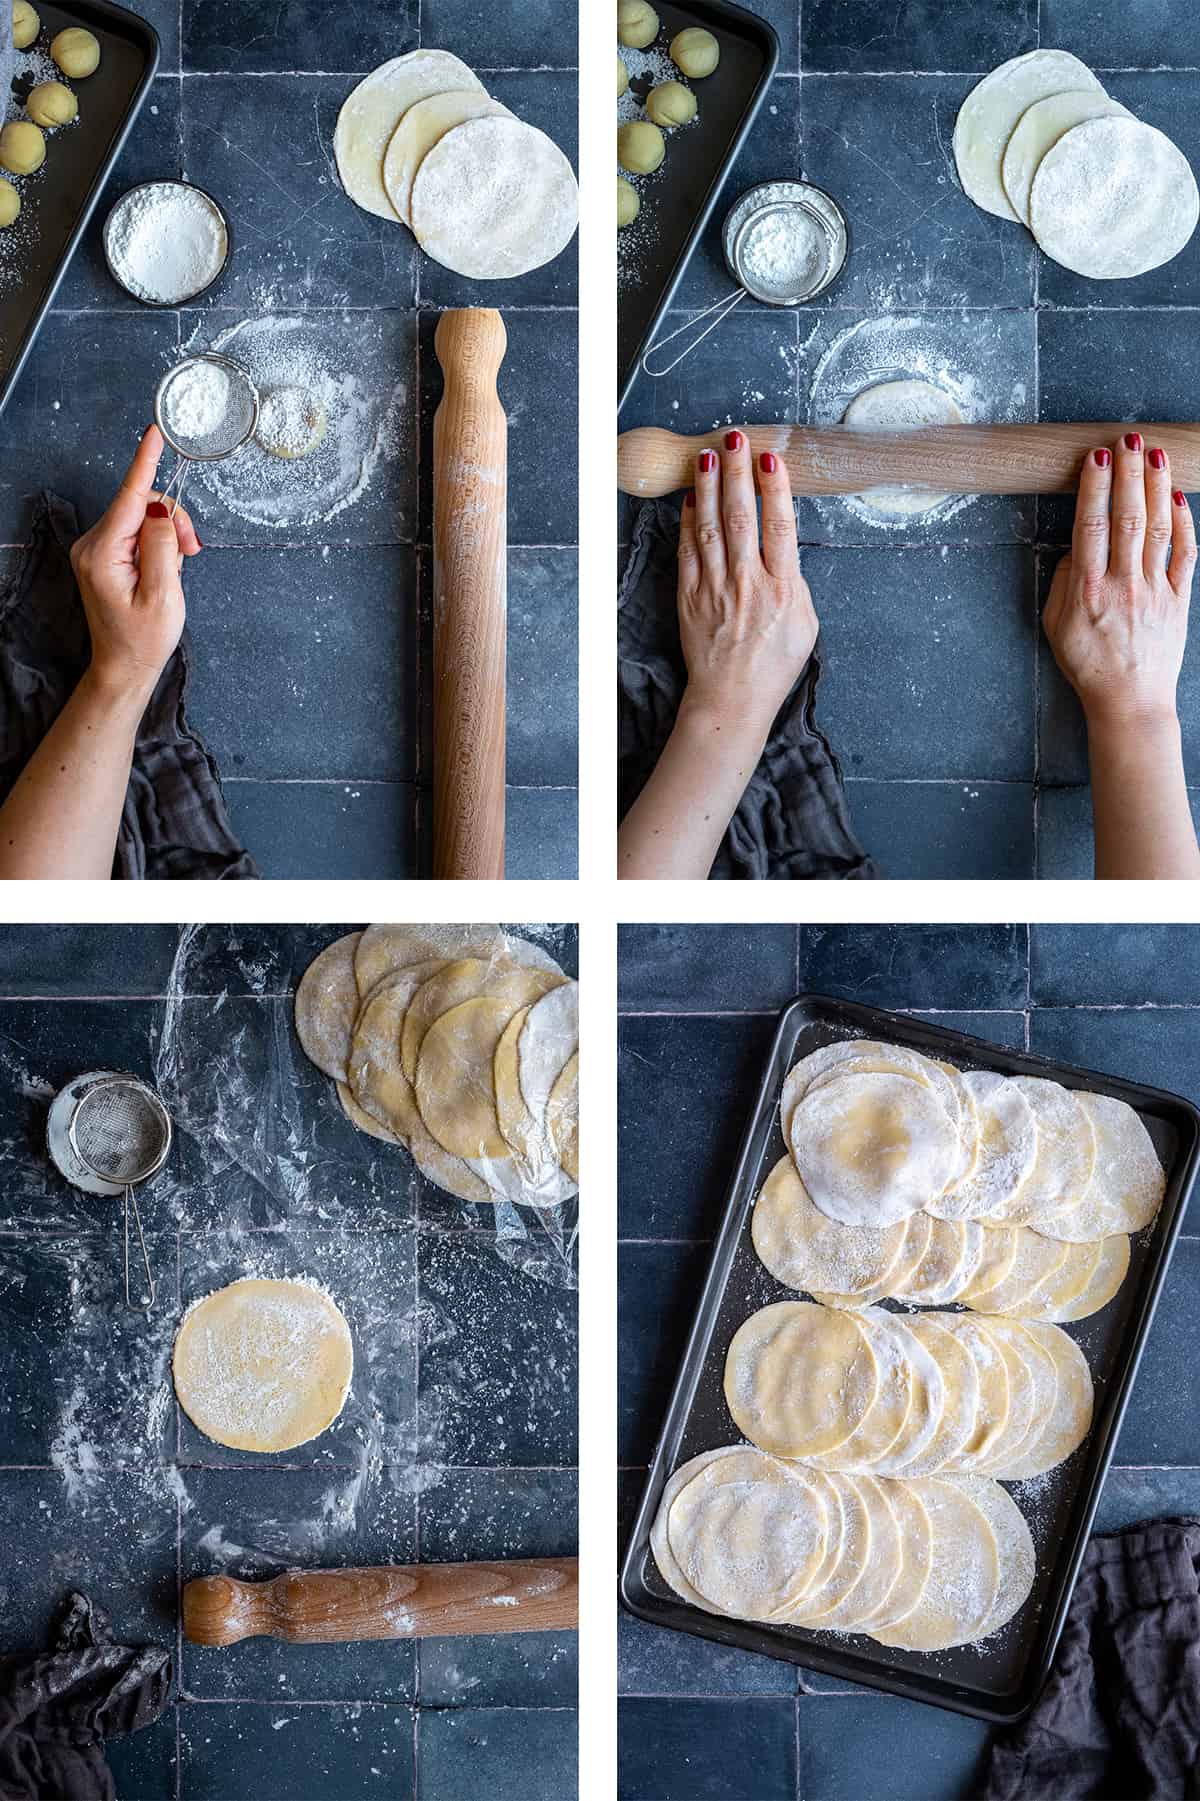
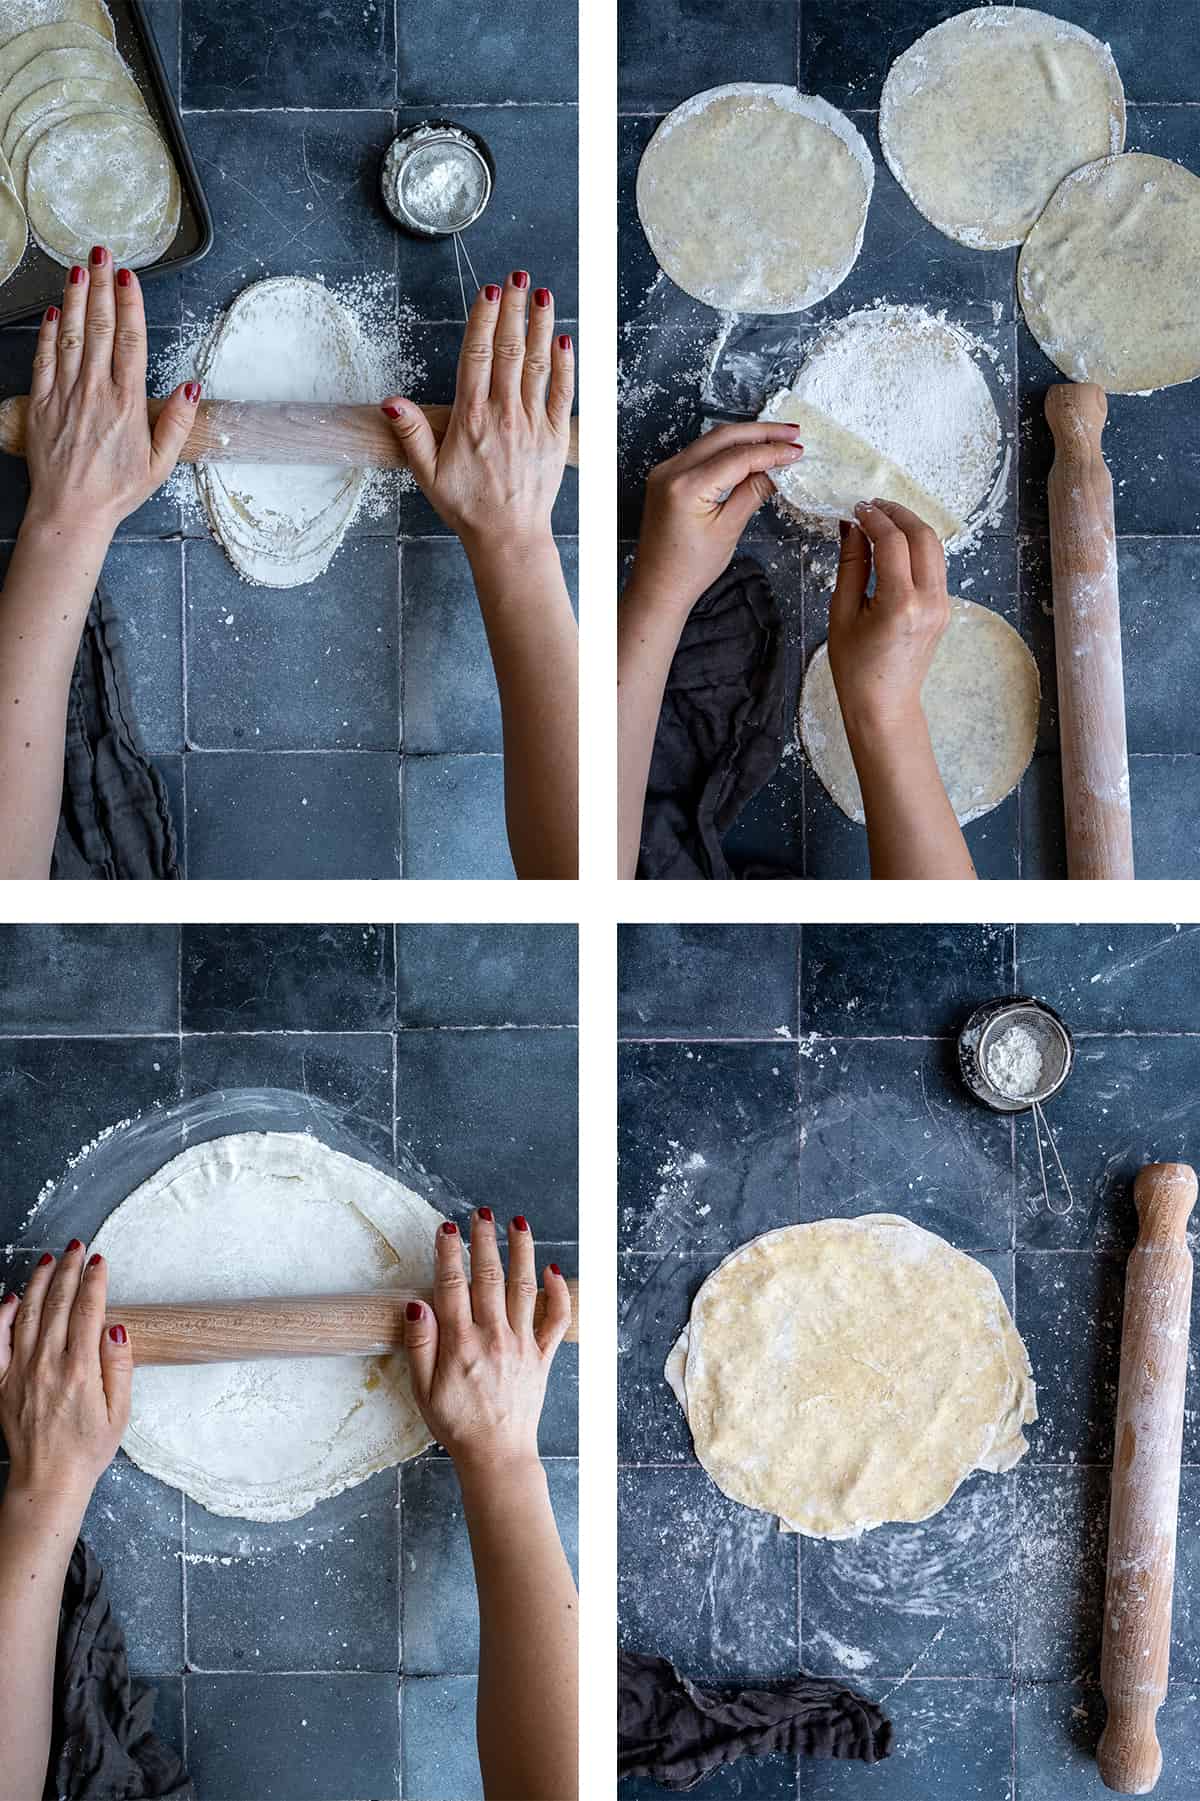
Roll the Dough into Small Circles:
Dust your work surface with cornstarch. Place a dough ball on the surface, gently flatten it with your hand, then sprinkle cornstarch on top of it.
Using a rolling pin, roll the dough into a small circle, about 4 inches / 10 cm in diameter. Cover each completed circle to prevent drying out as you work on the rest.
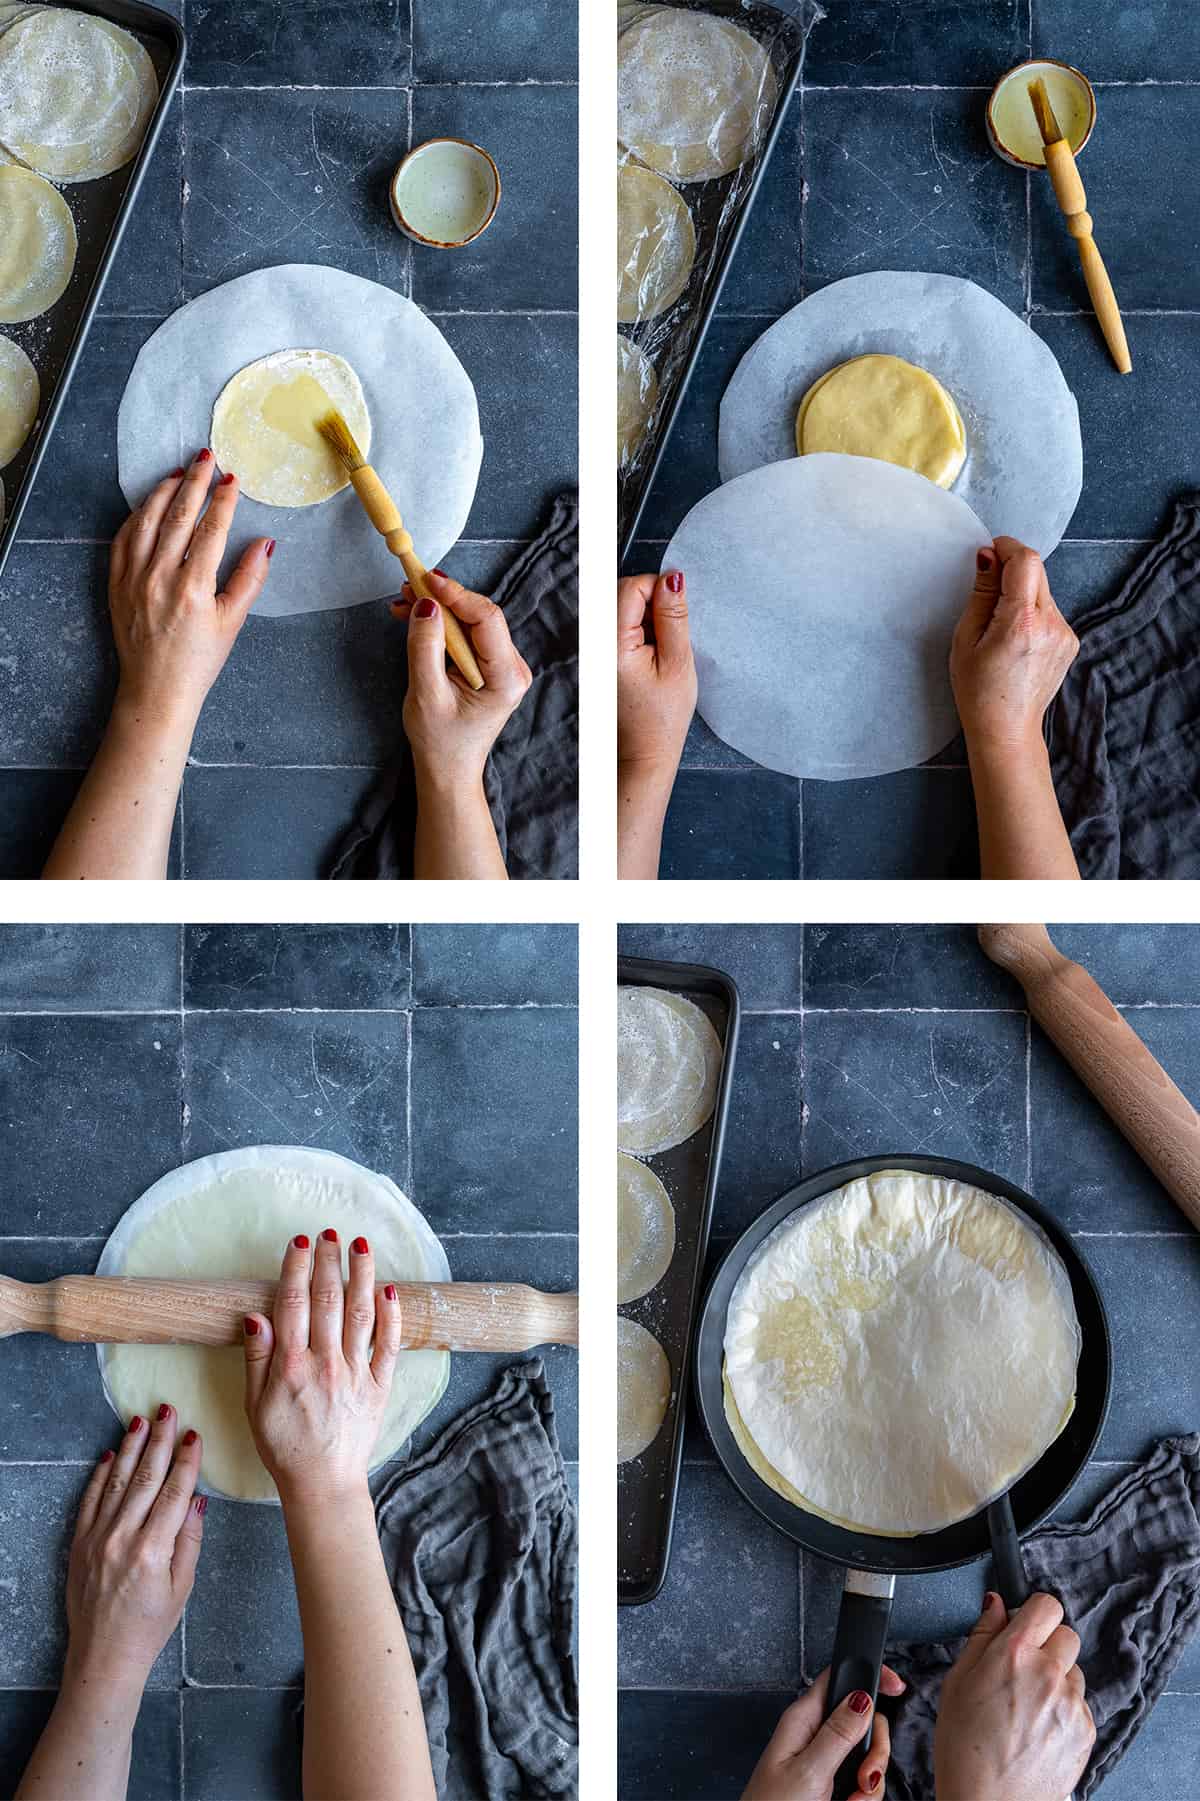
Roll the Dough into Larger Circles:
Prepare two pieces of baking paper cut to the size of the bottom of a non-stick pan. Put a small dough circle on one of the baking paper pieces. Brush both sides with oil. Then put three more dough circles, brushing oil between each layer.
Make sure to oil the top too. Put the second piece of baking paper on the top. Press gently on the stack a few times to secure the layers together, then roll out the stack into a larger circle the same size as your baking paper.
Partially Cook the Dough:
Heat a pan over medium-low heat. Place your rolled-out sheets of phyllo dough (still between the baking papers) in the pan and cook each side for about 15 seconds.
Repeat this process one more time. You're not trying to fully cook the dough here, just heat it enough to make the layers easier to separate.
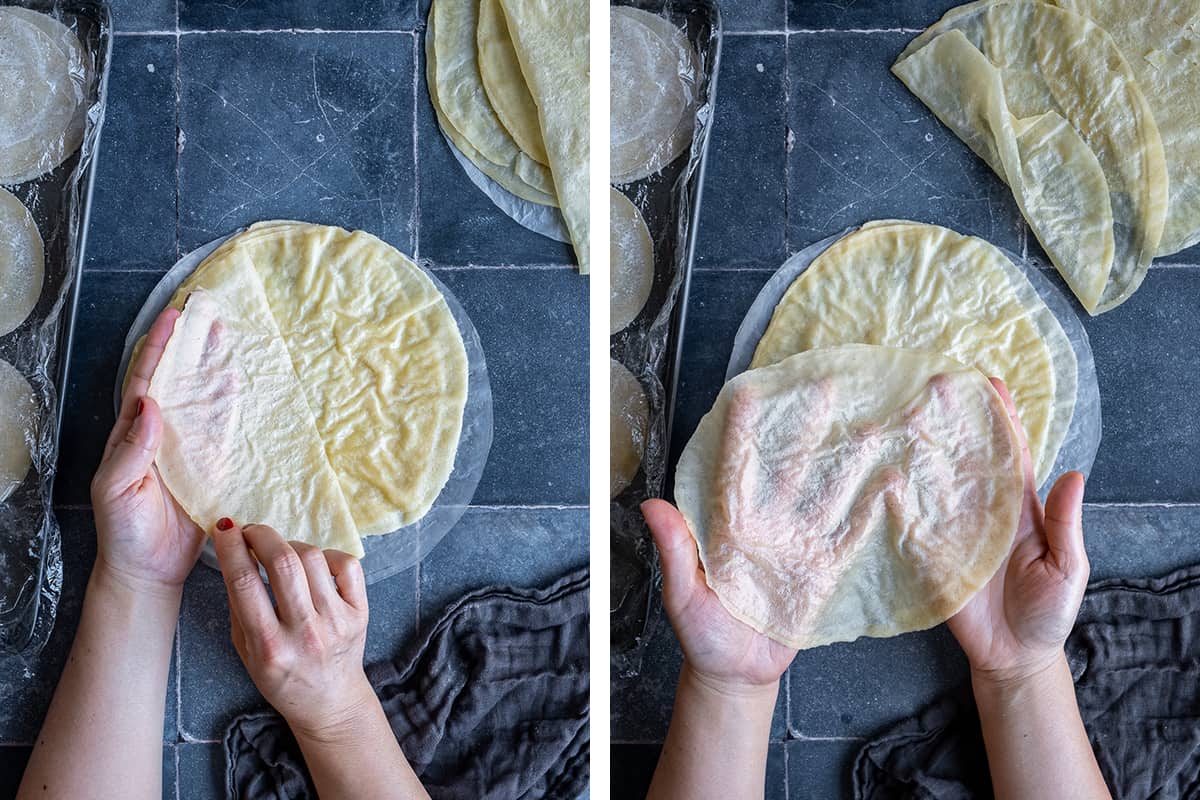
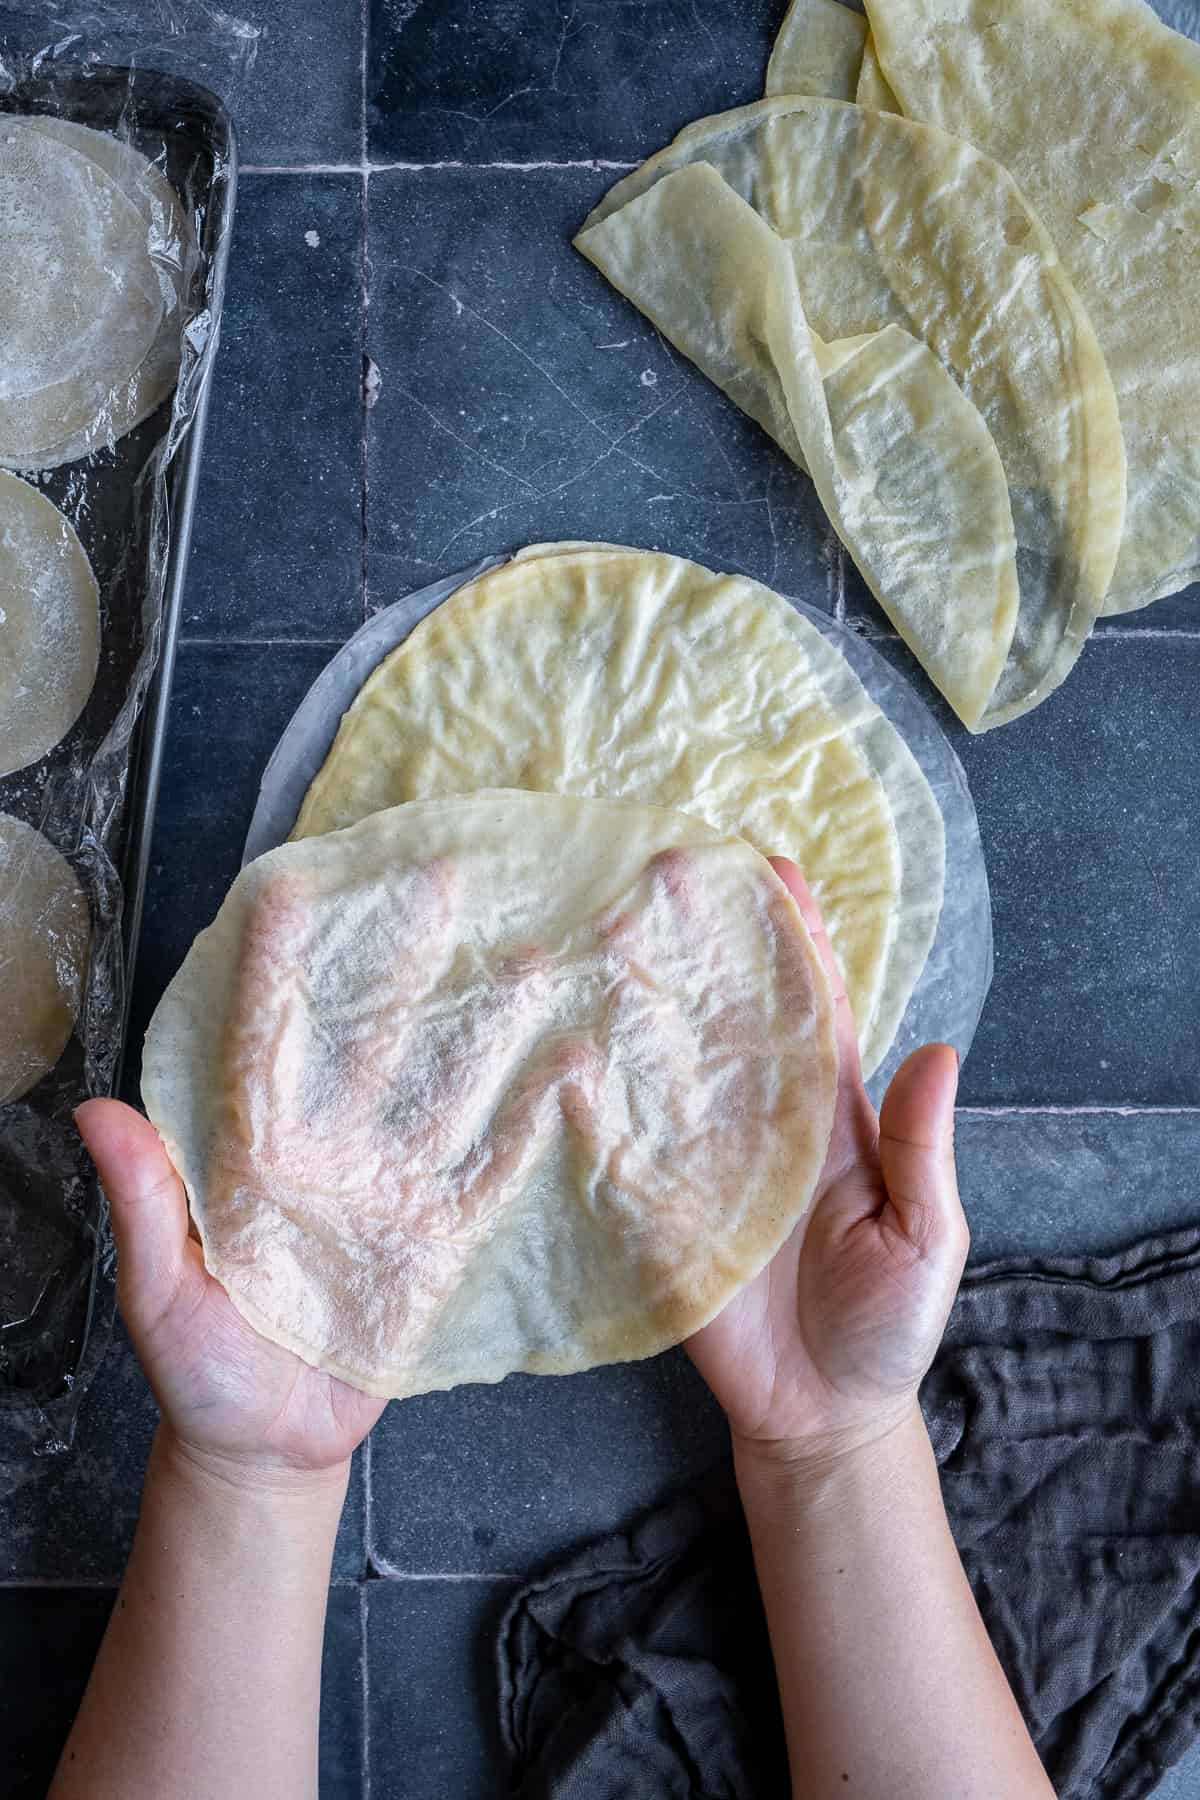
Separate the Layers:
Remove the heated dough from the pan and start separating the layers while they're still warm. Cover them immediately after separating to keep them from drying out. The filo sheets are ready to use.
Storage
Proper storage is key to keep your homemade phyllo dough fresh. If you're not going to use your phyllo dough right away, here's how to store it:
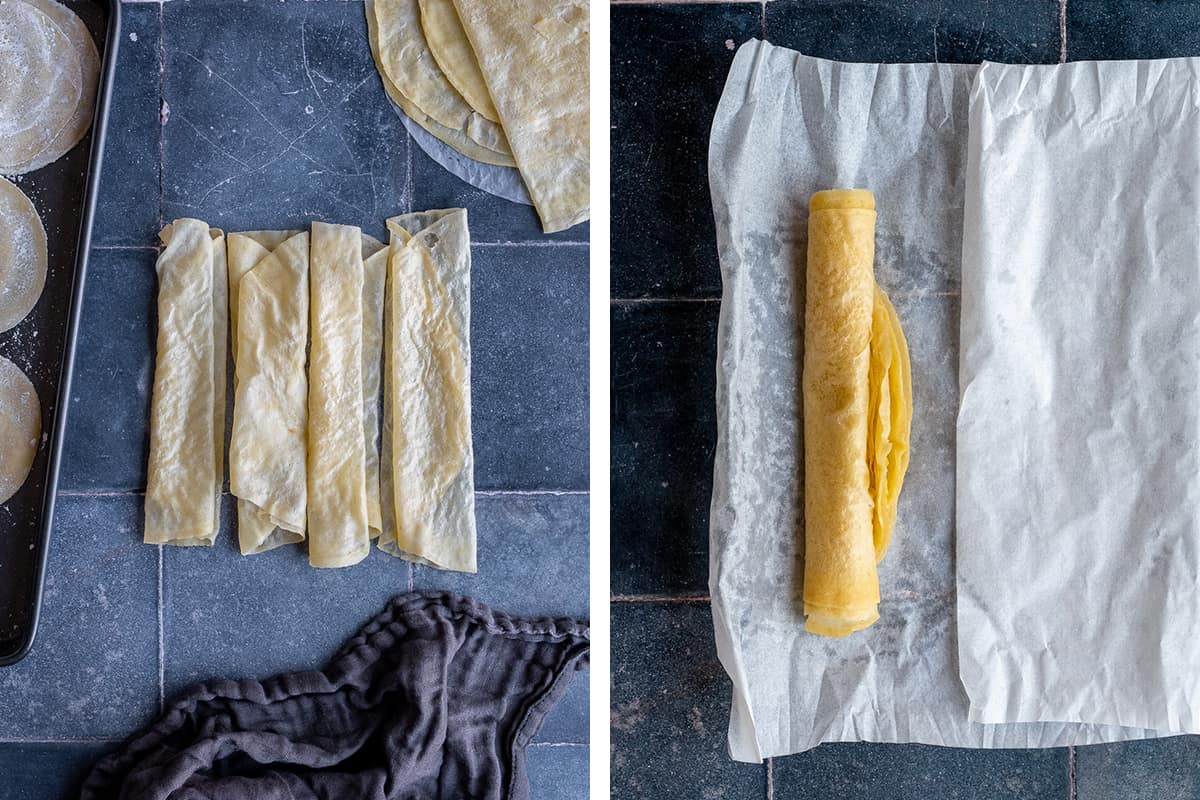
- Fridge Storage: Roll up the phyllo sheets in parchment paper. Place them in a plastic bag and then pop them in the fridge. They'll stay fresh for about a week.
- Freezer Storage: If you need to store them for a longer time, you can freeze them. Just like fridge storage, wrap the phyllo sheets in parchment paper and put them in a resealable plastic bag. In the freezer, they can last up to 3 months.
Our Helpful Tips
- Patience is key: Making thin phyllo sheets takes some time. Don't rush it, and take breaks if needed.
- Cover the dough: Always cover the dough balls and rolled-out sheets with plastic wrap or a damp kitchen towel to stop them from drying out.
- Use enough cornstarch: Dust your work surface and dough with cornstarch. It stops the dough from sticking.
- Roll out evenly: Try to roll out your dough as evenly as possible. It helps the sheets cook evenly.
- Separate while warm: After partially cooking the stack of filo sheets in the pan, separate them while they're still warm. It's harder when they cool down.
- Store properly: If not using immediately, store your sheets properly. Keep them in the fridge or freezer.
Traditional Method
While the method we've previously explained is our preferred one, it's worth noting that there's another way to make phyllo dough.
This is the classic method, often used by locals in Greece and Turkey. It's a bit more hands-on, but you might want to give it a try if you want to experience a more authentic process of making phyllo dough.
- Preparing the Dough: As in the method above, you'll start by making the dough and dividing it into portions. Roll these portions into small circles as explained earlier.
- Creating a Stack: Dust your work surface with cornstarch. Now create a stack of four small dough circles, dusting cornstarch between each layer and on top of the stack. This prevents the layers from sticking to each other.
- Rolling the Stack: With your stack ready, it's time to roll it out until it's about double in size.
- Separating and Re-Stacking Layers: After rolling, separate each layer carefully. Sprinkle cornstarch on each separated layer and stack them back together again.
- Rolling Thin: Now, roll out the dough stack again, this time until it's paper thin. Make sure to turn the dough after every two or three moves. Be gentle to avoid tearing the thin layers.
- Final Separation and Storage: After achieving the desired thinness, separate the layers one final time. If you plan on using the dough immediately, go ahead. If not, lightly dust the layers with cornstarch before stacking them again. Place this final stack on a piece of parchment paper, roll it up, and put it in a plastic bag for fridge storage.
Rolling The Dough Out With A Pasta Maker
If rolling out dough by hand seems a bit too labor-intensive, you can use a pasta maker to roll out your phyllo dough! It won't necessarily save time, but definitely saves you some elbow grease.
Here's how you can do it: Start by preparing your dough as described in the recipe. Cut it into small pieces, and then feed each piece through your pasta maker on its widest setting.
Fold the dough in half and feed it through the pasta maker again. Repeat this process a few times until your dough becomes smooth.
After that, you can start to reduce the thickness setting on your pasta maker and continue feeding the dough through until you get to the desired thinness for your phyllo dough.
Remember to keep the dough that you're not currently working with covered to prevent it from drying out. And dust each sheet with cornstarch or flour after rolling it out to prevent sticking.
Related: Homemade Pasta Without A Machine
What To Make with Filo
Filo sheets are incredibly versatile and can be used in a wide range of sweet and savory dishes. Here are some popular phyllo dough recipes you might want to try on special occasions:
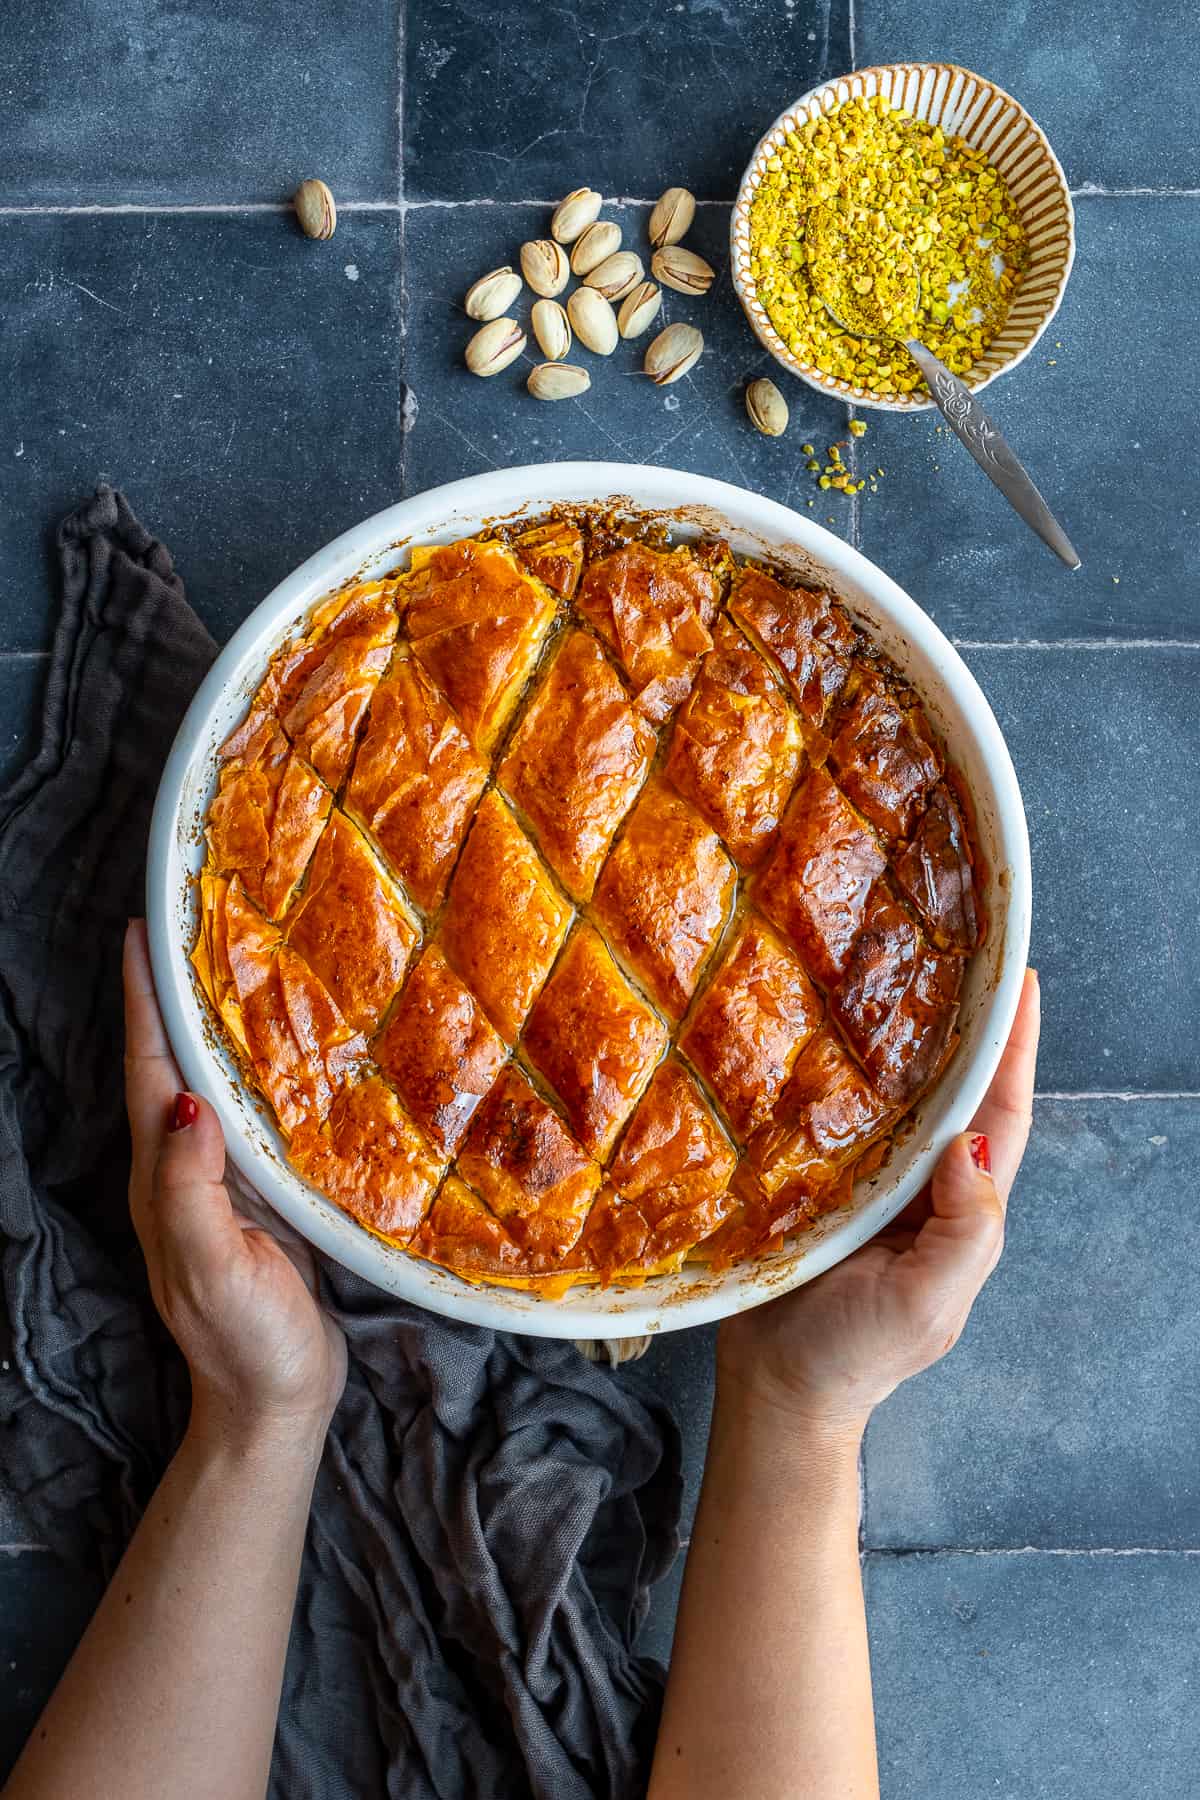
Desserts: One of the most famous filo recipe is Baklava, a sweet pastry made by layering filo sheets with a mixture of chopped walnuts or pistachios and sweet syrup or honey.
Check out our Homemade Baklava Recipe to get an idea! You can even make easy Apple Strudel with Phyllo, where thin filo sheets are filled with spiced apple filling and then baked to crispy, golden perfection.
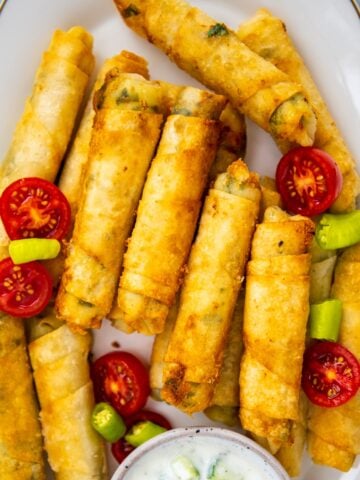
Savory Pies: They are used to make savory pies. You can fill these pies with anything from spinach and feta cheese (as in the Greek dish Spanakopita) to minced meat, chicken or potatoes (as in our Potato Borek).
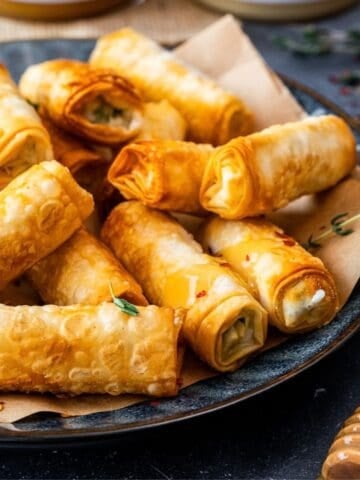
Appetizers: Filo pastry sheets can also be used to make a variety of appetizers. Think about flaky Turkish sigara boregi and Greek spanakopita phyllo triangles or tiropita.
Check our list of Easy Phyllo Dough Recipes out if you want more ideas!
FAQs
"Filo" or "phyllo" refers to the type of dough, not the number of sheets. When you buy pre-made phyllo dough, it comes in a roll of multiple sheets, often around 20-40. At home, you can make as many sheets as your recipe needs. The number of phyllo layers in a dish varies by recipe.
Yes, filo dough and phyllo dough are the same. "Filo" or "phyllo" is just two different spellings for the same type of thin, unleavened dough used in Middle Eastern, Mediterranean and Balkan cuisines.
Yes, traditional filo pastry does contain gluten as it is typically made with wheat flour. However, gluten-free versions may be available in some stores or can be made at home using gluten-free flour substitutes.
Yufka dough and phyllo dough are similar, but not the same. Both are unleavened doughs, but yufka is generally a bit thicker. That being said, they can be used interchangeably in recipes
More Recipes From Greek & Turkish Cuisines
- Lokma Dessert (Fried Sweet Dough Balls)
- Biber Dolma
- Imam Bayildi
- Su Boregi


Sign up for the FREE Give Recipe Newsletter to get the new recipes into your inbox!
And stay in touch with us on Facebook, Pinterest, YouTube and Instagram for all the latest updates.
📖 Recipe

Homemade Phyllo Dough Recipe
INGREDIENTS
- 1 medium egg please read the note below for an egg-free option
- 100 ml water at room temperature
- 1 tablespoon vinegar white or apple cider vinegar
- ¼ teaspoon salt
- 345 g all-purpose flour (or white bread flour)
- ½ cup cornstarch for rolling out
- ¼ cup oil sunflower or vegetable oil, for brushing the dough when rolling it out
INSTRUCTIONS
Make the Dough:
- In a large mixing bowl, combine egg, water, vinegar, and salt using a whisk.
- Incorporate the flour into this mixture. Using your hands, mix until a unified dough is formed.
- Knead the dough either in the bowl or on a lightly floured surface for roughly 5 minutes. You're aiming for a smooth dough which will feel somewhat firm, not soft.
- Shape the dough into a ball and wrap it in plastic wrap. Allow it to rest for at least 30 minutes, or up to 1 hour. This rest period will relax the gluten in the dough, making it softer and easier to roll.
Divide the Dough Into Portions:
- After resting, unwrap the dough and shape it into a log. Slice this log into two equal parts vertically.
- Roll each piece into a log shape again, and divide each log into 16 equal pieces. As an alternative, you could use a kitchen scale to measure out 32 portions of dough, each weighing between 15-17 grams.
- Form each piece into a small ball, then cover them with a kitchen towel or plastic wrap. This will prevent the dough from drying out while you're working.
Roll Out the Small Circles:
- Dust your work surface with cornstarch. Place a dough ball on the surface, gently press it flat, and dust it with cornstarch. Roll it into a small circle (roughly 4 inches/10 cm in diameter). Set it aside and cover it to prevent drying.
- Repeat this process with each dough ball, ensuring to keep your work surface and each dough ball dusted with cornstarch.
Expand the Dough Circles:
- Cut two pieces of baking paper to fit the bottom of a non-stick pan (a 12-inch/30 cm pan works well).
- Place a small dough circle onto one piece of baking paper. Brush both sides of the circle lightly with oil, making sure it's well-coated but not overly saturated. Repeat with three more dough circles, placing them on top of one another and brushing each with oil.
- Place the second piece of baking paper on top of your stack of dough circles. Using a rolling pin, gently press down a few times to secure the circles and baking paper together. Now, roll the dough circles into a larger circle, about the size of the baking paper. The oil will prevent the circles from sticking together.
Cook The Fresh Phyllo:
- Warm your pan over medium-low heat. Place the larger phyllo dough circle (still sandwiched between baking paper) into the pan. Allow it to cook for about 15 seconds, flip it over, and cook the other side for 15 seconds.
- Repeat this flipping process once more. In total, the dough should be cooked for about 1 minute. Be careful not to over-cook the dough as it can become too crispy and difficult to separate later on.
Separate the Phyllo Layers:
- After cooking, carefully separate the dough circles while they're still warm. Don't allow them to cool before separating, as it will make the process more challenging. Once separated, let them cool and keep covered with a kitchen towel. They are ready to use.
Store the Phyllo Dough:
- If you're not using your homemade phyllo sheets right away, roll them in large parchment paper and place in a plastic bag. They can be stored in the refrigerator for up to a week.
- If you need to store them for a longer period, place the parchment-wrapped phyllo sheets in a resealable freezer bag. They can be frozen for up to 3 months. Thaw them in the refrigerator overnight before using.
NOTES
- To make egg-free phyllo sheets, omit the egg and add an additional 3 tablespoons of water.
- Making thin phyllo sheets takes some time. Don't rush it, and take breaks if needed.
- Always cover the dough balls and rolled-out sheets to stop them from drying out.
- Dust your work surface and dough with cornstarch. It stops the dough from sticking.
- Try to roll out your dough as evenly as possible. It helps the sheets cook evenly.
- After partially cooking the stack of filo sheets in the pan, separate them while they're still warm. It's harder when they cool down.
- If you want a more traditional method, please read our explanation about how to do it in the post above.
NUTRITION
Nutrition information is automatically calculated, so should only be used as an approximation.
Leave a Reply